In addition to viewing and rendering a 3D scene, cameras can also project a 2D still image or image sequence onto geometry in the scene. This is similar to the front-projection systems used in practical photography, where a background image or other element is projected onto the stage and photographed with other elements.
In Nuke, a projection camera can receive camera data tracked from the original shot - or another shot - to setup a projection that is match-moved to another source.
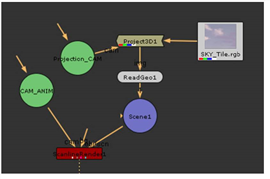
This setup requires these nodes: a projection camera, a Scene node, a Project3D node, a geometry object node (what you’ll be projecting onto), and a 2D node with the image that you want to project.
When you create a projection camera, you need to gather some information and do a few small calculations to make sure the projection works. Here are the bits of information you need:
• Focal length of the lens that photographed the projection image.
• Resolution of scanned image.
• Scanner pitch of the film scanning device.
After you have this information, you need to do these calculations to get the horizontal and vertical aperture settings for the projection setup:
horiz. res. / scanner pitch = horizontal aperture
vertical res. / scanner pitch = vertical aperture
So, for example, if your image resolution is 720 x 486 and the scanner pitch is 20, then these are the results:
720 / 20 = horizontal aperture = 36
486 / 20 = vertical aperture = 24.3
Generally, for most professional projects, you can get the lens focal length from the camera report for the shot(s). If that is not available, you may be able to extrapolate lens information by running the shot through a 3D tracking application, such as Boujou, Syntheyes, or RealViz.
Once you have the horizontal and vertical aperture and the lens focal length for the image you want to project, you can complete the projection camera setup.
| 1. | Select 3D > Camera to add a new camera to your script and rename the node to identify it as a projection camera. |
| 2. | Select 3D > Shader > Project3D to add a Project3D node to the script. |
| 3. | Connect the 2D image (i.e., Read node) to the Project3D node. |
| 4. | Connect the projection camera to the Project3D node. |
| 5. | Connect the Project3D node to the geometry node that should receive the 3D projection. |
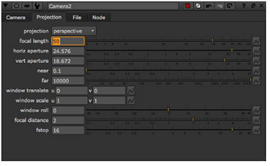
| 6. | Double-click the projection camera node to load its parameters. |
| 7. | Click the Projection tab in the camera’s panel and then enter the information you gathered for focal length, horiz aperture, and vert aperture. |
When you are finished, view the 3D scene to check the placement of the projection. The next section explains how to preview the 2D and 3D elements together to check the results of the composite.
| 1. | Select the Scene node and press 1 to display its output to the Viewer. |
| 2. | If necessary, press Tab to toggle the Viewer to 3D mode. |
| 3. | Select the rendering camera object or node and press H to look through it. |
| 4. | Select the node with the 2D image you want to see in the Viewer, and then press Shift+2. |
The Shift+2 keystroke connects the image to the Viewer (assigning the next available connection, number 2), and also sets up the compare wipe.
| 5. | Select the desired option from the Viewer composite dropdown menu (i.e., - (none), over, under, minus, wipe). |

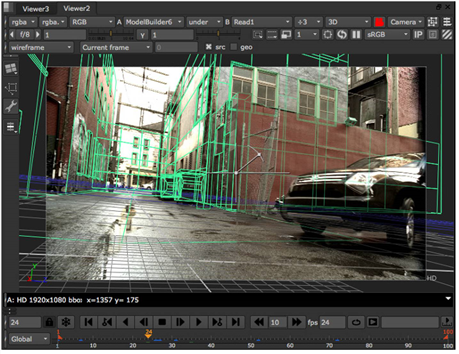
This last step superimposes the two elements in the Viewer. The crosshair (shown below) is the control that lets you adjust the location and angle of the wipe for the comparison.
|
|
| Comparing a 3D scene over a 2D image. |