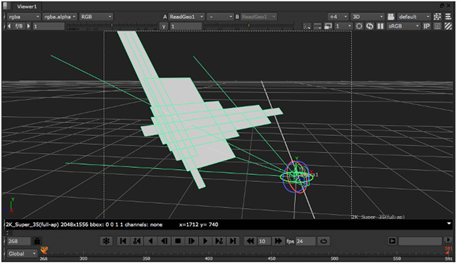
When you have a 3D setup in your script, any Viewer window can toggle between the 2D and 3D display modes. The 2D mode shows the result of a rendered scene, the 3D mode shows the perspective from one camera in the scene.
|
|
| The 3D Viewer. |
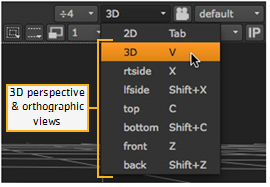
When you do not have a Camera node in your script, the 3D Viewer uses default views (see the figure below for the list of options). These views are similar to different cameras that you can look though, but they don’t appear as objects that you can manipulate in the scene.
TIP: To put you into the scale, the Nuke 3D world is measured in centimeters (that is, not inches or pixels).
Open a Viewer and press Tab or V to toggle between the 2D and 3D modes - or select the view you want from the dropdown menu at the top right corner of the Viewer window.
|
|
| Switching to the 3D Viewer. |
The “built-in” views give you different perspectives on your 3D scene. You can quickly switch between the views by pressing the hotkeys for right view (X), left view (Shift+X), top view (C), bottom (Shift+C), front (Z), back (Shift+Z), and three-quarter perspective (V).
• Dolly: Press Alt and middle-mouse-button drag.
• Pan: Press Alt and left-mouse-button drag.
• Tilt: Press Ctrl/Cmd and left-mouse-button drag.
• Spin: Press Ctrl/Cmd and left-mouse-button drag.
• Roll: Press Ctrl/Cmd+Shift and left-mouse-button drag.
• Look through camera: Select a camera object, press H.
• Fit the scene: Press F to fit the entire 3D scene within the Viewer.
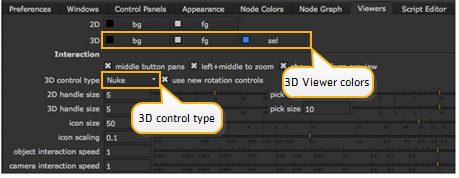
| 1. | Open the Preferences dialog (Shift+S), and select the Viewers tab. |
|
|
| 3D Viewer properties. |
| 2. | Make the desired changes to the 3D bg and fg colors. |
| 3. | From the 3D control type dropdown menu, select the navigation control scheme you want to use (Nuke, Maya, Houdini, or Lightwave). |
| 4. | Click Save Prefs. |
NOTE: The 3D control type also affects the mouse button assignments for panning and zooming in the node graph and 2D Viewers.
| 1. | Press V to make sure you are looking through the 3D perspective view, and not one of the orthographic views. |
| 2. | From the 3D Viewer window, select the camera from the dropdown menu in the top right corner. |
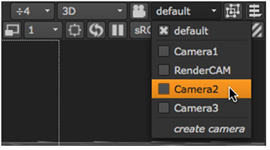
NOTE: This selection does not change the camera used for rendering. This changes only the camera to “look through” for the current 3D Viewer.
Cameras in the current data stream automatically appear in the dropdown menu of cameras you can select. To select a camera that doesn’t appear in the menu, double-click the camera node to open its panel, and it is added to the menu.
You can choose to lock the 3D view to the selected camera or light. You can toggle between the unlocked and locked modes by clicking the 3D view lock button, or by pressing Ctrl/Cmd+L.
• unlocked: to freely move in the 3D view without restrictions. The 3D view lock button is gray.
• locked: to lock your movement to the camera or light you’ve selected in the dropdown menu on the right side of the 3D view lock button. The 3D view lock button is red.
With the interactive 3D camera view mode you can change the camera or light values according to your movement in the Viewer. You can activate the interactive mode by Ctrl/Cmd+clicking the 3D view lock button. When the interactive mode is on, the 3D view lock button turns green. In order to activate the interactive mode, you need to have a Camera or a Light node selected in the dropdown on the right side of the 3D view lock button.
When the interactive mode is on, you can use the plus (+) and the minus (-) keys to change the translate values of the camera or light you’ve selected. When the interactive mode is off, these keys zoom your view in and out.