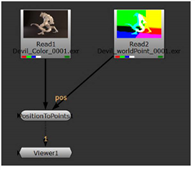
the source image, while
a second image contains
the position pass.
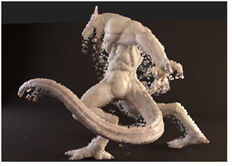
PositionToPoints takes position data contained in an image file (rendered from a 3D application) and recreates the image as a dense 3D point cloud in Nuke. The x, y, and z vertices in the position channel are used to define point positions in 3D space, the size and number of which can be adjusted using the point size and point detail controls.
| 1. | From the 3D > Geometry menu, select PositionToPoints to add the node to your script. |
| 2. | Read in a position pass and connect it to the node. |
If you have multiple images containing separate position and normal information, connect them to the pos and norm inputs, respectively.
Note that the pos and norm inputs only appear once you’ve connected the unnamed input.
|
|
| The normals are contained in the source image, while a second image contains the position pass. |
| 3. | Select the position channel from the surface point dropdown menu. If your image contains a normal channel, select this from the surface normal dropdown menu. You should now see the point cloud in the 3D Viewer. |
If you supplied the node with separate position and normal information via the pos and norm inputs, the surface point and surface normal dropdowns are disabled.
| 4. | To change the number of points, adjust the point detail slider. A value of 0 means no points are displayed. A value of 1 displays all available points. |
| 5. | To change the size of the points, adjust the point size slider. |
|
|
| Point cloud created from the PositionToPoints node. |