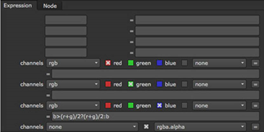
g>(r+b)/2?(r+b)/2:g
Similarly, you can despill a bluescreen image by setting the expression field for the blue channel to:
b>(r+g)/2?(r+g)/2:b

You can also use the HueCorrect node for despill. For more information, see Suppressing spill .
There are three ways in Primatte to remove the spill color. The quickest method is to select Spill Sponge from the operation dropdown menu and then sample the spill areas away. By just positioning the cursor over a bluish pixel and sampling it, the blue disappears from the selected color region and is replaced by a more natural color. Additional spill removal should be done using the Fine Tuning tools or by using the Spill(-) operation. Both are explained further on in this chapter.
NOTE: All spill removal/replacement operations in Primatte can be modified using the Spill Process replace with tools. Spill can be replaced with either the complement of the background color, a solid color you’ve selected, or by colors brought from a defocused background. Depending on the spill conditions, one of these options should provide the results you are looking for. See the information in Replacing Spill for more details.
NOTE: Primatte's spill removal tools work on color regions. In the image in Clean FG Noise, samples should be made on the light flesh tones, the dark flesh tones, the light blonde hair, the dark blonde hair, and the red blouse color regions. One sample in each color region removes spill from all similar colors in the foreground image.
If the spilled color has not been totally removed using the Spill Sponge or the result of the Spill Sponge resulted in artifacts or false coloring, the Spill(-) tool should be used instead for a more subtle and sophisticated removal of the spilled background color. This is discussed in Spill (-) .
TIP: There are several nodes in Nuke you can use for spill removal. For example, if you are using a greenscreen image, you can add an Expression node after your foreground image and set the expression field for the green channel to:
g>(r+b)/2?(r+b)/2:g
Similarly, you can despill a bluescreen image by setting the expression field for the blue channel to:
b>(r+g)/2?(r+g)/2:b
You can also use the HueCorrect node for despill. For more information, see Suppressing spill .