The ParticleEmitter node is the first and only required node in a minimum particle setup. Once you’ve created a ParticleEmitter, connected it to a Viewer and clicked play on the timeline, you’ll see the default set of particles emitting (from a 3D geometry or point cloud, if you’ve connected one). You can then adjust the ParticleEmitter controls to change the way the particles appear:
| 1. | Set the channels in which particles are emitted. Channels a and b are arbitrary names for channels which are useful if you want different particle force nodes to have an effect on separate channels. |
| 2. | Use the start at field to pre-roll or delay the point at which the first particles are emitted. For example, particles could imitate snow that has fallen already, instead of displaying the first flakes falling down, by using a negative start at frame. |
| 3. | Select the emission order and rate for the particles. Set: |
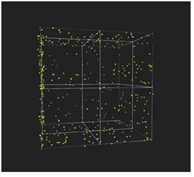
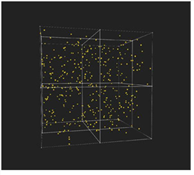
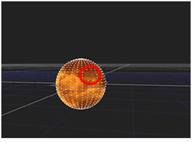
• emit from - select points, edges, faces or bbox (bounding box) to specify from which part of the 3D object, or point cloud, particles are emitted.
|
|
|
| emit from > points | emit from > edges |
|
|
|
| emit from > faces | emit from > bbox |
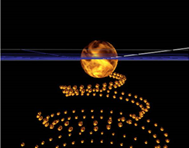
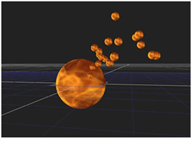
• emit order - select the order that the particles are emitted:
• randomly - produces a random emission order.
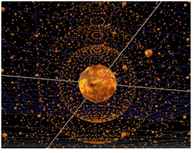
• uniformly - emits all particles at the same time.
• in order - emit particles as a multiple of the emission rate. For example, an emission rate of 2 could emit from two points, edges, or faces at a time.
|
|
|
| Particles emitted in order. | Particles emitted uniformly. |
• randomize type - select whether or not particles are emitted randomly. Select no random direction for a specific direction based on the emit object’s normals, randomized direction for a randomly selected initial direction, or randomize outwards for a randomly selected direction (dependent on the emit from selection):
• bbox - particles move randomly away from the center.
• points, edges, and faces - particles move randomly away from the origin, but at no more than 90 degrees from the nearest normal.
• emission rate - select the number of particles emitted per frame. This is an exact number, and it is affected by the rate channel. If the channel is at a varying value, the emission rate also increases or decreases.
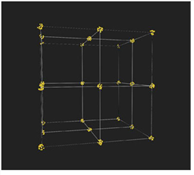
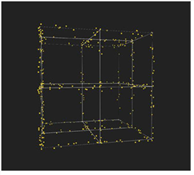
• only emit from selected points - specify whether the particles are emitted from the object, or selected vertices of the object using a GeoSelect node. You can also emit from selected points in a PositionToPoints point cloud using any normals information present.
See 3D Selection Tools for more information.
|
|
|
| Vertices selected using an upstream GeoSelect node. |
Emitting particles only from the selected vertices. |
• rate variation - specify the range of variation for emitting particles. If you set this to zero, particles are emitted at a constant even level.
• rate channel - select a specific channel to which you want to emit particles. Unchecking this is the same as selecting none, and in that case particles are emitted to all the channels. For example, if you are emitting from a Card node that has a Ramp texture, it emits particles from the light parts of the ramp at a higher rate (values closer to 1) than from the dark parts (values closer to 0).
| 4. | Set the particles’ color and channels. Enter: |
• color - select a color for your particles. Use this if you’re not using the particle input.
• color from texture - check to tint the particles with the colors from the geometry’s texture. If you leave this unchecked, the particles get color only from their own texture.
• channels - select the channels you want to apply particles to. By default, particles are emitted to channel a. Channels a and b are arbitrary names for channels which are useful if you want different ParticleEmitter nodes or other particle force nodes to have an effect on separate channels. An example of this might be if you want two ParticleEmitter nodes emitting particles, one to a channel, the other to b channel, so further down in your particle stream you can apply an effect to a specific set of particles.
| 5. | Select how long you want the particles to exist. Set: |
• max lifetime - specify the maximum life span for a particle in frames.
• max lifetime range - adjust the range within which your particles’ lifetime varies. If you set this to 0, all particles have the same lifetime.
• lifetime channel - select a channel of the input geometry texture that you want to use to modulate the lifetime. For example, if you are emitting particles from a Card node with a Ramp texture in the lifetime channel, particles emitted from the lighter parts of the ramp (values closer to 1) would have a lifetime value closer to that set in the max lifetime than particles emitted from the dark parts (values closer to 0).
• halflife - select the number of frames over which the number of the particles emitted is halved.
| 6. | Adjust the velocity and rotation for your particles. Set: |
• velocity - specify the initial speed at which you want your particles to move.
• velocity range - adjust the range within which you want your particles’ velocity to vary. If you set this to 0, the velocity doesn’t vary between particles.
• velocity channel - select a channel of the input geometry texture that you want to use to modulate the velocity. For example, if you are emitting from a Card node that has a Ramp texture, it emits particles from the light parts of the ramp at a higher velocity (values closer to 1) than from the dark parts (values closer to 0).
• rotation velocity - adjust the initial speed at which each particle rotates around its individual Y-axis. The Y-axis points to the direction the particles were initially emitted, and then stays unchanged (unless you use the ParticleMotionAlign node to change its direction). Rotational velocity is most useful when you’re emitting particles from a geometry object.
• rotation velocity range - adjust the scale of a random variation in the rotation velocity value. Value of 0 means the rotation velocity value is as set, value of 1 means it’s very random.
• rotation velocity channel - Select a channel of the input geometry texture that you want to use to modulate the speed of rotation. For example, if you are emitting from a Card which has a Ramp texture, the rotation velocity of the particles emitted from the light part of the Ramp (values closer to 1) is greater than that of those emitted from the dark parts (values closer to 0).
• transfer velocity - adjust this to transfer the velocity of the initial emitter to the particles. If you set this to 0, no velocity is transferred to the spawned particles. At value 1, full velocity is transferred from the originating particle.
• transfer window - adjust the time, in frames, to look forward or backward in order to determine the velocity that should be transferred to the particles.
| 7. | Modify the size and mass of the particles. Set: |
• size - specify the initial size of each particle.
• size range - specify the range within which your particle size varies.
• size channel - select a channel of the geometry texture that you want to use to modulate the size of the particles. For example, if you are emitting particles from a Card node which has a Ramp texture in the size channel, the size of the particles emitted from the lighter part of the Ramp (values closer to 1) is greater than that of those emitted from the darker parts (values closer to 0).
• mass - adjust the initial mass of each of your particles. The mass of the particles only becomes relevant when you apply a force to your particles, such as one generated by the ParticleDirectionalForce node.
• mass range - adjust to produce a random variation in the mass value. Simply put, 0 value means the particles’ mass is the value specified by the mass control, whereas a value of 1 means it’s very random.
• mass channel - select a channel of the input geometry texture that you want to use to modulate the mass. For example, if you are emitting from a Card which has a Ramp texture in the mass channel, the particles from the light part of the Ramp (values closer to 1) has a higher mass value than from the dark parts (values closer to 0). With this control, you can emit particles with different masses from different areas based on the input geometry’s texture.
• spread - adjust the extent to which you want your particles to spread in different directions during their lifetime. By default, this forms a cone around the direction of emission. If you set this to zero, each particle has a straight trajectory.
| 8. | Modify the way your particles are affected by the ParticleEmitter’s inputs. Adjust: |
• input order - if you’re using more than one particle input, you can select which particle input Nuke should select when creating particles. Select Randomly to pick one of the inputs randomly, or in order to rotate the inputs in numerical order.
• start at - select which frame of the particle input should be the representation of each new particle. Select first to pick the first frame of the particle input for each new particle. Select in order to pick consecutive frames from the input for each new particle. Select current to pick the frame where the particle was emitted. Select random to pick a random input frame for each new particle
• limit to range - limit the particle output to the representation’s frame rate, looping the frame range when in order or current is selected.
• advance - use this to determine if a particle should animate after being emitted. Select constant to keep the same representation throughout the particle’s lifetime. Select in steps - to animate the representation frame by frame. Select randomly to animate the representation one random frame after another.
| 9. | Vary the results of your range controls with the random seed field. Enter the random number used in the range controls (such as max lifetime range) to achieve slightly different effects. |
TIP: When you set large values for any of the particle controls it might take Nuke a few moments to calculate the result. In such a case a progress bar appears with a Cancel button you can use to cancel the calculation if necessary.