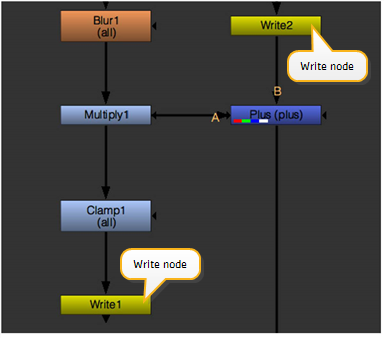
With the correct resolution and format selected, you then insert Write nodes to indicate where you want to render images from the script.
|
|
| Inserting Write nodes for rendering. |
One Write node is usually placed at the bottom of the compositing tree to render the final output. However, Write nodes have both input and output connectors, so they may be embedded anywhere in the compositing tree.
You can execute renders for a single Write node or all Write nodes in your compositing script.
| 1. | Select the node in the script from which you want to render an image. |
| 2. | Select Image > Write (or press W over the Node Graph). Nuke attaches a Write node and opens its properties panel. |
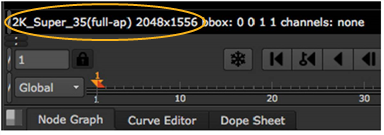
| 3. | Connect a Viewer to the Write node you want to render and verify that the correct resolution is displayed for output. If necessary, press Ctrl/Cmd+P to toggle between full-res and proxy resolution. The displayed output resolution is used for rendering. |
| 4. | In the properties panel, click the file or proxy field’s folder icon  (depending on whether you want to render high res or low res images) and browse to the directory where you want to store the rendered sequence. (depending on whether you want to render high res or low res images) and browse to the directory where you want to store the rendered sequence. |
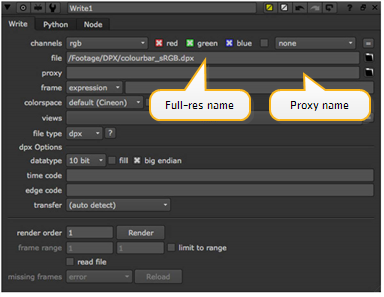
| 5. | After the path, type a name for the rendered image and then click OK. If you’re rendering an image sequence, include the frame number variable (for example, ####) in the name. |
See To Render Selected or All Write Nodes in the Script below for examples of valid file names with the frame number variable.
| 6. | If necessary, adjust the following controls: |
• Using the channels dropdown menu and checkboxes, select the channels you want to render.
• Using the frame dropdown menu and input field, set the relation between the currently processed frame and the numbering of the frame written out. For more information, see Changing the Numbering of Rendered Frames.
• check read file if you want the output of the Write node to be produced by reading the rendered file back in rather than by processing the upstream node tree. For more information on this and the missing frames control, see Using a Write Node to Read in the Rendered Image.
• From the colorspace dropdown menu, select which lookup table to use when converting between the images’ color space and Nuke’s internal color space.
• From the file type dropdown menu, select the file format for the rendered images. If you don’t specify a file format, Nuke uses the extension in the file name to figure out the format.
• Check the limit to range box if you want to disable the node when executed outside of a specified frame range. In the frame range fields, enter the range of frames you want to make executable with this Write node.
| 7. | In the Write node properties, click the Render button. |
| 8. | Nuke prompts for a frame range, defaulting to the range you gave in the frame range fields. If necessary, change the start and end frames (for example, 1-100), and then click OK. |
TIP: When specifying the frame range to render, you can enter complex frame ranges into the frame range prompt dialog. For example, if you enter "1-5 8 10 15 22-25", it only renders those frames. Likewise, you can specify multiple ranges on the command line, for example:
nuke -F 1-5 -F 8 -F 10 -F 15 -F 22-25 -x myscript.nk
You can see the progress of your render in the status window that appears. When the render is complete, the rendered images are added to the directory you specified in step 4.
TIP: When rendering with the Write node, you can force a certain data type by adding the data type and a colon before the file path. For example, you can enter ftiff:C:\Temp\test.tif as the file path to render a file whose data type is ftiff and extension tif.
| 1. | Connect a Viewer to a Write node you want to render and verify that the correct resolution is displayed for output. |
| 2. | If necessary, press Ctrl/Cmd+P to toggle between full-res and proxy resolution. The displayed output resolution is used for rendering. |
| 3. | If you want, you can change the order in which your Write nodes are rendered by giving them custom render order numbers in the render order field. |
| 4. | Do one of the following: |
• With the desired Write node selected, select Render > Render selected (or press F7).
• Select Render > Render all (or press F5).
| 5. | In the Render dialog, adjust the render settings if necessary. The default values are drawn from the Viewer you have active. |
• Frame range - set the frame range you want to render.
• Use proxy - check to use proxy mode.
• Render in background - check to render in the background. If you check this, you can also set #CPU limit and Memory limit controls. The former limits the number of threads that Nuke uses in the background and the latter limits the amount of cache memory that Nuke uses.
Setting the number of CPUs is useful for limiting Nuke to use only a particular number of CPUs (for example, 4 threads can occupy 4 CPUs) with the OS trying to distribute time accordingly, or you could limit Nuke to a number of CPUs so background rendering won't interfere too much with your interactive Nuke.
• Continue on error - check to keep rendering even if an error occurs during the process.
• Views - set which stereo views to include in the render.
| 6. | Click OK. |
TIP: When specifying the frame range to render, you can enter complex frame ranges into the frame range prompt dialog. For example, if you enter "1-5 8 10 15 22-25", it only renders those frames. Likewise, you can specify multiple ranges on the command line, for example:
nuke -F 1-5 -F 8 -F 10 -F 15 -F 22-25 -x myscript.nk
You can see the progress of your render in the status window that appears. When the render is complete, the rendered images are added to the directory you specified in step 4.
TIP: When rendering with the Write node, you can force a certain data type by adding the data type and a colon before the file path. For example, you can enter ftiff:C:\Temp\test.tif as the file path to render a file whose data type is ftiff and extension tif.
If you are rendering .mov files, you can:
• choose the QuickTime codec from the codec dropdown menu.
NOTE: If you're using the Avid DNxHD codec, Avid AVDn, avoid setting the pixel format control to r408 as there is a known issue within the codec causing frames to darken with each frame progression in the sequence.
• adjust advanced codec options by clicking the advanced button.
•
choose whether to write the nclc, gamma, and ProRes data into the atom/header of the video sample.
• use ycbcr matrix to set the way RGB is converted to Y’CbCr. This is only enabled when working with a Y’CbCr-based pixel type. Rec 601 and Rec 709 follow the ITU.BC specifications, whilst Nuke Legacy, Nuke Legacy Mpeg, and Nuke Legacy YUVS are retained for backwards compatibility.
NOTE: The default option, Format-based, selects Rec 601 or Rec 709 automatically based on the format size.
• use pixel format to set the write pixel format, which includes colorspace, bit depth, layout, and range. This setting defaults to the best format accepted by the codec, allowing Nuke to perform the conversion to Y’CbCr without the use of an unknown QuickTime transform where possible. RGB pixel types rely on QuickTime to do the conversion to Y’CbCr when dealing with a non-RGB codec.
Nuke writes the selected colorspace and pixel format, along with some other information, into the metadata of the file. If you then read the rendered file in, Nuke reads that metadata and is able to pick the correct defaults for the file. To see the file metadata yourself, use a ViewMetaData node.
QuickTime is only supported by default on Windows and Mac OS X. To load QuickTime files on Linux, you need to use the prefix ffmpeg: before the file path and file name, for example, ffmpeg:/users/john/job/FILM/MG/final_comp_v01.####.mov. This way, Nuke uses its reader that is based on the FFmpeg open source library to decode QuickTime files. Note that we are using this open source library to encode the output images, so image data may be subject to colorspace and transform shifts dependent on the codec employed.
When writing QuickTime files, some users have reported receiving the following error at the end of rendering:
Failed to flatten movie data: the movie is open in another application.
This is because the output file has been opened by some other process. This can be the Finder on Mac OS X trying to show a preview, an OS file system search trying to index the file, or a virus checker, for example. The workaround is to turn off Fast Start in the Write node controls to skip the flattening process that is affected.
Nuke supports multi-part OpenEXR 2.0.1 files, which allow you to store your channels, layers, and views in separate parts of the file. Storing the data this way can make loading .exr files faster, as Nuke only has to access the part of the file that is requested rather than all parts. However, for backwards compatibility, you also have the option to render your .exr files as single-part images.
To set how the data is stored in your rendered .exr file, open the Write properties and set interleave to:
• channels, layers and views - Write channels, layers, and views into the same part of the rendered .exr file. This creates a single-part file to ensure backwards compatibility with earlier versions of Nuke and other applications using an older OpenEXR library.
• channels and layers - Write channels and layers into the same part of the rendered .exr file, but separate views into their own part. This creates a multi-part file and can speed up Read performance, as Nuke only has to access the part of the file that is requested rather than all parts.
• channels - Separate channels, layers, and views into their own parts of the rendered .exr file. This creates a multi-part file and can speed up Read performance if you work with only a few layers at a time.