Nuke Studio Environments
The Compositing Environment
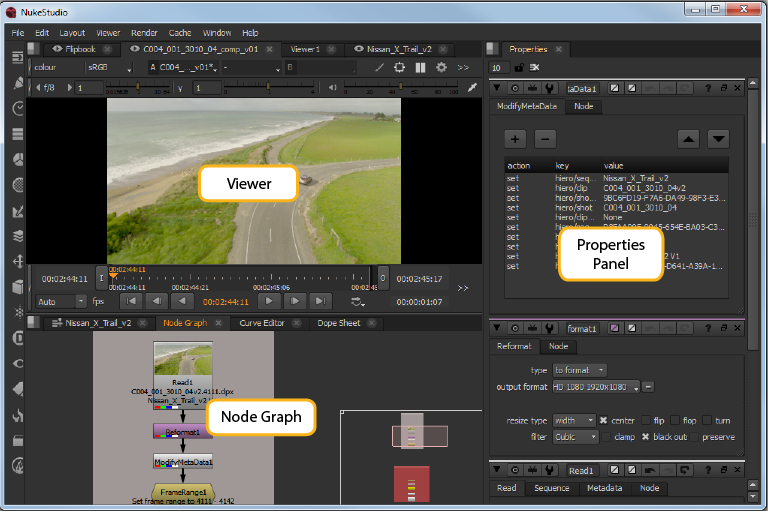
You can use the Compositing environment to perform node-based compositing with a choice of different VFX tools, manage color grading, review your script, and render out your script. See Using the Compositing Environment for more information.
By default, there is a Node Graph panel in the lower-left corner, a Viewer panel in the top-left corner, and a Properties panel on the right.
|
Node Graph |
The Node Graph is where you add nodes and build your node tree. |
|
Properties Panel |
When you add a node to the Node Graph, its properties appear in the Properties panel on the right. |
|
Viewer |
To check the result, you can view the output in a Viewer. |
The Timeline Environment
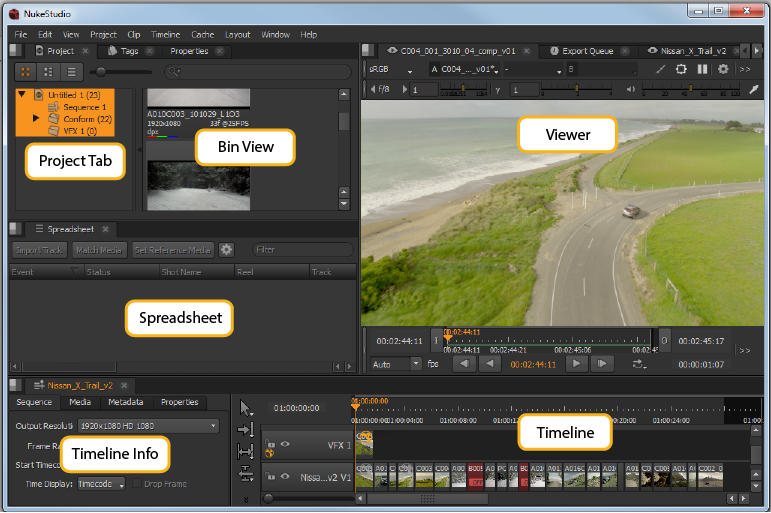
The Nuke StudioTimeline environment allows you to conform, create Nuke Comps, add soft effects, perform timeline-based editing, export your project, and view and edit metadata and properties. See Using Nuke Studio's Timeline Environment for more information.
|
Project Tab |
You can manage all aspects of your projects and bins in the Project tab. |
|
Menu Bar |
Use the Menu bar to access Nuke Studio's dropdown menus. |
|
Bin View |
The bin displays the contents of any selected Project tab. |
|
Viewer |
You can display and review your media in the Viewer. |
|
Timeline Info |
The timeline info displays the current timeline’s sequence, media, and metadata information. |
|
Editing Tools |
There is a comprehensive set of editing tools provided in Nuke Studio. See Timeline Editing Tools for more information. |
|
Spreadsheet Tab |
Use the Spreadsheet tab to display the contents of the timeline in spreadsheet form. Note that the spreadsheet and timeline are linked, mirroring any selections made. |
|
Timeline |
The timeline displays the current track, including all shots and any effects that have been added. |
How the Panels Link
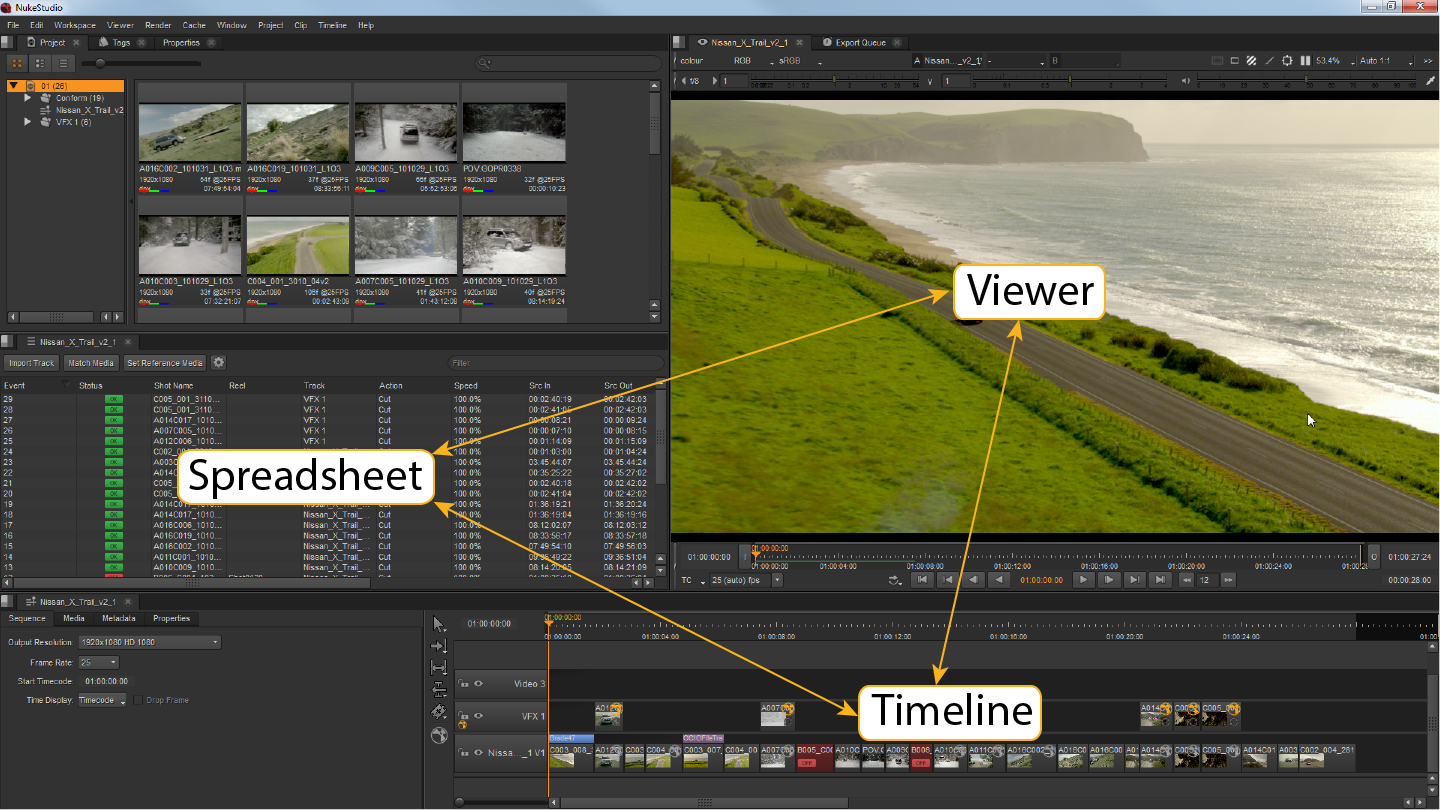
In Nuke Studio, some panels are linked together so that the linked panel tabs are automatically displayed at the front of a panel, when one of linked group is selected. This makes it quick and easy to switch between working in the Timeline and Compositing environments.
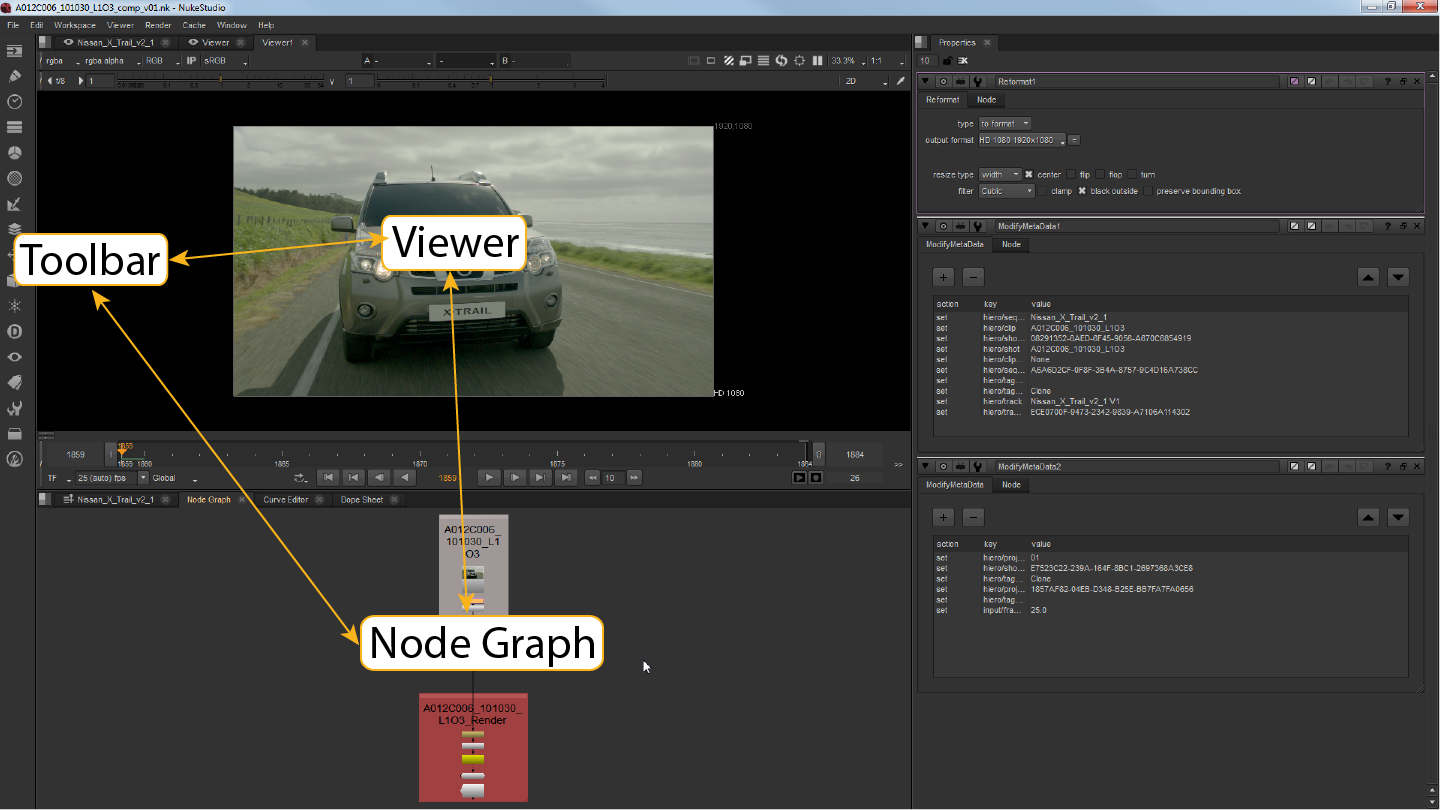
The Timeline linked group includes the spreadsheet, the Timeline environment Viewer, and the timeline. The Compositing linked group includes the Node Graph, the Compositing environment Viewer, and the node Toolbar.
|
|
|
| Timeline Linked Group | Compositing Linked Group |
For example, when you are in the Compositing environment and you select the a spreadsheet from the Properties content menu. The spread sheet appears as a new tab in the Properties pane, and automatically opens the timeline, and the timeline Viewer.
Note: If more than one tab in the linked group is in the same pane, the most recently viewed tab is displayed at the front of the pane.
Shared panels take precedence over unshared panels. Shared panels include Curve Editor, Dope Sheet, Pixel Analyzer, Scopes, and Progress bars. The Properties pane and Script Editor are also shared panels, but differ slightly in that they show workspace-specific content. For example, the Properties panels shows soft effect keyframes and Node Graph keyframes depending on the currently selected workspace.
Panel Focus and Keyboard Shortcuts
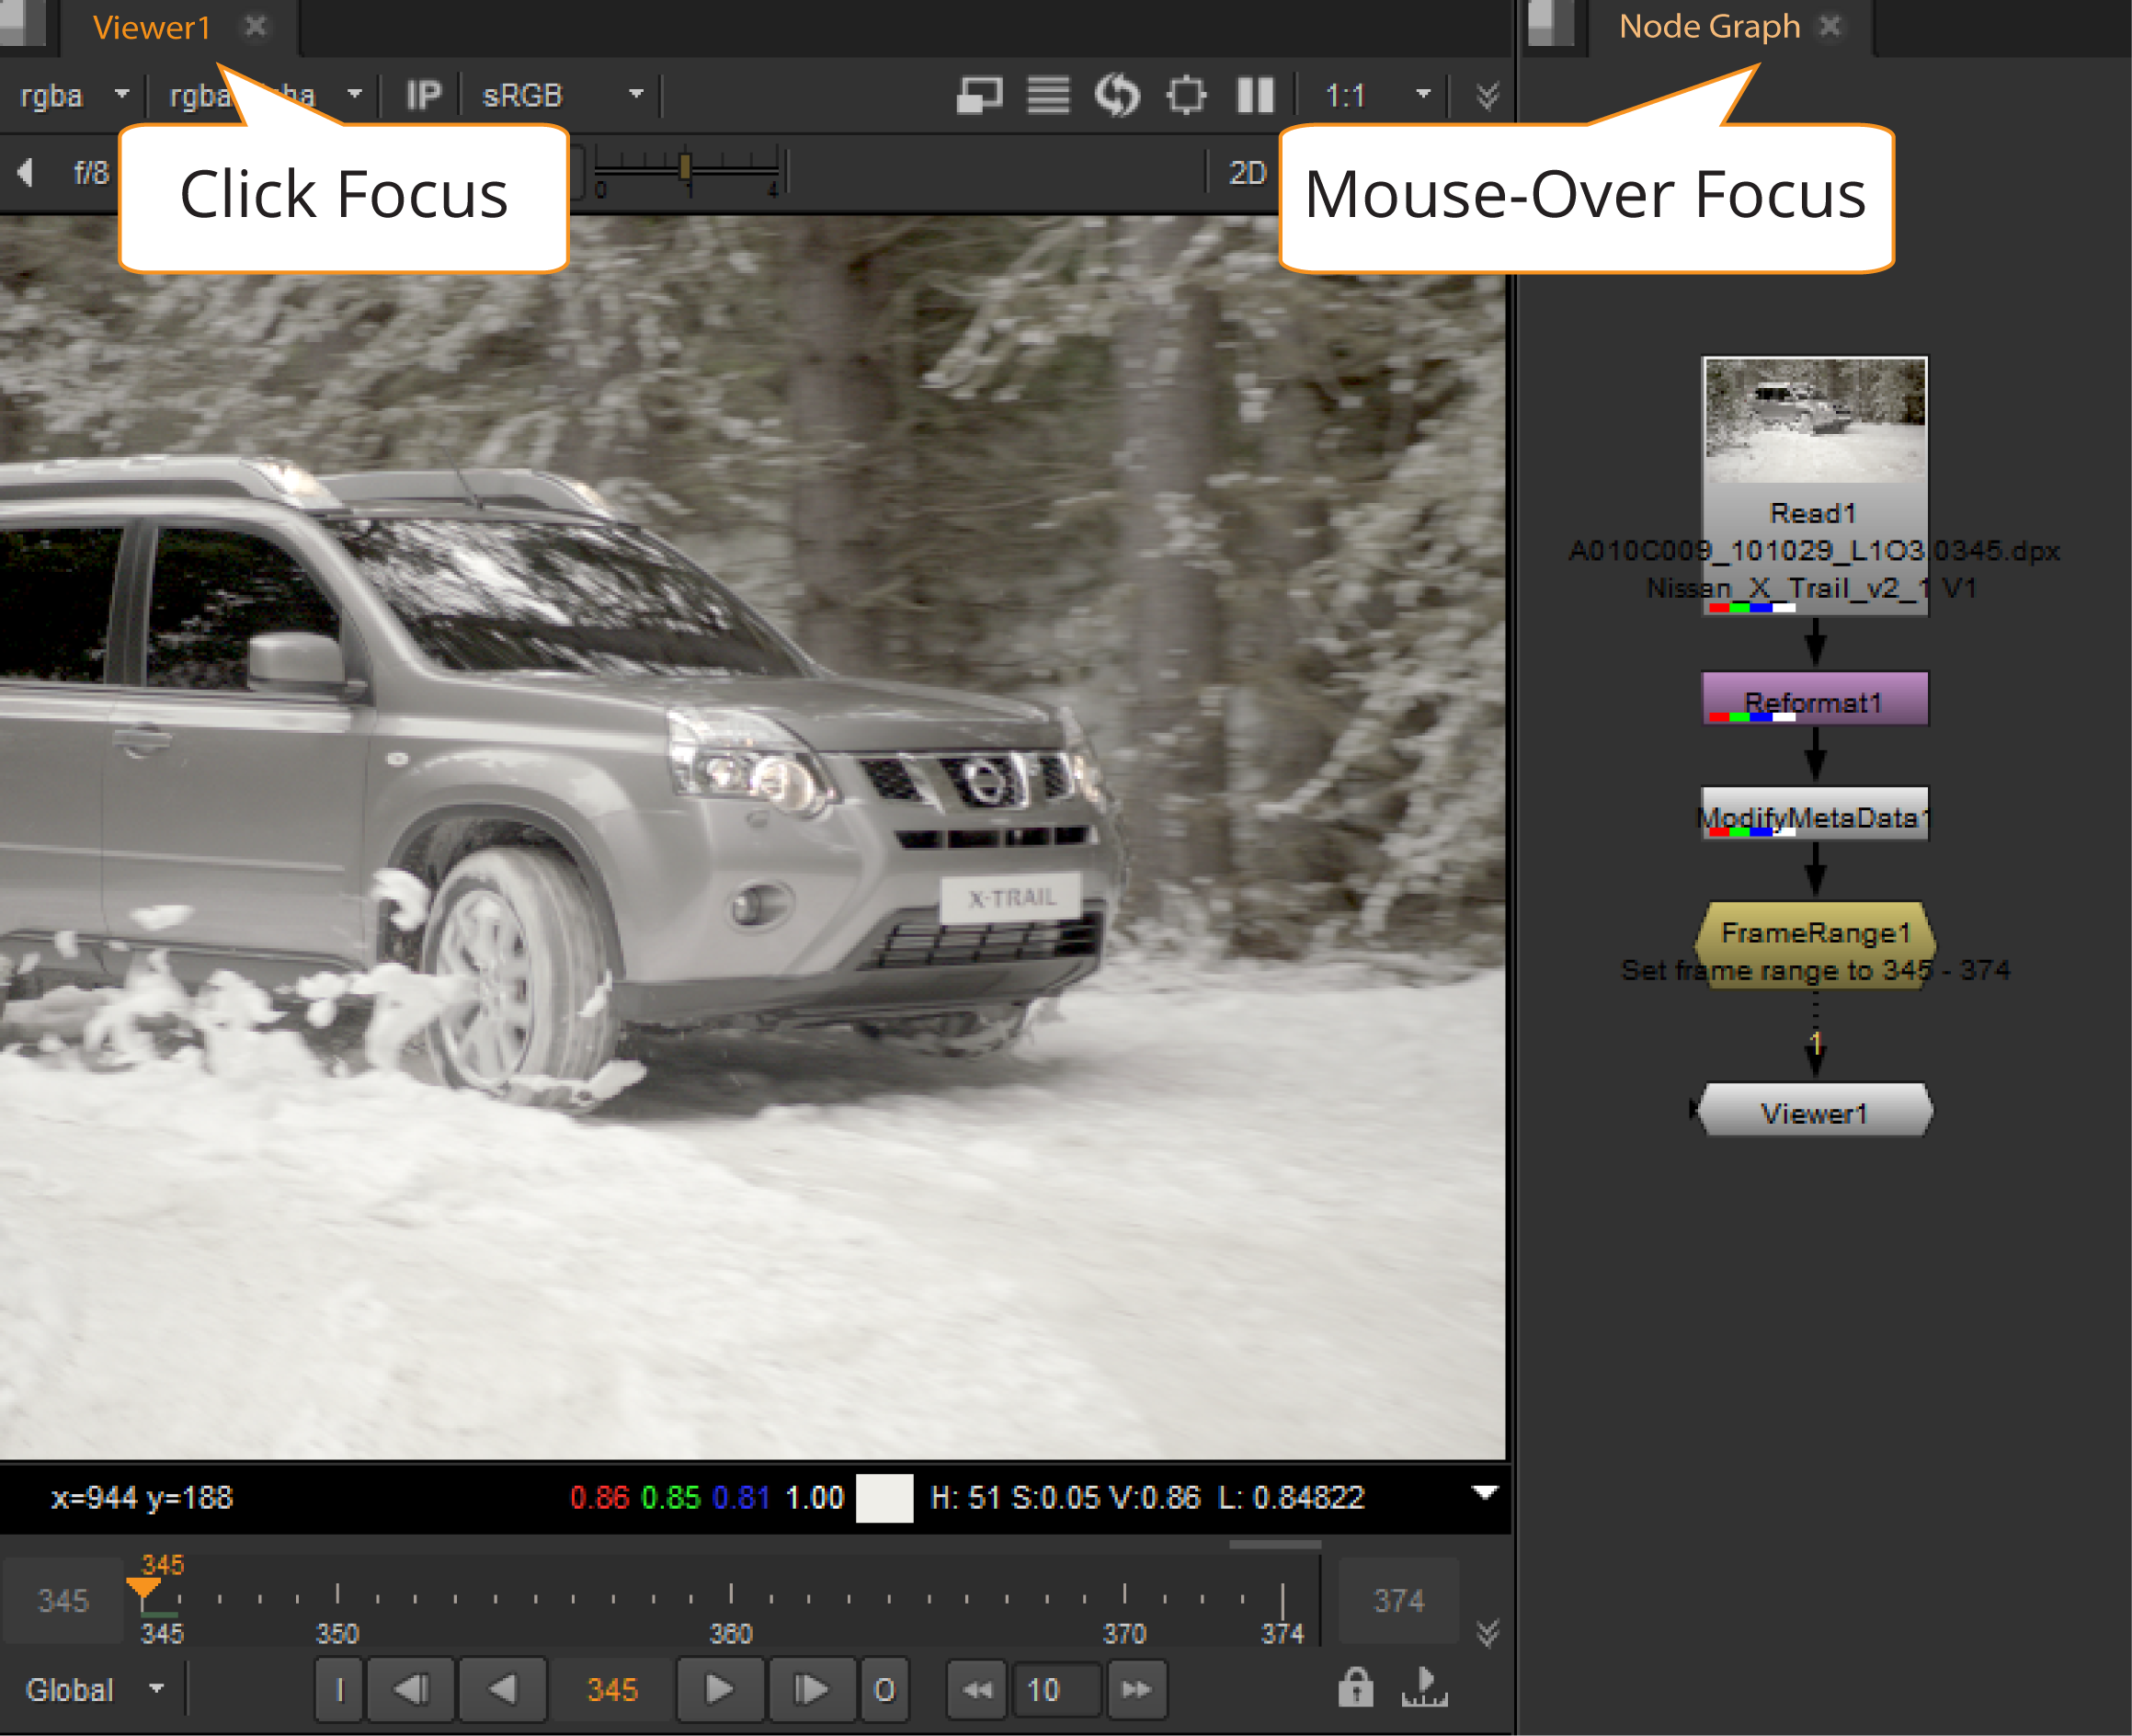
Nuke Studio deals with panel focus in two ways: click focus and mouse-over focus. Click focus defines the main panel where keyboard events are registered and mouse-over focus allows you to temporarily override that focus. If the mouse-over focus is centered on a panel that doesn't recognize a particular keyboard event, the event falls back to the click focus panel.
A good example of click focus versus mouse-over focus is between Viewers and the Node Graph:
• If a Compositing Viewer has click focus and you press B, only the blue color channel is displayed in the Viewer. If the mouse-over focus resides on the Node Graph and you press B, the click focus is overridden and a Blur node is added to the Node Graph.
• If a Compositing Viewer has click focus and you press , (comma), the gain is reduced in the Viewer. If the mouse-over focus resides on the Node Graph and you press , (comma), the gain is still reduced in the Viewer because the Node Graph has no , (comma) equivalent keyboard shortcut.
Some areas of the interface retain focus no matter where the mouse-over focus resides, such as the message control in the Text node's Properties panel and the Filter field in the Project panel.
Click focus is shown in the interface with a bright orange highlight in the panel name and mouse-over focus is shown as a muted orange highlight.
Default Workspaces
There are six default workspaces in Nuke/NukeX and Nuke Studio. By default, Nuke/NukeX opens in the Compositing workspace and Nuke Studio opens in the Finishing workspace. To change the workspace, you can do either of the following:
• Select Workspace from the top menu bar and then select the required workspace.
OR
• Use the keyboard shortcuts to open the required workspace. Press Shift and the required workspace keyboard shortcut, depending on mode:
|
Keyboard Shortcut |
Nuke/NukeX |
Nuke Studio |
|---|---|---|
|
Shift+F1 |
Compositing |
Conforming |
|
Shift+F2 |
Large Node Graph |
Editing |
|
Shift+F3 |
Large Viewer |
Reviewing |
|
Shift+F4 |
Scripting |
Timeline |
|
Shift+F5 |
Animation |
Finishing |
|
Shift+F6 |
Floating |
Compositing |
|
Shift+F7 |
Monitor Out |
Monitor Out |
|
Shift+F8 |
N/A |
Sync Session (Beta) |
Customizing Workspaces
Customizing Panes
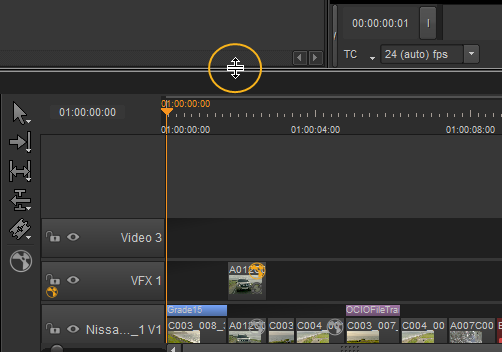
You can resize and split panes to make more room for different elements on the screen. To resize a pane, drag the divider line of the pane into a new location.
You can split a pane by clicking on the content menu button ![]() in the top-left corner of the pane, and then selecting Split Vertical or Split Horizontal from the menu that opens.
in the top-left corner of the pane, and then selecting Split Vertical or Split Horizontal from the menu that opens.
Note: Pressing and holding the spacebar brings up the right-click menu for that pane, where available.
Moving the Toolbar
You can move the Toolbar into a new position by adding a new panel for it, hiding the panel name and controls, and resizing the panel. For more information on how to do this, see Adding Tabs, and Hiding Tab Names and Controls.
Adding Tabs
When you can’t fit more elements into your display, you can use tabs to save space. You can also use tabs to move the Toolbar into a new location.
You can add a tab by clicking on the content menu button ![]() in the top-left corner of the pane, and then selecting the type of tab you want to add. For example, you can add Node Toolbar, Node Graph, New Viewer, or Script Editor. The new tab is added on top of the existing tabs.
in the top-left corner of the pane, and then selecting the type of tab you want to add. For example, you can add Node Toolbar, Node Graph, New Viewer, or Script Editor. The new tab is added on top of the existing tabs.
To move tabs, click on the name of the tab and drag it to a new position inside the same pane or in another pane.
You can close tabs again by clicking the X in the top-right corner of the tab you want to close.
Note: Closing a linked tab closes all associated tabs. If you hold Alt while closing a linked tab, it only closes that tab.
Soloing Tabs
You can choose to solo a tab by either right-clicking on the tab name or clicking the content menu, and then selecting Solo Tab. This automatically closes any other open tabs in the same pane, except for the one you have chosen to solo.
Floating Windows
You can turn tabs and panes into floating windows and vice versa. To turn a tab or pane into a floating window, click the content menu button ![]() in the top-left corner in the tab or pane you want to float, and then select Float Tab or Float Pane. You can also float tabs by either clicking Ctrl/Cmd+click on the tab name, or right-clicking on the tab name and select Float Tab.
in the top-left corner in the tab or pane you want to float, and then select Float Tab or Float Pane. You can also float tabs by either clicking Ctrl/Cmd+click on the tab name, or right-clicking on the tab name and select Float Tab.
To change a floating window into a tab or pane, click on the tab or pane name in the floating window and drag it to where you want it to dock. You can close floating windows by clicking the X button in the top-right corner of the tab or pane.
Maximizing Windows
To make a window fullscreen, first ensure the window you want to make fullscreen is active, and then press Alt+S. This could be the main application window or a floating Viewer. Making it fullscreen removes the window borders. You can also maximize tabs and panels by pressing spacebar.
Hiding Tab Names and Controls
You can hide the names and control buttons of tabs, as you may not need them with all panels, such as the Toolbar panel. To hide the names and controls on tabs, click the content menu button ![]() in the top-left corner of the tab, and disable Show Tabs.
in the top-left corner of the tab, and disable Show Tabs.
You can show the names and controls on tabs again by moving the cursor over the top of the pane area until the top edge of the pane highlights, right-click to open the content menu, and select Show Tabs.
Saving and Loading Workspaces
After you have customized a workspace and you are happy with it, you can save it by selecting Workspace > Save Workspace... You are then asked to name it. After saving it, your custom workspace appears in the Workspace dropdown under the existing default workspaces. Select it from the dropdown to load it.
Workspaces are saved in your .nuke file under Workspaces > Nuke or NukeStudio, depending on which Nuke mode you're currently using.
Note: The location of the .nuke file varies by platform. See Loading Gizmos, NDK Plug-ins, and Python and Tcl Scripts for more detailed information.
Setting the Startup Workspace
When you launch Nuke, it opens in the workspace set in the Preferences. You can change the startup workspace to any other default workspace or a custom workspace, by doing the following:
| 1. | Open the Preferences dialog by pressing Shift+S. |
| 2. | In the Behaviors section, select Startup. |
| 3. | Use the startup workspace dropdown to select the workspace you want Nuke to load on startup. |
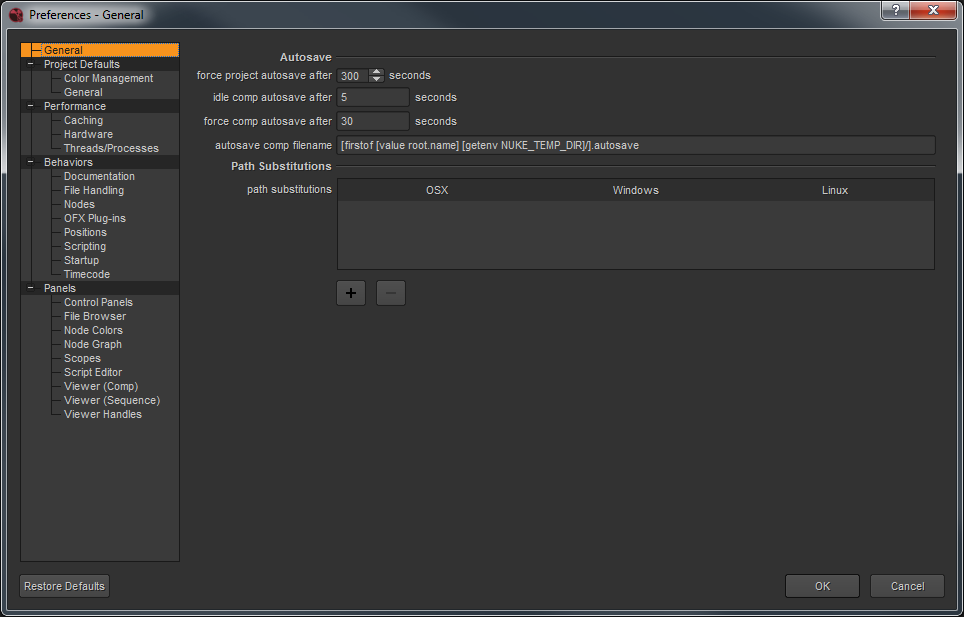
Setting Preferences
Open the Preferences dialog by pressing Shift+S. The preferences available depend on which mode Nuke is launched in.
Changing Preferences
The function of each preference is described under Preferences.
When you make a change to a preference, in most cases, the interface registers the change immediately (for example, an interface element displays in the new color). Some preference changes, such as Performance > Hardware > default blink device, require you to restart Nuke Studio, for the changes to take effect.
Saving Preferences
Nuke stores your preference settings in a file called preferences17.0.nk, which resides in your .nuke directory. The location of this is dependent on your operating system.
• Linux: /home/login name/.nuke
• Mac: /Users/login name/.nuke
• Windows: drive letter:\Users\login name\.nuke
Note: On Windows, .nuke resides in the directory pointed to by the HOME environment variable. If this variable is not set (which is common), the .nuke directory is under the folder specified by the USERPROFILE environment variable.
Each Nuke user can maintain his or her own unique settings. After making a change in the Preferences dialog, you can simply click OK to save and close your preferences. If you click Cancel, any changes that you made are not saved.
To save your preferences
Make the desired changes inside the Preferences dialog, then click OK. Nuke writes the new settings to preferences17.0.nk file, which you can find in the .nuke directory:
• On Windows: The .nuke directory can be found under the directory pointed to by the HOME environment variable. If this variable is not set (which is common), the .nuke directory is under the folder specified by the USERPROFILE environment variable - which is generally of the form drive letter:\Users\login name\
To find out if the HOME and USERPROFILE environment variables are set and where they are pointing at, enter %HOME% or %USERPROFILE% into the address bar in Windows Explorer. If the environment variable is set, the folder it’s pointing at is opened. If it’s not set, you get an error.
• On Mac: /Users/login name/.nuke
• On Linux: /users/login name/.nuke
Your new preferences remain in effect for the current and all subsequent sessions.
Resetting Preferences
To reset any changes you made simply click Restore Defaults in the bottom-left of the Preferences dialog. You can reset the preferences to default by deleting the preferences17.0.nk file. After doing this, the next time you launch Nuke, it rebuilds the file with the default preferences.