Preferences
The Available Preference Settings
The Preferences dialog is divided into the following sections:
|
General |
Settings for auto-saving and path substitutions. |
|
Project Defaults |
General project settings, and settings for color management. |
|
Performance |
Settings for caching, hardware, localization, and threads/processes. |
|
Behaviors |
Settings for start up, file handling, export options, scripting, node behaviors, and more. |
|
Panels |
Settings for the interface appearance, file browser, control panels, nodes, Viewers, script editors, and scopes. |
General
|
General |
|
|---|---|
|
Autosave |
|
|
force project autosave after <300> seconds |
Set the number of seconds after which to automatically save your project. Disable this by setting it to zero. |
|
idle comp autosave after <5> seconds |
Define how long (in seconds) Nuke waits before performing an automatic backup after you have left the system idle (that is, haven’t used the mouse or the keyboard). If you set the value to 0, automatic backups are disabled. |
|
force comp autosave after <30> seconds |
Define how long (in seconds) Nuke waits before performing an automatic backup regardless of whether the system is idle. If you set the value to 0, forced automatic backups are disabled. |
|
autosave comp filename |
Sets the file name of the autosaved project. If this is not set, it defaults to [firstof[value root.name] [getenv NUKE_TEMP_DIR]/].autosave |
|
Path Substitutions |
|
|
path substitutions |
Allows you to remap file paths in order to easily share projects across different operating systems. When the application encounters a file path, any text in the Mac/Linux column is replaced with the text in the Windows column, or vice versa. For example, if you enter /Volumes/networkmount in the Mac/Linux column and Z: in the Windows column: • On Mac and Linux, any file paths that start with Z: are converted to start with /Volumes/networkmount. • On Windows, any file paths that start with /Volumes/networkmount are converted to start with Z:. To be able to enter text in either column, you need to click on the + button below to add a row to the table. Note: Path substitution is invaluable for Sync Review sessions if you're using local source files rather than files from a central server. See Sync Review for more information. |
|
+ |
Adds a row under path substitutions. |
|
- |
Deletes the selected row(s) under path substitutions. |
Project Defaults
Note: You must restart the application for changes to Project Defaults preferences to be applied.
|
Channel Management |
|
|---|---|
|
Channel Management |
|
|
Channel Warning Threshold |
Sets the total number of channels required in a script to trigger the Channel Warning. Nuke only supports 1023 uniquely named channels per script. The Channel Count is displayed in the bottom-right of the interface, next to the Localization Mode indicator. Note: Nuke does not remove unused channels until you close and reopen a script, so the Channel Count does not decrease when you remove Read nodes from the Node Graph. |
|
Color Management |
|
|---|---|
|
Default Color Management |
|
|
Default Color Management |
Sets the default color management system to use in new projects. |
|
OpenColorIO config |
|
|
OpenColorIO config file |
Sets the OpenColorIO configuration to use, if you don’t intend to use the nuke-default settings. |
|
If you select custom from the dropdown, enter the file path of the configuration file or click Choose to use the browser. Note: Nuke also includes an environment variable method for setting a config file. See |
|
|
Default Color Transforms |
|
|
working space |
Sets the colorspace files should be converted to, on import, and from, during render - it's the colorspace used by |
|
viewer |
Sets the default LUT applied to Viewers. |
|
thumbnails |
Sets the default LUT applied to thumbnails when ever they are generated. |
|
Monitor Out |
Sets the default LUT applied to external monitors. |
|
8 bit files 16 bit files log files floating point files |
Sets the default LUT applied to the specified ingested file type. |
|
OCIO Roles |
|
|
Allow OCIO Roles in Colorspace Knobs |
When enabled, OCIO roles are available in all colorspace controls. |
|
Prioritize OCIO Roles |
When enabled, OCIO roles are created in the main menu of cascading dropdowns, with Colorspaces in a sub-menu. When disabled, roles are demoted to a sub-menu called Roles. You can also control this preference using an environment variable. See Nuke Environment Variables for more information. |
|
HDR (macOS only) |
|
|
Enable macOS HDR Color Profile (Display P3) (Beta) |
When enabled, running under macOS with a screen capable of displaying values greater than 1 allows you to display HDR images in the Display P3 colorspace correctly. |
|
Nuke Script Project Settings |
|
|
color management |
Sets whether Nuke uses the LUTs read from the configuration specified or the Nuke native LUTs during export. Selecting OCIO makes the relevant OCIO LUTs available to the Read and Write nodes in scripts on a per project basis. All configurations except nuke-default automatically switch this control to OCIO. |
|
General - these preferences only apply to new scripts and projects. To affect the current project, use the Project Settings. |
|
|---|---|
|
Project |
|
|
project directory |
Sets the project directory used by new projects. You can change the project directory for the current project in the Project Settings. |
|
Hrox Directory |
Click to set the project directory to the location of the .hrox file using the [python {nuke.script_directory()}] expression. |
|
export directory |
Sets the directory used by timeline exports: • Use Project Directory - use the directory specified by the project directory preference. • Use Custom Directory - use the directory specified by the custom export directory control. |
|
custom export directory |
Sets the export directory used by new projects when the export directory control is set to Use Custom Directory. |
|
Sequence |
|
|
output resolution |
Use this to set the output resolution in the Timeline environment for new projects. By default, clips in the sequence are not reformatted to fit this format, they retain the source clip resolution. You can adjust the reformatting for new clips added to a sequence using the Clip settings below or by selecting clips in the timeline and adjusting the settings in the Properties tab. |
|
frame rate |
Select the frame rate for new projects in the Timeline environment. |
|
start timecode |
Use this to define the start timecode for new projects. For shots, this overrides the timecode defined in the media. |
|
time display |
You can use this to select the display format for times. You can select either Timecode or Frames. |
|
drop frame |
Use this to choose whether timecodes from this sequence are displayed in drop frame times or not. Drop Frame is a timecode display option that leaves out two frames from the 30 fps timecode sequence every minute (except every 10th minute) so that long running NTSC sequences are accurate to a real-time clock (NTSC frame rate is 3000/1001, or approximately 0.01% slower than 30fps). Note: Enabling Drop Frame is a Timecode display feature only - the source media remains a continuous stream of frames. |
|
Clip |
|
|
clip reformat |
Sets how new clips added to a sequence are formatted. The default, None, displays shots at the source clip resolution, whereas To Sequence Resolution reformats the shot to the output resolution using the resize type control. |
|
resize type |
When clip reformat is To Sequence Resolution, determines how the shot is resized to fit the output resolution. This control is disabled when clip reformat is set to None. |
|
center |
When clip reformat is To Sequence Resolution, disabling center places the clip at the bottom-left of the output resolution, rather than the center. |
|
Link bin and track item versions |
When enabled, selecting a new version for a clip in a bin or a shot on the timeline updates all instances of that media. When disabled, you can version clips and shots independently, even if they reference the same media. |
|
Poster Frame |
|
|
poster frame |
Sets a preset poster frame for all new source clips or select Custom to select a relative frame offset as the poster frame: • First - new source clips display the first frame of the file on disk as the poster frame. • Middle - new source clips display the middle frame of the file(s) on disk as the poster frame. • Last - new source clips display the last frame of the file(s) on disk as the poster frame. • Custom - the poster frame number is derived from the number of frames in the clip starting at 0. Use the frame offset control to set the relative offset. |
|
frame offset |
When poster frame is set to Custom, enter the relative frame offset from the first available frame in the file(s) on disk. |
|
Sync Session |
|
|---|---|
|
Default Appearance |
|
|
name |
Sets the name and color you want to display on participant sessions. Click the color swatch to open the color picker. |
|
Default Behavior |
|
|
open sync panel on sync session startup |
When enabled, automatically open the Sync Session panel when a session is started. |
|
Project Saving |
|
|
save directory |
Sets the default directory where all Sync Session projects are saved. |
|
Views - these preferences only apply to new scripts and projects. To affect the current project, use the Project Settings. |
|
|---|---|
|
Views |
|
|
+/- |
Click to add and remove views from the views list. |
|
↑ ↓ |
Click to move views up and down the views list. Moving a view changes the position of the corresponding Viewer button. |
|
View |
Lists the views in the script or project and the color associated with the view when Use color in UI is enabled. |
|
hero |
Sets the principal view selected on script or project load. |
|
Set up views for stereo |
Click to automatically add left and right views to scripts or projects. |
|
Use colors in UI? |
When enabled, the colors specified in the views matrix are applied to the interface. For example, if you click Set up views for stereo and enable this control, any UI items representing the left and right views are colored red and green. |
Performance
|
Caching |
|
|---|---|
|
Timeline Disk Caching |
|
|
directory path |
The directory where all .exr files from timeline disk caching are stored by default. The caching directory should be on a local disk, preferably with the fastest access time available. It’s also important to leave enough space for the maximum disk cache size (defined below). |
|
limit to (GB) |
This allows you to set the maximum amount of space (in GB) to use for the timeline disk cache. Set to zero for unlimited size. Values lower than zero, leave that amount of space free. The currently in use and currently free fields display how much free cache remains from the total specified. If this limit is reached during caching, a dialog displays options to free up disk space. |
|
EXR compression |
Sets the type of compression applied when writing files to the disk cache: • DWAB • Zip (1 scanline) Note: DWAB compression produces smaller cache files more quickly, but can be lossy compared to Zip compression. |
|
clear cache |
Clear All removes all cached files from the root directory specified in the directory path control. A dialog displays a list of files for confirmation before the files are deleted. |
|
default disk caching mode |
Sets the default dick caching mode for new sequences: • Manual - the default mode. When frames are cached, any changes made to soft effects on the cached frames are not automatically re-cached. • Automatic - when frames are cached, any changes to soft effects made after the initial cache operation automatically triggers a re-cache of the affected region of your cached timeline. This means that your timeline is always cached and up to date in the selected regions, regardless of changes made. Note: You can override this preference in the Sequence panel using the Disk Caching Mode dropdown. |
|
Comp Disk Caching |
|
|
temp directory |
The comp disk cache saves all recent images displayed in the Viewer for fast playback. Using this control, you can specify where you want Nuke to save these images. Select a local disk (for example, C:/temp), preferably with the fastest access time available. It’s also important to leave enough space for the maximum disk cache size (defined below). |
|
comp disk cache size (GB) |
Specifies the size of Nuke's disk cache, independent of the playback cache. It is the maximum amount of disk that Nuke can allocate for caching. When the limit is reached, Nuke attempts to free disk space before using any more. The environment variable NUKE_DISK_CACHE_GB overrides this setting. Note: Setting this control to 0 GB also disables Nuke's RAM cache (the orange bar in the timeslider) as both caches rely on files written to disk. |
|
rotopaint cache size (GB) |
Specifies the size of Nuke's RotoPaint tile cache. It stores tiles for the output image of each RotoPaint node, enabling you to paint on top of existing RotoPaint without having to re-render the strokes underneath. If you run out of RotoPaint disk cache, response times may suffer when painting onto tiles containing lots of strokes. |
|
Memory Caching |
|
|
playback cache size (% of system RAM) |
Specifies the percentage of system RAM used for the timeline Viewer playback cache. The entire amount is allocated, even if you've only got a few frames in the Viewer. Recently used frames are retained in the memory to avoid relying on the disk buffering system. The cache is freed when you switch to the compositing Viewer and reallocated when you switch back to the timeline Viewer. Tip: On low-end machines, minimizing this may improve application responsiveness at the expense of smooth playback. |
|
free timeline playback RAM cache when switching to the node graph |
When enabled, any frames cached to RAM (the white bar in the timeline Viewer) are discarded when you switch to the Node Graph within Nuke Studio, freeing the RAM for use in Nuke. Note: When you switch back to the timeline, the cached files are re-cached, which can be time consuming. |
|
comp cache size (% of system memory) |
Specifies the percentage of system memory available for comp caching. It is independent of the playback cache and is the maximum amount of memory that Nuke can use for caching. When the limit is reached, Nuke attempts to free memory before using any more. |
|
comp playback cache size (% of comp cache) |
Specifies the percentage of the comp cache available for comp playback. This cache holds data displayed in Nuke's compositing Viewer, the result from the node tree you're viewing. Results from further up the tree are sometimes cached inside the comp cache as well, such as the output from a node which is needed by more than one downstream node. |
|
comp paint cache size (% of comp cache) |
Specifies the percentage of the comp cache available for comp paint. The comp playback cache and comp paint cache are limits for the total memory that is used, so it's possible to have a combined size greater than 100%. How the memory is shared between the two depends on what you're doing, and you won't necessarily be filling both up at the same rate. For example, if you're doing a lot of paint work, you might want to allow the paint cache to fill up more than 50% of the available memory if the playback cache isn't using its full share. |
|
Audio Waveforms |
|
|
waveform memory (MB) |
Sets the amount of memory available for storing timeline audio waveforms. |
|
Application in Background |
|
|
pause timeline Viewer when the application goes to the background |
When enabled, pause timeline Viewer caching when the application is in the background. |
|
clear timeline Viewer cache when the application goes to the background |
When enabled, the timeline Viewer cache is cleared when the application goes into the background. Note: This preference is only available when pause timeline Viewer when the application goes to the background is enabled. |
|
pause comp Viewer when the application goes to the background |
When enabled, pause comp Viewer caching when the application is in the background. |
|
clear comp Viewer cache when the application goes to the background |
When enabled, the comp Viewer cache is cleared when the application goes into the background. Note: This preference is only available when pause comp Viewer when the application goes to the background is enabled. |
|
Undo Caching |
|
|
undo history size |
Allows you to set the amount of RAM, in MB, to use for the undo history. If this limit is exceeded, older items are discarded. |
|
minimum undo events |
Use this to set the amount of undo events. This setting always applies, even if it breaches the undo history size limit. |
|
Expression |
|
|---|---|
|
Expressions Re-Evaluation |
|
|
Mode |
Sets when expressions in Nuke scripts are re-evaluated: • Always - expressions in the script are re-evaluated after every change to the Node Graph. This can cause performance issues in large, expression-heavy scripts. • Lazy - expressions are only re-evaluated when required for GUI or render updates. This option can speed up interactive performance in large, expression-heavy scripts. |
|
Hardware |
|
|---|---|
|
Audio |
|
|
audio device |
The audio device control allows you to select an existing audio device for playout from a list of automatically detected devices. You can disable playout on a device by selecting Disabled. |
|
GPU |
|
|
expand 3 to 4 channels |
You can use this to expand images cached for playback from 3 to 4 color channels per pixel. Some graphics hardware performs better at loading images to video memory with 4 channels per pixel, than it does with 3. Enabling this option improves playback performance on such hardware, at the expense of reducing the number of frames that it's possible to cache. If you are seeing poor playback performance, enabling this option may help. However, if you are seeing acceptable playback performance with this option disabled, then leaving it disabled increases the number of frames that may be cached for smooth playback. Note: You must restart Nuke for this option to take effect. |
|
enable vsync |
When enabled, synchronize new timeline Viewer's playback frame rate with the refresh rate of the monitor. Enabling vsync limits the playback fps to the monitor refresh rate and may reduce performance. When disabled, timeline Viewer performance is unaffected but you may see tearing in timeline Viewers. Note: This preference is only shown in Nuke Studio and Hiero sessions and only affects new timeline Viewers. Close and reopen any existing Viewers after enabling this option. |
|
GPU texture cache size (MB) |
Use this to set the maximum amount of GPU memory to use for caching textures. |
|
default blink device |
You can use this to set the default blink device to use the CPU, or choose which GPU to use for GPU accelerated plug-ins, such as, ZDefocus, Convolve, Denoise, BlinkScript, Kronos, MotionBlur, and so on. Any changes to this setting only take effect after you have restarted the application. |
|
disable blink cache |
When enabled, nodes that support GPU caching pass on the GPU data to the last node that supports GPU caching and then transfer all the data back to the CPU at once. GPU caching is supported by all CaraVR nodes, the updated Bilinear and SphericalTransform nodes, and the BlinkScript node. When disabled, Nuke behaves in the same way as legacy versions. |
|
blink cache size |
Controls the size of the GPU memory and the percentage of that memory available for the Blink cache. Note: Increasing the percentage of memory used for caching does not necessarily decrease processing time, and can in some cases have a negative effect. The default 40% is preferred in most instances. |
|
enable multi_GPU support |
If have multiple GPUs of the same type installed, you can enable this preference to share work between the available GPUs for extra processing speed. This is a global preference and is applied to all GPU enabled nodes. Note: For more information on GPU support, see the Release Notes for your version of Nuke. |
|
Localization |
|
|---|---|
|
System |
|
|
mode |
Sets the overall localization mode: • on - checks for updates to source clips and Read nodes with localization policy set to On or From auto-localize path and localizes those files automatically. • manual - checks for updates to source clips and Read nodes with localization policy set to On Demand and prompts you to update them manually. • off - no source clips or Read nodes are localized, regardless of the their localization policy. Note: The current localization mode is displayed in the status bar at the bottom-right of the interface. |
|
read source files when localized files are out of date |
When enabled, source clips and Read nodes referencing out of date localized files automatically revert to reading the entire sequence from the original source files. Source files are read in the following circumstances: • With Localization mode set to on: • A localized source clip or Read node with localization policy set to on demand is detected to be out of date. • A localized source clip or Read node with localization policy set to on or from auto-localize path is detected to be out of date and it is queuing to be automatically localized. • With Localization mode set to manual: • A localized source clip or Read node with localization policy set to on, on demand, or from auto-localize path is detected to be out of date. When disabled, the out of date localized files are read until you update them manually. |
|
hide out of date progress bar |
When read source files when localized files are out of date is enabled, you can enable this control to hide the progress/status bar on Read nodes that are reading from the original source files. |
|
pause localization on script/project open |
When enabled, localization does not start automatically when you open a script or project. Enabling this option can help to open scripts and projects more quickly. |
|
Inputs |
|
|
localization policy |
Sets the localization policy for all new source clips and Read nodes: • on - always localize source clips and Read nodes with this policy automatically. • from auto-localize path - localize these source clips and Read nodes automatically if they reside in the auto-localize from directory. • on demand - only localize these source clips and Read nodes when you manually update them. • off - never localize these source clips or Read nodes. |
|
Paths |
|
|
auto-localize from |
Enter the location of the files you need automatically localized, unless otherwise specified in the Read node’s cache locally control |
|
localize to |
Enter the file path where all the localized files are automatically stored. Localizing files allows for faster reloading for files that are stored in a location that is slow to access (such as a network drive). On Windows, files saved to the localize to directory replace \\ (double back slashes) and : (colon drive signifiers) with underscores so that the file path works as expected between operating systems. For example: \\windowspath\to\my\network\file.dpx is saved as __windowspath\to\my\network\file.dpx |
|
Storage |
|
|
limit to (GB) |
This allows you to set the maximum amount of space (in GB) to use for localized files. Set to zero for unlimited size. Values lower than zero, leave that amount of space free. The currently in use and currently free fields display how much free storage remains from the total specified. If this limit is reached during localization, a dialog displays options to free up storage space. |
|
Network |
|
|
check for updated files every |
When files are localized, specifies the time interval (in minutes) before Nuke checks for updated versions of the files. |
| Appearance | |
|
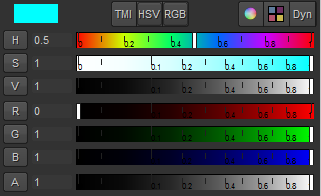
progress bar |
Sets the colors used to represent the localization states of source clips and Read nodes. |
|
Threads/Processes |
|
|---|---|
|
Playback |
|
|
default number of threads per reader |
Sets the number of threads to use per reader. If your source files are located on high performance local drives, increasing the number threads can significantly improve read times. CPU intensive operations, such as .jpg decoding, can also be improved by increasing the number of threads per reader. |
|
override number of threads per reader |
Allows you to override the default number of decode threads used, dependent on file format. Use the plus button to add an entry to the table and then select the file format using the dropdown menu. Double click the Number of threads column to set the required number of decode threads for that format. |
|
OpenEXR helper threads to use |
Sets the number of helper threads to use for OpenEXR only. The default, zero, automatically sets the number of helper threads used. |
|
Rendering |
|
|
render using frame server (Nuke) |
When enabled, the Frame Server is always used for rendering. Note: Local Frame Server processes use ports 5558-5662. |
|
frame server render timeout |
Allows you to increase the number of minutes a render process can stay unresponsive before ending. If you're experiencing Render application timed out messages with process-heavy scripts, you can try increasing this value. |
|
focus background renders |
When enabled, rendering using the Frame Server automatically opens the Background Renders panel, or if it is already open, shifts focus to the panel. |
|
frame server processes to run |
Set the number of worker Nuke processes to run for the frame server. Note: You must restart Nuke for this setting to take effect. |
|
export renders |
You can select from several render options: • limit renderer (more responsive ui) – Select this option to make the user interface more responsive during transcodes. It tells Nuke to use 2 threads to transcode and to use 25% of RAM to cache. Using this option is likely to result in slower transcodes. • no renderer limits (fastest transcoding) – Select this option to ensure that transcodes happen as quickly as possible. This option may result in a less responsive user interface during transcodes. • customize render limits – Select this option to manually configure the number of threads used and cache memory available when transcoding files. Note: You must restart Nuke for this setting to take effect. |
|
number of threads |
Sets the number of threads that Nuke uses when transcoding. Lower numbers allow the Timeline environment's interface to be more responsive. Higher numbers allow faster transcodes. This setting is passed to Nuke using the -m option. |
|
cache memory (GB) |
Use this to set the number of gigabytes of RAM that Nuke uses for its cache settings. Lower numbers may improve the Timeline environment's interface responsiveness, while higher numbers may improve the speed of the transcodes. This setting is passed to Nuke with the -c option. |
|
background renders |
Sets when background renders occur: • don't auto-start background renders – Comps on the timeline are not rendered in the background automatically. • start background renders on Comp save – Comps on the timeline are rendered in the background automatically when they are saved. • start background renders on Comp create, Comp save and Comp version change – Comps on the timeline are rendered in the background automatically when first created, when saved, and when a new version is selected. |
|
Downsize Filtering |
|
|
8-bit images 10-, 12- and 16-bit integer images 16-bit float images 32-bit images |
Customizes the downsize filtering behavior by bit-depth. The default (1x) retains the original image size. You can select 2x to halve the image size, or 4x to quarter the image size. The Viewer image quality dropdown affects the decode rate and resolution of clips displayed in the Viewer. Lower resolutions decode faster and vice versa. |
Behaviors
|
Documentation |
|
|---|---|
|
documentation source |
Sets the help source for the Properties ? button: • local – use Nuke's built-in HTML help server. Nuke's local help server also searches the NUKE_PATH, .nuke, and .nuke/Documentation directories for HTML files with the same name as the requested node, such as Blur.html. • foundry – This uses Foundry's Online Help, the most up-to-date version of the documentation. • custom – Select this to point to your own help server. |
|
auto port |
When enabled, assign a free port automatically. |
|
local port |
Specify a local documentation server port manually. This is usually >= 1024. You can also set this to 0 to automatically assign the port. |
|
range |
Specify a range of ports to attempt with the local documentation server. |
|
File Handling |
|||||||
|---|---|---|---|---|---|---|---|
|
scan for file sequence range on drop into Bin view |
When enabled, identify and import the file range of media that is dropped into the bin. When disabled, no range is detected and only a single frame is ingested. (This does not affect container formats, such .mov and .r3d.) |
||||||
|
automatically rescan versions when moving off end of the version list |
When enabled, incrementing a source clip or shot’s version past the end of the previously discovered versions list, forces a rescan to update the versions list. See Using Versions for more information. |
||||||
|
frame number style |
Sets the sequence display mode to be used in the file browser. |
||||||
|
assume fixed width frame numbers in file sequences |
When enabled, assume frames have a fixed width number. With this selected, frame numbers need to be padded with zeros to a fixed length, otherwise frame numbers without preceding zeros are assumed to belong to sequences with no padding. This is important as the sequence identifier specifies a unique file name for each and every frame. For example:
|
||||||
|
alembic files |
|||||||
|
always load abc files as all-in-one |
When enabled, all .abc files are imported as a single node, without displaying the Alembic import scenegraph. |
||||||
| 3D geometry files | |||||||
| block geoimport popup | Block the geoimpot popup from appearing when loading a geo file. | ||||||
|
Nodes |
|
|---|---|
|
new Merge nodes connect A input |
When enabled, inserting a new Merge node automatically connects the A input. |
|
autokey roto shapes |
When enabled, keyframes are added automatically to Roto shapes when they are adjusted. |
|
when Viewer is closed delete its node |
When enabled, Viewer nodes are deleted when you close the associated Viewer. |
| Double click the Viewer node to open the Viewer settings |
Open the Viewer settings by doing any of the following: • Double-click on the Viewer node in the Node Graph. • FN_CTRLKEYNAME+click on the Viewer node in the Node Graph. • Select the Viewer node in the Node Graph and press Return. • To open the Viewer settings in a floating window, FN_CTRLKEYNAME+double-click or FN_CTRLKEYNAME+Alt+dick on the Viewer node. |
|
Tab Search Menu |
|
|
Weighting |
When enabled, nodes in the Tab menu are weighted so that more commonly used nodes appear at the top of the list. When disabled, the node list is ordered as it appears in the nodes toolbar or alphabetically if you start typing. |
|
Favorites |
When enabled, nodes that you have marked as favorite in the Tab menu appear at the top of the list. When disabled, the node list is ordered as it appears in the nodes toolbar or alphabetically if you start typing. |
|
Clear Weighting |
Click to reset any weighting information collected by Nuke. |
|
Clear Favorites |
Click to reset any nodes marked as favorite. |
|
OFX Plug-ins |
|
|---|---|
|
allow trial mode in OFX plugins |
When enabled, OFX plug-ins that offer a trial mode render in that mode, if a license cannot be found. When disabled, OFX plug-ins that can't get a license appear in an error state. |
|
Positions |
|
|---|---|
|
show menus with previous item under the cursor |
When enabled, opening contextual menus positions them with the most recently used item under the pointer. |
|
Scripting |
|
|---|---|
|
script command dialog defaults to Tcl |
When enabled, the dialog that appears when you press X in the Node Graph defaults to Tcl, rather than Python. |
|
Startup |
|
|---|---|
|
startup workspace |
Sets which workspace to display on startup. You can choose from Compositing, Conforming, Editing, Finishing, Reviewing, and Timeline. You can also choose to save a customized workspace, which would also be available from this list. |
|
show splash screen at startup |
When enabled, display the splash screen on startup. |
|
show startup dialog |
When enabled, display the dialog on startup. |
|
restore workspace when opening projects |
When enabled, restore the selected saved workspace when opening projects. |
|
Timecode |
|
|---|---|
|
R3D file timecode |
Sets the source timecode for RED files. You can choose from Default From File, Absolute Timecode, or Edge Timecode. |
|
other media timecode |
Sets the timecode source for file-per-frame media (such as .dpx). You can choose from File Header or Frame Number. If File Header is selected and a timecode exists, then the timecode is used. Otherwise it defaults back to using the frame number from the file name. |
|
max valid timebase (fps) |
Sets the maximum image header timebase above which the value is clamped. Image files are often created with application specific timebase values in the header description. This can lead to reading in spuriously high frame rates and the clamp aims to prevent this from happening. If your clips do have extremely high frame rates, increase this value as necessary to avoid clamping. |
|
EDL style spreadsheet timecodes |
When disabled, the srcOut and dstOut values in the spreadsheet use the film convention, representing the last frame of the cut. When enabled, the srcOut and dstOut values in the spreadsheet use the video convention, representing the frame directly after the cut. |
|
UI Scaling |
|
|---|---|
|
Note: You must restart the application to apply changes to UI Scaling preferences. |
|
|
UI Scaling Mode |
Sets the scaling mode for the UI on Windows and Linux. macOS handles UI scaling automatically. • off - no scaling is applied to the UI, regardless of screen resolution. • auto - the UI attempts to scale appropriately dependent on screen resolution. • all - enables the Scale All dropdown, which allows you to scale all screens by the selected factor. • per display - enables the Per Display table, which allows you to set the scaling applied per screen. |
| Scale All | When UI Scaling Mode is set to all, allows you to scale all screens by the selected factor. |
| Per Display | When UI Scaling Mode is set to per display, allows you to set the scaling applied per screen. |
Panels
|
Appearance |
|
|---|---|
|
Font |
Change the type, weight, angle, and size of the font used on Nuke’s user interface. |
|
UI Colors - right-click on any color button and select Set color to default to revert changes. |
|
|
Background |
Change the background color of most user interface elements (menus, toolbars, panes, properties panels, Viewers, and pop-up dialogs). |
|
Base |
Change the color of input fields, the input pane of the Script Editor, and the left side of the Curve Editor. |
|
Highlight |
Change the color of the highlighting that appears when you hover the cursor over a control, select a file or folder in the File Browser, or scrub to a new frame on the timeline. |
|
Highlighted Text |
Change the color of any highlighted text (for example, text you select in node properties). |
|
Label |
Change the color of labels and text on the application interface. Note that this does not set the color of the labels on nodes in the Node Graph. |
|
Button |
Change the color of buttons and dropdown menus. |
|
Animated |
Change the color that indicates a control has been animated. |
|
Keyframe |
Change the color that indicates a keyframe has been set. |
| Predicted | Change the color of the keyframes on the frame slider. |
|
Disk cached frames |
Change the color of the disk cached frames on the Viewer timeline. |
|
RAM cached frames |
Change the color of the RAM cached frames on the Viewer timeline. |
|
Playhead |
Change the color of the frame marker on the Viewer timeline. |
|
In/Out Markers |
Change the color of the in and out frame markers on the Viewer timeline. |
| Clip Annotation Markers | Change the color of the clip annotation markers. |
| Sequence Annotation Markers | Change the color of the sequence annotation markers. |
|
Curve Editor / Dope Sheet - right-click on any color button and select Set color to default to revert changes. |
|
|
no. of curves visible |
Sets the maximum number of curves visible in the Curve Editor. |
|
background |
Change the background color of the Dope Sheet tab. |
|
unselected key |
Change the color used for an unselected key on the Dope Sheet. |
|
part-selected key |
Change the color used for a part-selected key on the Dope Sheet. |
|
selected key |
Change the color used for a selected key on the Dope Sheet. |
|
timeline |
Change the color used for the timeline on the Dope Sheet. |
|
control text |
Change the color used for the control text on the Dope Sheet. These indicate the frame number of a key when you select one. |
|
control text shadow |
Change the color used for the shadow of the control text on the Dope Sheet. |
|
time label |
Change the color used for the time labels on the Dope Sheet. These indicate frame numbers. |
|
current frame |
Change the color used for the current frame on the Dope Sheet. This is a vertical line that indicates the current frame on the timeline. |
|
project frame range |
Change the color used for the project frame range on the Dope Sheet. These are two vertical lines indicate your frame range. |
|
Contact Sheet |
|
|---|---|
| show border | Toggle the shot border on or off. |
| border color | Change the border color of shot items. |
| Pick Mode Fill Color | Change the fill color of shots in the sequence viewer. |
| Pick Mode Border Color | Change the border color of shots in the sequence viewer. |
| default resolution | Defines the default output resolution of the Contact Sheet. |
| default max row count | Sets the default maximum number of rows on a Contact Sheet Page. |
| default max column count | Sets the default maximum number of columns on a Contact Sheet Page. |
|
Control Panels |
|
|---|---|
|
max nodes in properties bin |
Use this to set the maximum number of panels that can be open in the Properties pane. |
|
reopen acts like new panel |
When this is enabled, double-clicking a node that has been open before, places the panel in the same place as a new panel. If this is disabled, the panel appears in its previous position. |
|
expand / collapse panels in Properties bin to match selection |
If this is enabled, the node selection in the Node Graph determines which control panels are expanded (all unselected nodes automatically have their panels collapsed). This does not apply to floating control panels. |
|
input button action |
Use this to define node input button action, which is located in the top-left of the node properties panel. For example, you can set this to center a selected input of a node in the Node Graph. |
|
max items channel menu |
Use this to set the maximum number of channels or layers that are displayed in a single sub-menu of the main channel control. |
|
Color Panel |
|
|
color picker button opens |
Sets the type of color picker displayed when you click a color picker button in the properties panel: • in-panel color picker - opens a color wheel and sliders in the properties panel. • floating color picker - opens a color wheel and sliders in a floating panel. Tip: Holding Ctrl/Cmd and clicking the color picker button opens the alternate color picker to the one specified in the Preferences. |
|
File Browser |
|
|---|---|
|
start file browser from most recently used directory |
When enabled, new file browsers open at the last location used. When disabled, new file browsers open at the current working directory. |
|
Node Colors |
|
|---|---|
|
autocolor |
Deselect this checkbox to ignore individual |
|
Shade Nodes |
Select this checkbox to apply a slight gradient shading to nodes. |
|
<node name or type> |
The
|
|
All Others |
Use this to select the color to use as default for all |
|
Text |
Use this to select the color used for node label text. |
|
Selected |
Use this to choose the highlight color applied to any selected nodes. |
|
Selected Input |
Use this to choose the color used for node inputs' label text when selected. |
|
GL Color |
Use this to select the color to draw nodes' Viewer controls in. For example, the Ramp node's gradient control. |
|
Node Graph |
|
|---|---|
|
autolabel |
When disabled, nodes only show the filename or node name - most of the code in autolabel.py is disregarded. For example, the Blur node does not display the affected channels when this control is disabled. |
|
highlight running operators |
When enabled, highlight any nodes whose output is currently being calculated. |
|
postage stamp mode |
When displaying a thumbnail render of the node’s output on its surface (either using the PostageStamp node or the postage stamp control on the Node tab of each node), you can select one of two modes: • Current frame - The postage stamp is always updated to match the current frame. • Static frame - The postage stamp displays a fixed frame. To specify the frame to use, open the node’s controls, go to the Node tab, and adjust static frame. Note: If the frame number you use is outside the frame range for the node, it is clamped to the first or last frame in the range accordingly. |
|
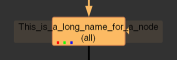
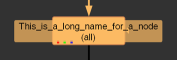
node name background |
When a node is selected and the node’s name is too long to fit inside the node, a background is drawn behind the name to improve legibility. Use this control to set the intensity of the background, from 0 (no background) to 1 (fully opaque background).
|
|
label font |
Sets the font for labels. You can use the B and I, to the right of the font dropdown, to bold or italisize the selected label font. |
|
tile size (WxH) |
Sets the size of nodes in the Node Graph using the width and height. |
|
snap to node |
When enabled, nodes snap into positions (while dragging them) that line up horizontally and vertically with their inputs and outputs. |
|
grid size (WxH) |
Sets the grid size using width and height. |
|
snap to grid |
When enabled, nodes snap into positions (while dragging them) that line them up with the grid. |
|
show grid |
When enabled, display the grid using the overlay color. |
|
snap threshold |
When snap to grid is enabled, use this to set the maximum number of pixels to jump by, when snapping nodes to the grid or other nodes. |
|
Colors |
|
|
Node Graph |
Sets the color of the Node Graph background. |
|
Overlay |
Sets the color of the selection marquee when you lasso nodes. |
|
Elbow |
Sets the color of the dots created when you 'elbow' a connection pipe by holding Ctrl/Cmd. |
|
Bounding Box Warning |
|
|
Highlight |
When the bounding box warning is enabled, sets the color of the warning displayed on nodes that exceed the threshold. |
|
Line |
When the bounding box warning is enabled, sets the color of the dotted line around the Highlight color on nodes that exceed the threshold. |
|
enable |
When enabled, nodes that force the bounding box past the format size are marked in the Node Graph: • red rectangle with dotted stroke - the indicated node creates a bounding box greater than the format. • dotted stroke without the red rectangle - the bounding box size is greater than the format at the indicated node, but the bounding box size has been set by an upstream node. |
|
threshold % |
Sets the threshold past which the bounding box warning is displayed. |
|
Arrow |
|
| <directional arrows> | You can select one of the directional arrows (up, down, left, or right) to change the color it is displayed in. Click the arrow to open the color menu and select a new color. |
|
deep arrows |
Sets the color of arrows carrying deep data. Click the button to open the color menu and select a new color. |
|
expression arrows |
Sets the color of expression arrows, if enabled. Select the enable checkbox to display expression arrows. |
|
link knob arrows |
Sets the color of arrows indicating that a node contains linked knobs, that is, knobs that are in use in another node's Properties panel. Select the enable checkbox to display link knob arrows. |
|
clone arrows |
Sets the color of clone arrows, if enabled. Select the enable checkbox to display clone arrows. |
|
<arrow components> |
Sets arrow and arrow head, lengths and widths. You can also use the numeric field next to each component to enter a specific value. |
|
allow picking of connected arrow heads |
Select this checkbox to be able to pick up and move connected arrow heads. |
|
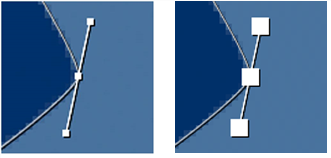
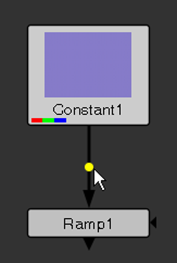
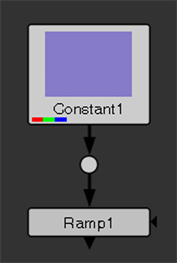
allow picking of arrow elbows to create Dots |
When enabled, press Ctrl (Cmd on a Mac) on the Node Graph to display yellow “elbows” on the Node Graph arrows and then click on these to insert Dot nodes.
If you Ctrl/Cmd+Shift+click on an elbow, the new Dot node is branched off to a new arrow rather than inserted in the existing arrow. When disabled, adding Dot nodes in this manner is not possible. |
|
drag-to-insert only work near middle of arrows |
Select this checkbox to restrict the arrow hotspot, for inserting nodes, to the middle of the arrow. |
|
size of dots |
Use this slider to set the size of the Dot nodes. You can also enter a specific value in the numeric field to the left of the slider. |
|
Disconnect Nodes |
|
|
shake to disconnect nodes |
When enabled, click and hold a node or selection of nodes, and then shake the pointer to disconnect the selected nodes. |
|
shake sensitivity |
Determines the sensitivity of the shake to disconnect nodes feature. Higher values mean less shaking to disconnect nodes. |
| Group View | |
| Global Group View Disable | Turns off Group View across your whole project. When this is checked, the ability to show group views will be disabled and all currently visible group views will become invisible. |
| Zoom | |
| Middle Click Zooms to Fit | When this is checked, clicking the middle mouse button on the Node Graph will zoom the Node Graph to fit all Nodes. |
|
Project Items |
|
|---|---|
|
shade project items |
When enabled, additional shading is applied to source clips and shots in the Project bin and timeline. |
|
Item Labels |
|
|
project bin |
Click to change the color of labels in the Project and timeline panels. A color wheel displays allowing you to select the required color. |
|
timeline |
|
|
auto-adjust contrast |
When enabled, label colors are automatically adjusted if a potential color-clash is detected. |
|
Item States |
|
|
offline |
Click the buttons to change the color of shots and comps in the timeline panel. A color wheel displays allowing you to select the required color. |
|
error |
|
|
freeze |
|
|
comp not rendered |
|
|
comp out of date |
|
|
comp rendered |
|
|
Item Colors |
|
|
display in project panel |
When enabled, the specified item colors, or defaults, are displayed in the Project panel. |
|
display in sequence panel |
When enabled, the specified item colors, or defaults, are displayed in the timeline panel. |
|
spreadsheet color rows |
When enabled, the specified item colors applied to rows in the spreadsheet. |
|
project |
Click the buttons to change the color of items in the Project and timeline panels. A color wheel displays allowing you to select the required color. |
|
bin |
|
|
sequence |
|
|
source |
|
|
audio |
|
|
comp |
|
|
file types |
Allows you to add custom color-coding by file extension. Click the Any source clip or shot with that extension is then colored accordingly in the interface.
|
| Item Behavior | |
|
Keep the source folder structure when pasting between projects |
When enabled, pasting bin items between projects creates the same folder structure as the original project. When disabled, pasting bin items between projects adds the items to the root folder of the project. |

|
Scopes |
|
|---|---|
|
black point |
Use the slider or the entry box to select the black point value. |
|
white point |
Use the slider or the entry box to select the white point value. |
|
luma/chroma encoding |
Use this to select the video standard to use when converting from RGB to luma and chroma for scope display. |
|
Include viewer color transforms |
Select this checkbox to include applied Viewer color transforms (gain, gamma, and LUT) in scope data. If this checkbox is disabled, all Viewer transforms are ignored. Note: If disabled, rendering may become slow as image calculation may be needed. |
|
Force full frame |
Select this checkbox so that the Viewer always requests full frame data when a scope is displaying data for that Viewer. If this checkbox is disabled, the scopes only display data for the current area requested by the Viewer, rather than the whole image. |
|
Script Editor |
|
|---|---|
|
font |
Use this to select the font to use in the Script Editor. Note: This control also changes the font in the BlinkScript Kernel Source field. |
|
indent |
You can use this control to set the indent value to use when scripting. |
|
save and restore script editor history |
Disable this checkbox if you prefer that the contents of the Script Editor is not saved and restored between sessions of Nuke. |
|
echo python comments to output window |
Select this checkbox to print any Python commands executed by Nuke itself to the Script Editor output window. Note: Note that not everything you do results in a command being echoed, because many of Nuke's internal functions are not executed using Python commands. |
|
clear input window on successful script execution |
Disable this checkbox if you want the most recent script to remain in the input window after execution. |
| BlinkScript | |
| Default Library Files Directory | Set the default path to look for Blink library files. |
|
Timeline |
|
|---|---|
|
Highlight clones of selected clone(s) |
When enabled, selecting a clone in the timeline highlights all clones associated with the selected clone. |
|
Playhead |
|
|
Show frame end marker |
When enabled, an extra line is drawn on the timeline to the right of the playhead, indicating the end of the current frame. |
|
Show buffer labels |
When enabled, A/B labels are displayed on the buffer indicators at the playhead if the buffers are enabled and have shots assigned. |
|
Visible range follows playhead |
When enabled, the timeline scrolls with the playhead, constantly updating the view. When disabled, the playhead is allowed to move off screen. |
|
Use the Shift key to insert a new track between existing tracks while dragging |
Disable this to drag to insert a new track without pressing the Shift key. Inserting a new track on the top of the timeline does not require the Shift key. |
|
Audio Tracks |
|
|
half waveforms |
When enabled, audio tracks on the timeline display only the rectified waveform. When disabled, the full waveform is displayed. |
| Selection | |
| Auto-selection mode enabled | Toggles whether the auto-selection feature is on or off by default. Setting an environment variable NUKE_DISABLE_SOFT_SELECTION overrides this preference. |
|
Viewer (Comp) |
|
|---|---|
|
Defaults |
|
|
default renderer |
Currently, only one Hydra delegate is available in Nuke, the GL renderer, which handles the USD-based geometry. Classic 3D system geometry is still drawn with Nuke's classic renderer, regardless of which Hydra render delegate you choose. In future releases, more render delegates will be made available. |
|
new Viewers go to own window |
When enabled, new Viewers are placed in their own window instead of docking in existing windows. |
|
prevent auto zoom for new Viewers |
When enabled, new Viewers are not auto-zoomed to the current Viewer's zoom level. |
|
apply LUT to color channels only |
When enabled, look-up tables (LUTs) are only applied to the red, green, and blue channels. When disabled, LUTs are applied to all channels. |
|
viewer buffer bit depth (byte) |
Use this to select the OpenGL buffer depth, and enable use of the GPU for the Viewer process and input process. • byte – Converts to 8-bit with error diffusion. • half-float – Converts to 16-bit (half) float. In this mode, the GPU can be used to apply Viewer effects like gamma and the LUT in a Viewer process. • float – Uses a full 32-bit floating point texture. This may be slow on selected cards. In this mode, the GPU can be used to apply Viewer effects like gamma and the LUT in a Viewer process. You can choose a default value for this setting in the Preferences, or by using knobDefault() in a startup script. |
|
use GPU for Viewer when possible |
When this is checked, the Viewer applies its effects (such as the Viewer Process node) in the GPU when possible. However, in some cases, like when monitor out is enabled or gl buffer depth is set to byte in the Viewer settings, effects (such as gain and gamma) must still be computed on the CPU. |
|
use GPU for inputs when possible |
Normally, the Viewer only attempts to run its own effects (such as the Viewer Process node) on the GPU. However, when this is checked, any nodes connected to the Viewer are also computed on the GPU when possible. Note that this cannot be done for all nodes because not all nodes have a GPU implementation. If nodes are computed on the GPU, the color values displayed in the Viewer are inaccurate. This is because they show the color from the last node computed in the CPU prior to transferring the image into the graphics card. |
|
disable GPU Viewer dithering |
Check this to disable dithering in the Viewer when you’re using half-float depth. Uncheck to allow dithering at all times. |
|
dithering algorithm |
Sets the frequency of dithering applied to GPU enabled compositing Viewers, so that you can be sure you're working in a consistent environment: • high frequency - the default setting, applies a high frequency dithering algorithm in screen space, after any viewer rescaling is applied. As you pan and zoom the Viewer, dithered pixels remain the same scale. • low frequency - applies a low frequency dithering algorithm in image space, before any viewer rescaling is applied. As you zoom in the Viewer, dithered pixels get bigger. • no dithering - disables GPU dithering. |
|
Note: When the Viewer AB mode is changed to wipe or stack, the state of the GPU acceleration controls is stored, GPU acceleration is turned off, and GPU dithering is disabled. |
|
|
no incomplete stereo for new viewers |
When this is checked, the Viewer only displays one view of a stereo project until both views have been rendered. This is to prevent disorienting effects when watching the results. When this is not checked, the Viewer displays both stereo views, even if the render of either is incomplete. |
|
show hardware stereo warning |
When enabled, a warning message is displayed in the Viewer when you switch to OpenGL Stereo mode. |
|
Settings |
|
|
flip stereo interlaced views |
Select this checkbox to flip the left and right stereo views when the Viewer is set to Stereo Mode > Interlaced in the right-click/context menu. |
|
texture size |
Use this to define the OpenGL texture size in Nuke's Viewers. It affects the 2D Viewer preview texture size, such as the preview displayed when dragging transform or SplineWarp handles, and all textures in the 3D Viewer. You can choose from 256x256, 512x512, 1024x1024, and 2048x2048. Note: The larger the texture size, the sharper it is, but larger texture sizes need more time and memory. Setting this preference to a high value can impact 3D Viewer performance. |
|
texture mode |
Use this to choose how textures are handled in the Viewer. You can choose from the following options: • Multiframe – Cache each frame of a texture; this gives animated textures and fast playback after each frame is cached, but uses a lot more memory. It also enables you to have multiple frames of a texture visible at one time (for example, on particles). • Classic – Textures are not updated in the Viewer during playback; this gives the fastest playback speed. |
|
Viewer (Monitor Out) |
|
|---|---|
|
use video legal range for monitor out |
When enabled, automatically limit monitor out to the legal range when swapping between the Timeline environment and Compositing environment. |
|
always keep the floating window on top |
When enabled, Nuke's internal floating monitor out window always remains on top of other open application windows. |
|
Enable support for HMD devices |
When enabled, VR headsets such as the Oculus Rift and HTC Vive are added to the Monitor Out > Device dropdown. Choose the required headset from the dropdown to pass the monitor out to the selected device. See Reviewing on VR Headsets (HMD) for information on supported headsets. |
| Enable global monitor out mode | Makes all viewers share the same monitor output, including node graph and timeline viewers (Nuke Studio). Requires a restart to take effect. |
|
Mouse Pointer Scale |
Sets the size of the pointer displayed on the monitor when the Show Pointer control is enabled for Nuke Studio monitor out. |
|
Background |
|
|
[background] |
Sets the background color used to fill Nuke's floating window when the output is not full-frame: • Black • Gray - use the slider to the right to set the brightness of the plain background. • Checkerboard - use the slider to the right to set the brightness of the checkerboard background. |
|
NDI |
|
|
Enable NDI |
When enabled, you can stream Viewer output over the local network from the Monitor Out controls using NDI from NewTek. |
|
Viewer |
|
|---|---|
|
default flipbook |
Sets the default flipbook mode, Nuke's Flipbook Viewer or HeiroPlayer. • Flipbook Viewer opens a new Viewer inside Nuke containing the flipbooked content. • HieroPlayer launches an instance of the application containing the flipbooked content, but requires either a Nuke Studio or HieroPlayer license. |
|
playback mode |
Use this to set the Viewer playback mode: • Play All Frames - the default setting, plays all frames in real-time (dependent on hardware). • Skip Frames - plays frames in real-time skipping where necessary to maintain the frame rate. • Play All Frames, Buffering - plays all frames by buffering and playing frames back as they become available. |
|
guides |
You can use this to choose to show overlays in the image area. You can choose from: • Title Safe – Indicates where text should be entered to be visible. • Action Safe – Indicates the area in which to place actions so that they are visible. • Format – Displays the size of the format over the Viewer. |
|
fullscreen display |
Use this to select which display to use for fullscreen mode. This setting takes effect the next time fullscreen mode is entered. |
|
see through missing media |
Select this checkbox to see through missing media in the timeline, displaying the first displayable media in the underlying tracks. |
|
background |
Use this to select the Viewer background. You can select black, or gray (using the slider to determine the grayscale), or checkerboard (using the slider to determine the brightness). |
|
frame increment |
Use this to set the default number of frames skipped by the Viewer skip controls, and the timeline Nudge More commands. |
|
filtering mode |
Use this to determine the filtering used during rendering in the Timeline environment. You can select Auto, Nearest neighbour, or Linear. Auto uses ths same automatic selection as in the Compositing environment. This does not affect exports or rendering in the Compositing environment. |
|
Audio |
|
|
default latency adjustment (ms) |
Use this to adjust the default timing offset (in milliseconds) between audio and video to apply to new Viewers. Positive values make audio play earlier relative to video; negative values make audio play later. To convert from video frames to ms, divide 1000 ms by the video frame rate. For example: • at 25fps, a video frame is 1000/25 = 40ms, or • a 1.5 video frame delay = 1.5 * 40ms = 60ms. |
|
default volume |
Use the slider or numeric field to set the default volume. |
|
Viewer Handles |
|
|---|---|
|
Colors |
|
|
2D |
• bg – Change the background color of the 2D Viewer. • fg – Change the color of borders and text in the 2D Viewer. |
|
3D |
• bg – Change the background color of the 3D Viewer. • fg – Change the color of borders and text in the 3D Viewer. • sel –Change the color of the selected vertices or faces of an object in the 3D viewer. |
|
Splines |
|
|
line width |
Sets the width of splines drawn in RotoPaint and SplineWarp. |
|
draw shadows |
When enabled, shadows are added to splines drawn in RotoPaint and SplineWarp to make the overlay easier to see. |
|
general |
• Expression color – Change the default color of the control points when an expression is set. • Focus color – Change the default color of the control points when focused. |
|
roto |
• Points - Change the default color of the points on RotoPaint shapes and strokes. • Curves - Change the default color of the rotoshape and stroke curves in RotoPaint and Roto. • Transform - Change the default color of the RotoPaint transform jack. • Locked - Change the default color of RotoPaint points and curves when locked or otherwise unmodifiable. |
|
splinewarp |
• A Sourcecolor - Change the default color of SplineWarp’s A source curves. • B Sourcecolor - Change the default color of SplineWarp’s B source curves. • draw source stippled - Check to change source curves from solid to stippled. • A Destinationcolor - Change the default color of SplineWarp’s A destination curves. • B Destinationcolor - Change the default color of SplineWarp’s B destination curves. • draw destination stippled - Check to change destination curves from solid to stippled. • Correspondencecolor - Change the default color of the SplineWarp correspondence lines. • Boundarycolor - Change the default color of the SplineWarp boundary curves. • Hardboundarycolor - Change the default color of the SplineWarp hard boundary curves. |
|
Note: To set a color back to its default, right-click on the button and select Set Color to Default. |
|
|
Controls |
|
|
middle button pans |
Check this to use the middle-mouse button to pan in the Viewer, Node Graph, the Curve Editor, and the Dope Sheet. |
|
left-middle to zoom |
Check this to use the left and the middle-mouse button together to zoom in the Viewer, Node Graph, the Curve Editor, and the Dope Sheet. |
|
show transform preview |
Check this to disable the OpenGL preview when manipulating the handles of 2D nodes, such as Transform and CornerPin. |
|
3D hotkeys |
Select the hotkeys control scheme you want to use in the 3D Viewer: Katana/Maya, Houdini/Flame, Blender, or Nuke Classic. |
|
3D navigation |
Select the navigation control scheme you want to use in the 3D Viewer: Nuke, Maya, Houdini, Lightwave, or Modo. |
|
3D transform handle size |
Sets the size of the transform handles in Nuke's 3D Viewer. |
|
3D handle size |
Adjust the size of the square control handles that appear when you’re, for instance, selecting vertices on a 3D object in the 3D view. By default, this value is set to 5. You can also set the pickable area size of the square control handles in the numeric field or slider to the right of the 3D handle size control. |
|
2D handle size |
Adjust the size of the square control handles that appear on the Viewer for some operations, such as transformations, warps, and Bezier and B-spline shapes.
By default, this value is set to 5. You can also set the pickable area size of the square control handles in the numeric field or slider to the right of the 2D handle size control. |
|
icon size |
Adjust the size of the 2D transformation overlay, 3D camera, 3D object normals, and 3D axis on the Viewer. By default, this value is set to 50. |
|
icon scaling |
Adjust how much the scale of display affects the size of the 2D transformation overlay, 3D camera, and 3D axis. When this is set to 0, these controls are always drawn the same size, regardless of the zoom level. When the value is set to 1, the controls scale with the displayed image or 3D scene when you zoom in or out. Intermediate values mix this so that the controls do scale, but not as much as the image does. This gives an optical illusion that you are zooming in or out without making the controls unusably small or large. |
|
object interaction speed |
Set how fast mouse movements rotate and translate 3D axis and cameras. The lower the value, the finer the movements. The default value is 1. |
|
camera interaction speed |
Set how fast mouse movements tumble and roll the 3D view in the Viewer. The lower the value, the finer the movements. The default value is 1. |