Compositing Viewers
A Viewer node displays the render output of any connected process nodes in the Viewer panel and does not edit any data. Viewer nodes allow you to quickly assign the right values to parameters as they allow you to edit in context - that is, edit a given node’s parameters upstream in a script while viewing the effect of those changes downstream.
Nuke's Viewer output is labeled with the bounding box size and the format. The bounding box is the area the Nuke treats as containing image data and the format is the resolution of the input image. These two are the same by default so that the output is the same as the resolution.
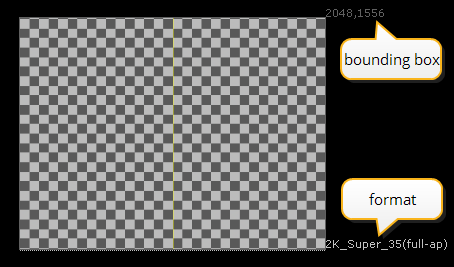
See Reformatting Elements and Adjusting the Bounding Box for more information on format and bounding boxes.
You can place as many Viewer nodes in a script as you wish, which allows you to simultaneously view multiple outputs. You can also pipe the output from up to ten process nodes into a single Viewer node, and then cycle through the various displays. This allows you to easily compare an image before and after processing by a given effect.
Note: The maximum image size the Nuke Viewer can display is 2^32 = 4,294,967,296 pixels. This is the same as 64k x 64k, 128k x 32k, 256k x 16k, or 512k x 8k. If your image is larger than this, it is resized and you get the following warning:
“Viewer image is clipped to <size> x <size>!”
For example, if your image resolution is 60,000 x 4473, Nuke is able to display the image because the number of pixels is less than 2^32. However, if the resolution is 110,000 x 50,000 (more than 2^32 pixels), the image is resized to 85,899 x 50,000.
In addition to the Viewer, this limit is also applied to the bounding box of the images being passed between each node.
Adding Viewer Nodes
Viewers have corresponding nodes that appear in the Node Graph. These nodes do not produce output for rendering; they generate display data only. You can connect Viewer nodes as described in Working with Nodes. In practice, it is faster to use the Viewer keyboard shortcuts described below.
To add a Viewer node:
| 1. | Select the node that you want to view the output of. |
| 2. | Do one of the following: |
• Using the menu bar, choose Viewer > Create New Viewer.
• Using the Toolbar, choose Image > Viewer.
• Using a keyboard shortcut, press Ctrl/Cmd+I.
Nuke connects a Viewer node to the node you selected in step 1, and displays the output of the node in the Viewer panel. You can also insert a Viewer node and set up its first connection by simply pressing 1 over the Node Graph.
Connecting Viewer Nodes
After you add a Viewer node to the script, you can quickly pipe any process node’s output to it simply by selecting the process node then pressing any number key. Doing so, pipes the output to one of the ten input ports available on every Viewer node (the 0 key represents the tenth slot).
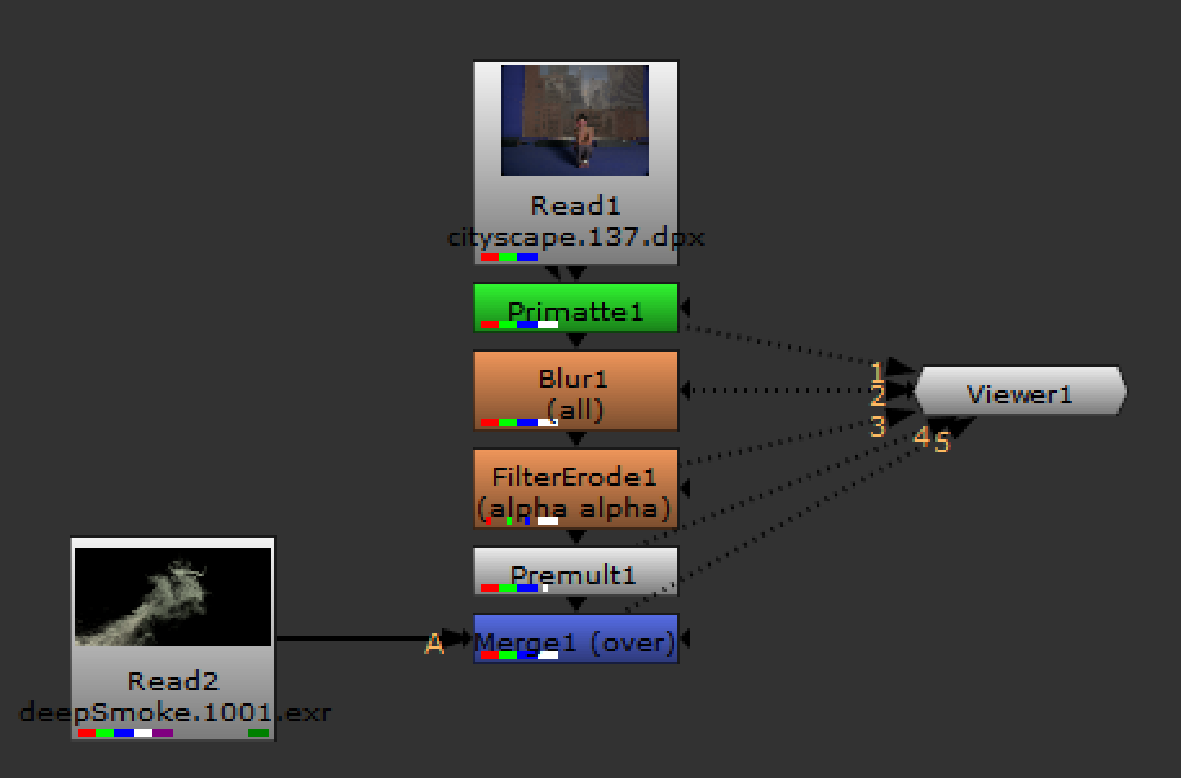
Toggling Views
If a Viewer node has multiple inputs, like the one depicted above, you can press the up or down arrow keys to quickly cycle through the views (your cursor needs to be in the Viewer window). To view a particular node press the number key (1, 2, 3... 0) corresponding to the pipe number whose contents you wish to view.
Panning and Zooming the Viewer Window
Nuke offers several ways, including some useful keyboard shortcuts, to focus on the area of the Viewer you need to see.
Panning the Frame
To pan the frame, hold the middle-mouse button and drag on the display (you can also use Alt+drag). The frame follows the mouse pointer.
Note: In many Linux windows managers, the Alt key is used by default as a mouse modifier key. This can cause problems in 3D applications where Alt is used for camera navigation in 3D environments.
You can use key mapping to assign the mouse modifier to another key, such as the ![]() (Super or Windows logo) key, but the method changes depending on which flavor of Linux you're using. Please refer to the documentation on key mapping for your particular Linux distribution for more information.
(Super or Windows logo) key, but the method changes depending on which flavor of Linux you're using. Please refer to the documentation on key mapping for your particular Linux distribution for more information.
Re-centering the Frame
You can re-center the frame by clicking the middle-mouse button or pressing F.
Zooming In and Out
To zoom in on the frame:
| 1. | Move your pointer over the area of the display on which you want to zoom. |
| 2. | Drag the mouse while pressing the middle mouse button and the left mouse button. |
OR
Press the plus button (+) repeatedly until the frame attains the desired scale.
OR
Select zoom in from the zoom dropdown menu in the top right corner.
To zoom out from the frame:
| 1. | Move your pointer over the area of the display from which you want to zoom. |
| 2. | Drag the mouse while pressing the middle mouse button and the left mouse button. |
OR
Press the minus button (-) repeatedly until the frame displays at the desired scale.
OR
Select zoom out from the zoom dropdown menu in the top right corner.
Restoring the Zoom to 100%
You can restore the zoom to 100% by pressing Ctrl/Cmd+1.
Showing / Hiding Floating Viewers
You can hide and show floating Viewers using a handy keyboard shortcut.
To hide or show a floating Viewer, press ‘ (the backtick key).
Showing / Hiding Viewer Toolbars
To hide or show the top toolbar, press {.
To hide or show the bottom toolbar, press }.
Locking the Viewer Zoom Level
You can choose to lock the Viewer zoom level, so that it doesn’t change when you switch between inputs of different sizes. Right-click on the Viewer, and select Prevent Auto Zoom to toggle between maintaining the same zoom level for all inputs (on) and changing it according to on-screen image dimensions (off). Alternatively, you can also press Alt+Z on Viewer, or toggle prevent auto zoom in the Viewer settings.
Viewing Overscan in the Viewer
If you want the Viewer to show overscan, that is any pixels extending beyond the left/right or top/bottom of the frame, you can check the showoverscan box in the Viewer settings or check the option in the Viewer right-click menu. Viewing pixels beyond the edges of the frame can be useful if some of your nodes need to have access outside the frame. You can also control the amount of overscan shown by specifying the pixel amount in the overscan field.