Displaying Views in the Timeline
You can only display the views that exist in your Project Settings. To see a list of these views, or to add or delete views, select Project > Edit Settings and go to the Views tab. For more information, see Creating Views in a Project.
Adding a multi-view clip to the timeline groups all views into a single track. All the views in the clip are assigned a Viewer button. Click the assigned view icon ![]() to display the views available in the shot. All Views are visible by default.
to display the views available in the shot. All Views are visible by default.
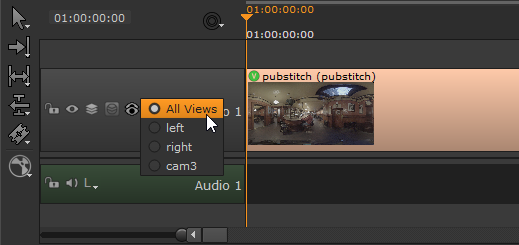
Selecting a particular view for a track in the timeline, such as left, means that only the left view is visible in the Viewer for that track.
Note: You can also import single-view files manually and then assign them views in the timeline individually, providing that the views exist in the Project Settings.
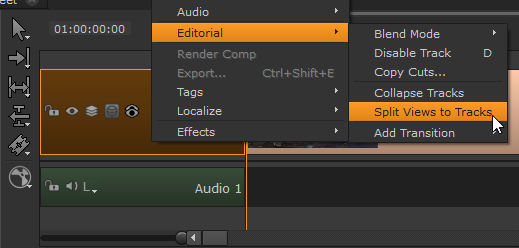
Splitting Views to Separate Tracks
Working with all views in a single track is not always convenient, such as when you need to apply different color corrections to stereo cameras. Nuke Studio includes a Split Views to Tracks option that quickly separates views into individual tracks. You can use Split Views to Tracks with grouped single- and multi-view shots.
| 1. | Right-click a multi-view shot on the timeline and select Editorial > Split Views to Tracks. |
A separate track is created for each view in the group or file.
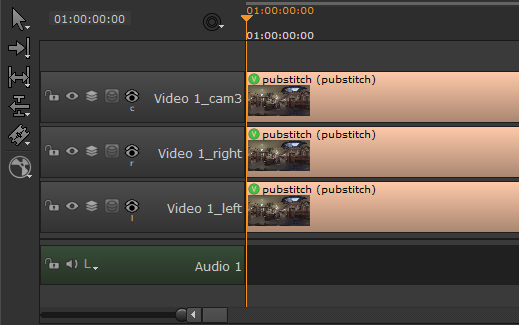
The new track names are suffixed with the view name, for example Video1_left, and the views are assigned appropriately.
Note: If a view exists in the Project Settings, but there's no corresponding view in the source files, empty placeholder tracks are added.
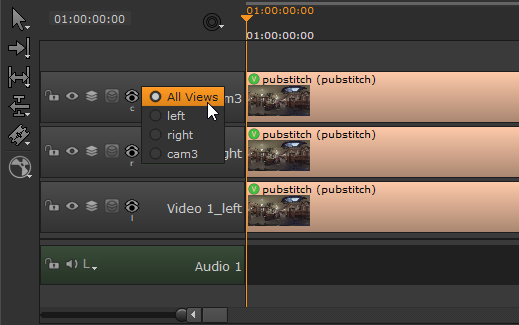
| 2. | You can change the view assigned to a track by clicking the |
See Applying Changes to Selected Views for information on adding soft effects to different views.
Displaying Two Views Next to Each Other
| 1. | Right-click in the Viewer and select the Stereo Modes menu. |
| 2. | Select on of the following options: |
• Side by Side - displays the views side by side at the correct aspect ratio, and adds selection controls above the Viewer.
• Squeezed Side by Side - displays the views side by side and squeezed to fit the format horizontally, and adds selection controls above the Viewer.
• Squeezed Above by Below - displays the views above and below each other and squeezed to fit the format vertically, and adds selection controls above the Viewer.
Displaying a Blend Between Two Views
| 1. | Right-click in the Viewer and select the Stereo Modes menu. |
| 2. | Select on of the following options: |
• Interlace H - displays the views interlaced horizontally, and adds selection controls above the Viewer.
• Interlace V - displays the views interlaced vertically, and adds selection controls above the Viewer.
• Checkerboard - displays the views using an alternating checkerboard pattern (one pixel from left and one pixel from right), and adds selection controls above the Viewer.
• Anaglyph - displays the views simultaneously using a red hue for left and green hue for right, and adds selection controls above the Viewer.
• Flicker - displays both views alternately, and adds selection controls above the Viewer.