Creating and Editing Occlusion Masks
Creating an Occlusion Mask
Note: Disparity vectors are required to generate an occlusion mask.
To generate an occlusion mask, do the following:
|
1.
|
If disparity vectors do not yet exist in the script, insert an O_DisparityGenerator node after your image sequence to calculate the disparity vectors. See DisparityGenerator for more information. |
Note: Disparity vectors may already exist in the image sequence, in which case you do not need to insert an O_DisparityGenerator node to generate an occlusion mask.
|
2.
|
From the toolbar, select Ocula > Ocula 4.0 > O_OcclusionDetector to add an O_OcclusionDetector node. Insert the O_OcclusionDetector node either after the O_DisparityGenerator node (if you added one in the previous step), or the stereo image sequence. Your node tree should now look something like this: |
|
3.
|
Open the O_OcclusionDetector controls. O_OcclusionDetector renders using the Local GPU specified, if available, rather than the CPU. The output between the GPU and CPU is identical, but using the GPU can significantly improve processing performance. See O_OcclusionDetector Controls for more details. |
|
4.
|
In the O_OcclusionDetector controls, you can see all the views that exist in your project settings under Views to Use. Select the two views you want to use to calculate the occlusion mask. The two views you select are mapped for the left and right eye. O_OcclusionDetector calculates the occlusion mask and stores it in the mask_occlusion.alpha channel. |
|
5.
|
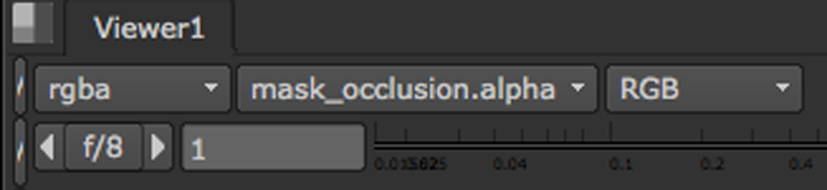
In the Viewer controls, set the alpha channel menu to mask_occlusion.alpha as shown below. |
|
|
Set this menu to mask_occlusion.alpha.
|
This sets the occlusion mask that O_OcclusionDetector generated as the channel displayed in the alpha channel.
|
6.
|
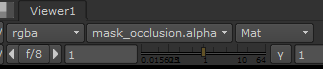
Next, you can either select Matte overlay from the RGB dropdown or press M on the keyboard with the Viewer selected, to superimpose that channel as a red overlay on top of the image’s RGB channels. |
|
|
Set RBG to Matte overlay
|

|
|
The red overlay indicates occluded regions where
picture building operations are likely to fail.
|
|
7.
|
Adjust the Gradient Threshold, Consistency Threshold and Dilate Occlusions controls as required to generate the best possible result. See O_OcclusionDetector Controls for information about the controls. |
|
8.
|
When you’re happy with the results, press M again to return to the RGB display. |
Manually Editing an Occlusion Mask
If there are occluded regions in the mask, which have not been marked correctly, you can manually edit the mask by doing the following:
|
1.
|
Press P on the Node Graph to add a RotoPaint node after O_OcclusionDetector. |
|
2.
|
To add regions to the occlusion mask, set output to mask_occlusion in the RotoPaint controls, and use the paint tools to mark additional regions. |
|
3.
|
To remove or correct existing occluded regions, set output to mask_occlusion in the RotoPaint controls, and set the paint brush color to black to manually paint out or correct the occluded areas. |
Rendering Out and Loading Occlusion Masks
To render and save the color channels, disparity channels and occlusion mask into the channels of a stereo .exr file, insert a Write node after the O_OcclusionDetector node. When you load the image sequence at a different time, the occlusion mask is loaded with it.
Note: If you correct occlusions using RotoPaint, insert a Write node after the RotoPaint node to include your corrections in the occlusion channel.
Editing Rendered Occlusion Masks
You can edit the rendered occlusion mask that you have loaded for use with O_FocusMatcher or O_ColourMatcher, using two different methods:
• Insert a RotoPaint node to adjust the occlusions manually with paint.
• Replace the occlusions by inserting a new O_OcclusionDetector. This overwrites the original occlusion mask. However, you can disable or delete the new O_OcclusionDetector node to revert back to the original mask.
