Flix Top Five Things to Onboard New Story Artists
Flix is designed to speed up and manage the various workflows feeding into the creation of a story. Storyboards, Dialogue, Notes from the director, annotations, every version sent and received from Editorial; it's all fed in and managed within Flix. As a Story Artist, you'll be working primarily in your sketching app, like Storyboard Pro. Flix makes your life easier as it tracks every version of a story sequence, acting as the hub that brings together everyone working on the story.
Here are the top five things that will help Story Artists get up and running quickly, so they can get back to focusing on creative tasks.
In the video:
1. Importing Artwork into Flix
1. Importing Artwork into Flix
The first thing you need to do is make sure your boards are in Flix. This makes sure they are backed up securely and that everyone in the production can see them. Once the boards are in Flix, they can be arranged into a sequence and the director can make notes, add annotations or send the sequence on to Editorial.
Flix supports multiple image formats, so artists can bring boards directly into Flix to construct shots and sequences. Imports can be flattened JPGs, PNGs and TIFFs you’ve already created, and PSDs from Photoshop or .sboard and .sbpz (packaged project) files from Storyboard Pro, if your artwork has layers you’d like to retain.
Note: Importing .sbpz files provides an optimized experience using less storage and reducing backup issues or loss of data.
Importing Image Files
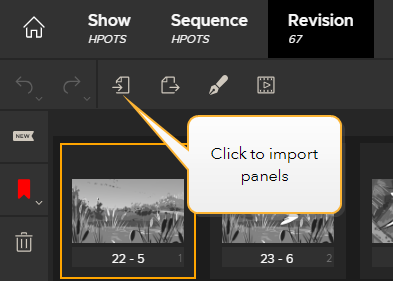
To import image files, simply drag and drop them directly into Flix's panel browser, or use the Import to Flix button at the top of the panel browser.
Importing PSD Files
You can import a PSD using the drag/drop method or the Import to Flix button, however, we recommend using the Flix interactive toolset in Photoshop to send the PSD file to Flix. This toolset can send layers, layer comps, thumbnails and frames directly from Photoshop’s canvas into Flix’s panel browser. See Flix for Story for more information or check out the Flix & Photoshop online video course.
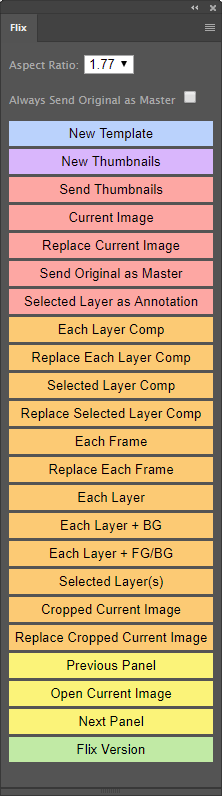
Flix/Photoshop toolset
Importing Storyboard Pro Files
You can easily import an entire project file from Storyboard Pro using the SBP Import button to browse for the desired .sboard or .sbpz (packaged project) file. This creates a new sequence revision which contains only panels from the Storyboard Pro file. Panels from other sequence revisions can be found in Flix’s Library tab, and drag/dropped into this new revision. See Flix for Story for more information or check out the Flix & Storyboard Pro online video course.
Note: .sboards and .sbpz (packaged project) are the only project file types that Flix supports from Storyboard Pro. Importing .sbpz files provides an optimized experience using less storage and reducing backup issues or loss of data.
For more information on importing panels and Flix workflows with Photoshop and Storyboard Pro, see Flix for Story. For video tutorials aimed at Story Artists, click here.
2. Panel ID vs Panel Index
What is the difference between a Panel ID and a Panel Index?
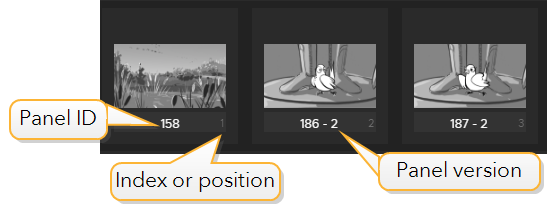
Each panel in Flix is assigned a unique Panel ID. This number never changes, so everyone on a production can trust they are always referring to the exact same panel.
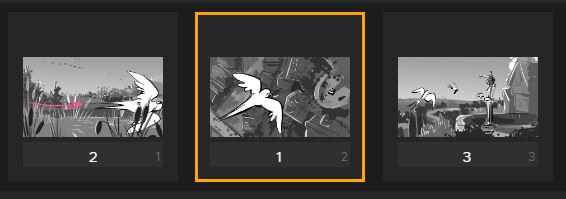
Default positions of Panel ID and Panel Index.
The Panel Index is simply the number that indicates the order of panels. It's always sequential. In other words, if you rearrange the order of panels, the indexes will change but the IDs will not.
If you prefer, you can swap the position of the Panel ID with the Panel Index.
Go to File > Preferences > Panel Browser > Swap Panel ID with Index and toggle the switch ON.
The Panel Index now appears in the center of the panel and the Panel ID is shown on the right.
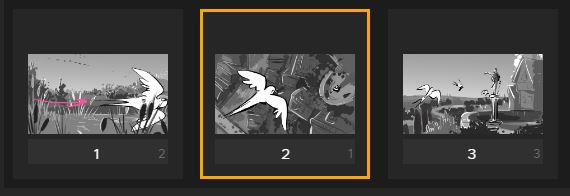
Panel ID and Panel Indexin swapped positions.
3. Editing Existing Panels
Throughout the storyboarding process, your director and colleagues will add annotations and comments in Flix to let you know that a panel or sequence revision needs changes. You can just open up the board straight from the sequence in Flix, rather than digging through folders on your local machine to find the original.
To edit the original Photoshop file:
-
Make sure Photoshop is your default sketching app. To check this, go to File > Preferences > Third-Party Apps and check the Sketching Tool is set to Photoshop.
-
In Flix's panel browser, select the panel you would like to edit in Photoshop.
-
Double-click the panel or use the Open in Sketching App button.
The master Photoshop document opens in Photoshop.
Note: The Current Image option in the Flix/Photoshop toolset sends a flattened PNG to Flix, so layers and layer comps won’t have been retained when that panel is reopened in Photoshop.
To send existing panels to Storyboard Pro for further editing:
-
Make sure Storyboard Pro is your default sketching app. To check this, go to File > Preferences > Third-Party Apps and check the Sketching Tool is set to Storyboard Pro.
-
Select the panel in Flix.
-
Double-click the panel or use the Open in Sketching App button.
Flix prompts you to export the full sequence revision as an XML file.
-
Click Export.
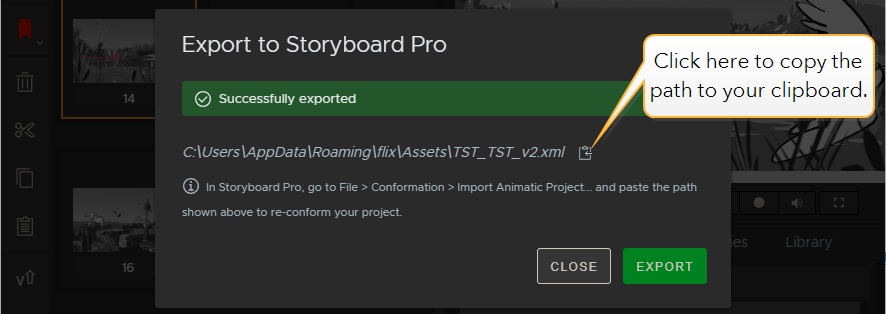
You can manually import the XML into Storyboard Pro, which reconforms the sequence with all the latest changes you made in Flix.
Switching Panel Versions
Each time you make changes to a panel within Flix, your previous Flix edits are still available to you as panel versions. If it turns out that your team prefers the previous iteration of a panel, just click on the space at the bottom of the panel and select the desired version from the Revisions list.
4. Adding Dialogue Text
If you receive script changes or decide to add different dialogue options to shots, you can use Flix to add dialogue to panels.
-
Click on a panel you’d like to add dialogue or other text to.
-
Type your dialogue in the text field in the Dialogue tab.
The text appears as subtitles in the Viewer.

Note: You can also select multiple panels and enter text in the Dialogue tab to have that text applied across all selected panels.
Tip: You can switch to use the Dialogue workspace if you prefer. Click on the Switch Workspace button at the top right of the panel browser.
Each time you revise a panel’s dialogue, the panel’s previous text is saved in Flix’s Dialogue History. If you’d like to revert to an earlier version of a panel’s dialogue, click on the Dialogue History button above the text field, and select the desired iteration.
For more information on working with dialogue in Flix, see Adding or Editing Dialogue.
5. Adding Audio to a Pitch
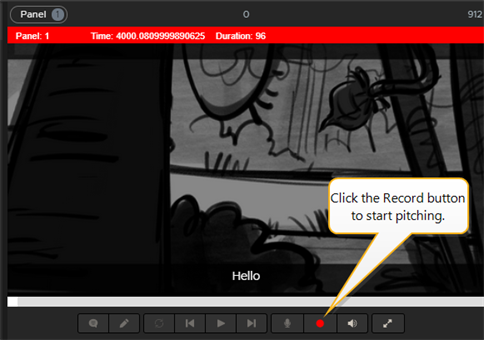
Flix allows artists to add vocals and sound effects to a sequence revision. This means you can get the sequence as close as possible to a worthy representation of the story, so decisions are made without any guesswork. Playing out your sequence in Flix can help artists determine if the pacing for each panel is right, or if the duration of certain panels should be adjusted to fit the overall timing of the sequence. You can even add the silhouette of an audience at the bottom of the viewer, so you're always reminded of the end goal.
-
Press the Record button underneath the Viewer.
-
Flix plays through the sequence.
Record your audio in time with the sequence revision.
Note: You can use pre-recorded audio to add background music or other sound effects by importing MP3 or WAV files, which are added in time with the panels.
Tip: When playing the sequence, press A to add an audience to the bottom of the viewer.
For more information on recording audio, see Recording a Pitch or the Flix for Story online video course.
Pitching the Final Sequence Revision
You can really only know how it plays when you screen it to a group. So, once your sequence is developed to a point where you're ready to show, you can play it to your team in Fullscreen/Pitch Mode. While in Pitch mode, annotations are not available, but you can toggle dialogue on or off, loop the playback, record additional audio, and adjust the volume.
If you prefer to pitch the sequence the traditional way, you can also simply step forward or backward through the sequence, using either your keyboard arrows or the Go-to buttons.