Getting Started
Flix is a story development hub for animated film and TV, gaming, and other visual narrative mediums. Watch the video below for a brief overview of how Flix works.
Navigating Through Flix
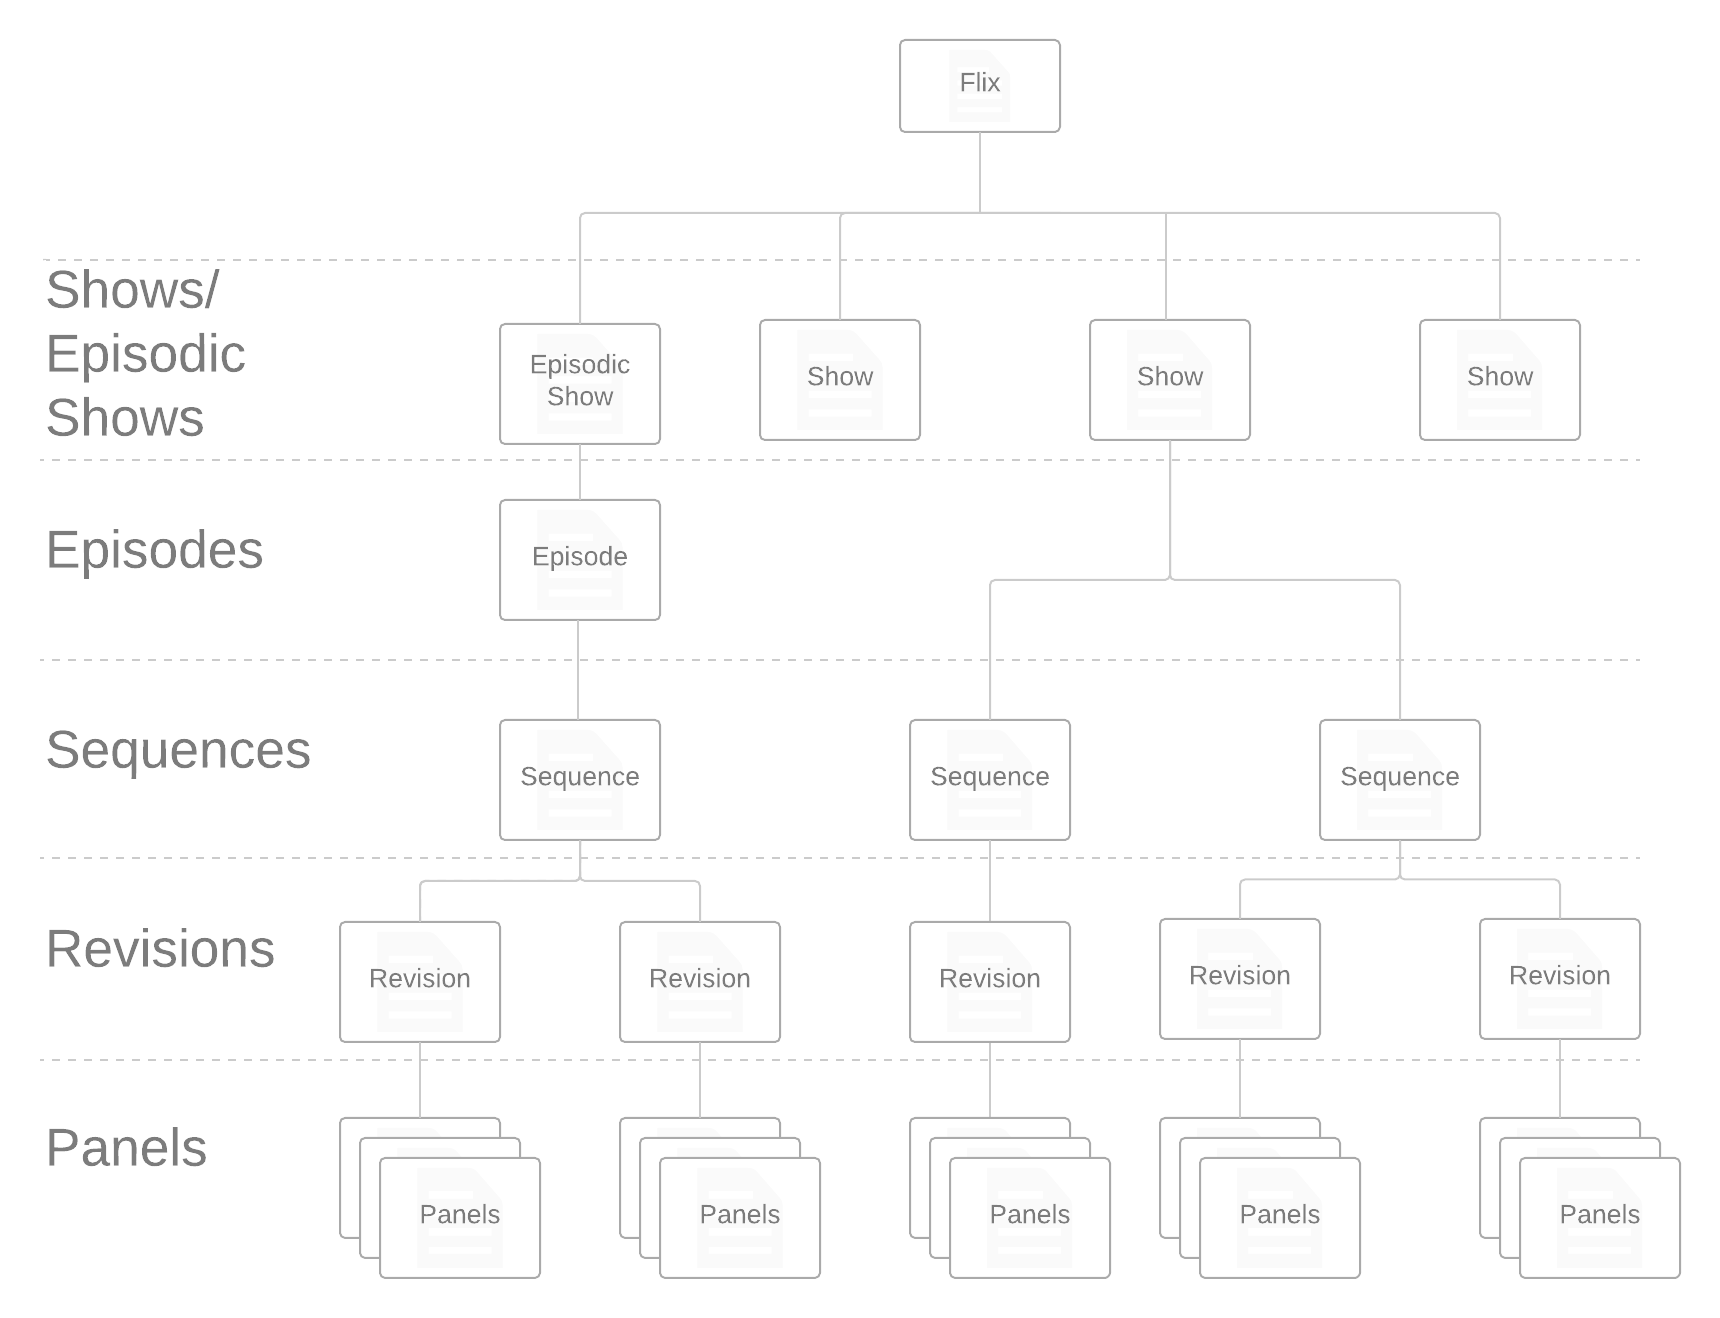
When you first log in to Flix, the Shows level displays the shows you are assigned to. The diagram below shows the hierarchy of how shows are organized along the breadcrumb. The breadcrumb is used to navigate back and forth through the levels of a project.


Loading an Existing Sequence
To open an existing sequence:
-
At the Shows level, click on the show to which you have access.
-
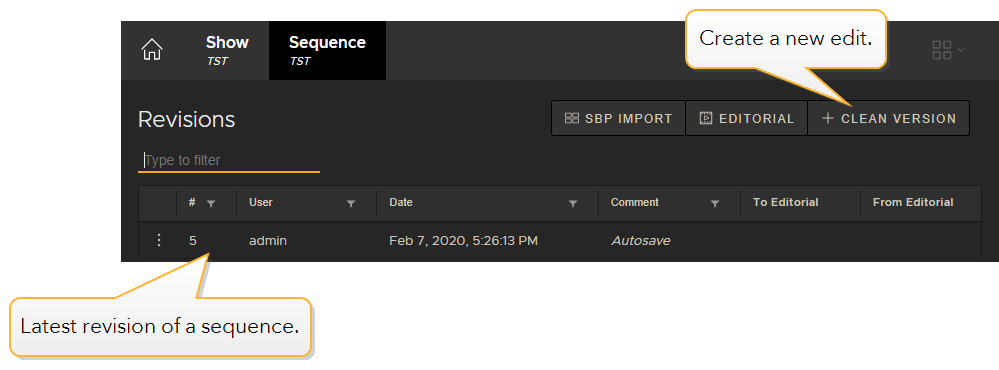
At the Sequences level, the most recent edit, or sequence revision, is always at the top of the list. If the list is long, you may want to use the filter to search for a specific comment. For example, "George's version".
-
Click on the revision to open it.
The image below shows the Revisions level of a show. Every revision is listed on this page, with the latest always at the top. Use the filter to narrow down the list by comments that contain specific terms.
Creating a Clean Version of an Edit
To create a brand new edit, or sequence revision, from scratch:
-
At the Revisions level, click Clean Version.
A blank Panel Browser opens. Here you can import new image files to start a new sequence revision.
Creating a Show
When you log in to Flix, you start at the Shows level. This is where you can open existing shows or create a new one.
The video below details how to set up a new show.
In the video:
-
Setting up a new Show
-
Setting up Flix with Photoshop
-
Click the + New Show button to create a new show.
-
Fill in the Details as described in the table below.
-
Click Create.
Your new show is added at the Shows level.
Details
| Property | Description |
|---|---|
| Tracking Code |
This information is used to keep track of shows. Note: The Tracking Code is mandatory and must contain between 1 and 10 characters. |
| Title | Input the working title of your show here. |
| Description | A short paragraph description of your show, which can be viewed at the Shows level when you hover over the show's thumbnail. |
| Preview Image |
Adds a thumbnail image for your show, which can be viewed at the Shows level. Note: You can use .jpg, .gif, .png files. The maximum resolution is 800 x 800 pixels. |
Configuration
| Property | Description |
|---|---|
| Frame Rate | Sets your show's frame rate. Choose from the common film and television frame rates up to 30fps. |
| Episodic |
Toggles whether your show contains episodes or not. This exposes a new option to set the Season number. |
| Default Aspect Ratio |
Sets the default aspect ratio to use for new sequences added to the show. Choose from the following ratios: 1.0:1 1.77:1 1.85:1 2.0:1 2.2:1 2.35:1 2.39:1 The aspect ratio will be reflected when you send your panels to Photoshop/ Storyboard Pro/ Premiere, and can be further customized on a per-sequence basis. |
Permissions
| Property | Description |
|---|---|
| Groups | Specifies the groups of users who can access this show. For more information on creating groups, please refer to Creating Groups and Assigning Roles to Manage Permissions. |
Editing a Show
-
Navigate to the Shows level in the breadcrumb, click the kebab menu
 and select Edit.
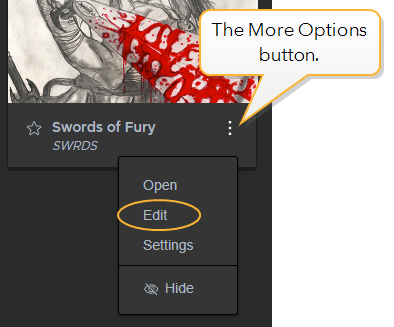
This opens the Edit Show dialog.
-
Here you can edit the Details, Configuration and Permissions for your show. For example, use this menu to change the frame rate or access permissions for a user group.
Warning: Changing the frame rate and/or aspect ratio of a show once story artists have begun work is not recommended, due to the fundamental impact on your production pipeline.
-
Click Update to save your edits.
Hiding a Show
Admin users and users that are specifically granted permissions can choose which shows are displayed at the Shows level.
To hide an existing show:
-
Navigate to the Shows level in the breadcrumb, click the kebab menu
and select Hide.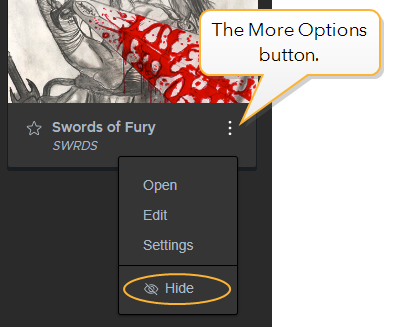
The show is invisible at the Shows level.
Note: Users with access to a show can still view it if it is hidden by toggling the Show hidden button on. This button is set to off by default. To completely disable access to a hidden show for a user, you must remove the user from the relevant permission group(s). See Control User Access with Group and Role Permissions for more information.
-
To unhide the show, click on the kebab menu
and select Unhide.
Starring a Show
If you have access to lots of shows, it can be useful to mark specific ones so they appear at the top of lists. Flix allows users to star shows and remembers this setting on a per-user basis, meaning if you mark a show as starred it will only appear starred for you.
To star a show:
-
Navigate to the Shows level in the breadcrumb.
-
Click the
 icon
on a show's tile.
icon
on a show's tile.The show is now marked important and appears at the top of your show list.
Creating an Episode
Episodes are shown at the first level down from Shows in the breadcrumb.
-
In the breadcrumb, navigate to the Shows level and open your show.
Note: If your show does not contain any episodes, a menu for creating a new episode opens here.
-
Click + New Episode.
The New Episode menu opens. Enter the details as listed in the table below.
-
Click Create.
You can continue creating additional episodes in this window. Click Close when finished.
Your new episode/s are listed at the Episodes level.
Note: Open an episode and click + New Sequence to create sequences, then follow the steps above.
| Property | Description |
|---|---|
| Tracking Code |
This information is used to keep track of shows. Note: The Tracking Code is mandatory and must contain between 1 and 20 characters. |
| Title | Use this to name your episode. For example, "The Big Wedding". |
| Episode Number |
Enter the episode number. For example, a common naming convention for is 101, 102 etc. |
| Description | Here you can write a brief synopsis of the episode. |
| Comments | Enter additional comments here. These can be viewed at the Episodes level in the Comments column. |
Editing an Episode
-
Using the breadcrumb, navigate to the Episodes level and click the kebab menu
, then Select Edit.
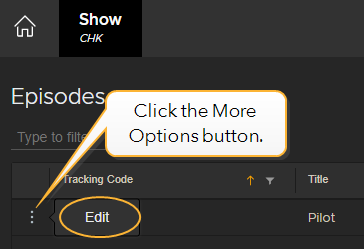
This opens the Edit Episode dialog.
-
Enter the new information for your episode.
-
Click Update to save your edits.
Hiding an episode
-
Navigate to the Episodes level and click the kebab menu
, then select Hide.
-
Switch the Show Hidden toggle on in the UI to display hidden shows. From this view you can click the kebab menu
, then select Unhide to restore the show's visibility.
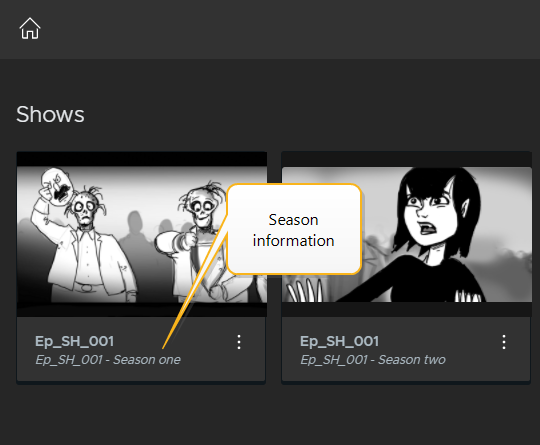
Creating Additional Seasons
A season of a show is stored at the Shows level and contains a number of episodes.
To create additional seasons:
-
Using the breadcrumb, navigate to the Shows level and select the required season. The season information is displayed under the thumbnail of your show.
-
Click the kebab menu
and select New
Season. 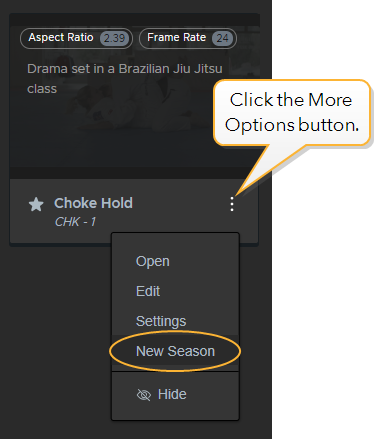
This opens the Create Show dialog. The details are pre-filled with the information you provided for the previous season.
-
In the Details section, you can add a thumbnail for the new season.
-
In the Configuration section, you can change the Season information. You can also change any other information if required. Click Next.
-
In the Permissions section, update the Groups if needed, then click Create.
Your new season is added at the Shows level.
Creating a Sequence
Sequences are shown at the first level down from Shows in the breadcrumb.
-
In the breadcrumb, navigate to the Shows level and open your show.
Note: If your show does not contain any sequences, a menu for creating a new sequence opens here.
-
Click + New Sequence.
This opens the New Sequence menu. Edit the values as listed in the table below.
-
Click Create.
You can continue creating additional sequences in this window. Click Close when finished.
Your new sequences or episodes are listed at the Sequences level.
| Property | Description |
|---|---|
| Tracking Code |
This information is used to keep track of shows. Note: The Tracking Code is mandatory and must contain between 1 and 20 characters. |
| Title | Use this to name your sequence or episode. For example, "Wedding montage". |
| Act | Specifies the act of the story in which your sequence occurs. |
| Aspect Ratio |
Sets the aspect ratio to use for this sequence. By default the show-level aspect ratio will be selected when creating a new sequence. Choose between: 1.0:1 1.77:1 1.85:1 2.0:1 2.2:1 2.35:1 2.39:1 This aspect ratio will be reflected when you send your panels to Photoshop/ Storyboard Pro/ Premiere. When using Photoshop, new Photoshop templates will also be created with the correct aspect ratio for the current sequence. Note: If the same artwork is imported into two sequences with different resolutions, the second import will transcode the artwork separately using the correct resolution. Similarly when you copy and paste a panel or import it from the library, Flix will also create a new asset with the correct aspect ratio.
|
| Comments | This description can be viewed at the Sequences level in the Comments column. |
Your new sequences or episodes are listed at the Sequences level. This list displays the key information of the Sequence:
• Act
• Tracking code
• Title
• Comments
• Aspect Ratio
• Last Revision
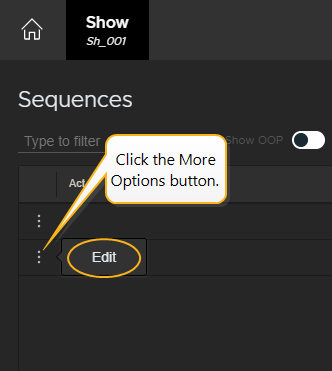
Editing a Sequence
-
Using the breadcrumb, navigate to the Sequences level and click the kebab menu
, then Select
Edit.
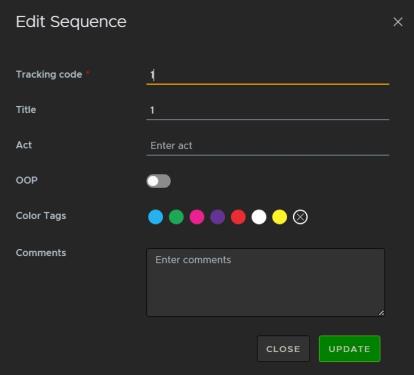
This opens the Edit Sequence dialog.
-
Enter new information for your sequence or choose a color tag for it.
-
Click Update to save your edits.
Viewing Sequence Revisions
Sequence revisions are organized in a table format, and can be navigated using the page navigation icons. These can be found at the footer. From left to right, they navigate to the following locations: First Page / Previous Page / Next Page / Last Page.
Use the Show Hidden button to view hidden revisions.
Color Tagging a Sequence
You can assign colors to Sequences to indicate ownership, state, purpose or use. For example the color green may be used to indicate sequences that have been signed off.
-
Navigate to the Sequences level and click the kebab menu
on a sequence, then select a color.
-
Select the
 button to remove a color tag.
Note: Color selection is also available when hovering over the Sequence tab in the breadcrumb at the top of the user interface.
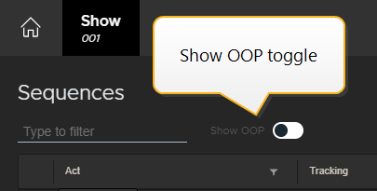
Hiding a Sequence
You may want to hide a sequence from your list if it has been cut from the story or shelved for later use. To do this:
-
Navigate to the Sequences level, click the kebab menu
on the required sequence and select
Edit.
This opens the Edit Sequence menu.
-
Click the OOP (Out Of Picture) toggle button.
The sequence is now hidden from the list.
-
Click Update to save this setting.
At the Sequences level, toggle the Show OOP button to reveal hidden sequences.
Keeping Edits Organized
To keep your edits organized, you can filter the Comments column at the sequence level by keyword.
For example:
-
Go to the Sequence level of your show.
-
Find a sequence revision at random in the list, then click on the kebab menu
and select Edit. -
Above the Revisions list, type the word "screening" into the filter.
Type in the comment "Use for screening" and click Save.
Only sequence revisions with comments containing that word are now displayed. This is a handy way of organizing a long list of sequence revisions.
Tip: If you are on the Panel Browser and make any change to a revision, such as adding dialogue or annotations, you can also add a comment and after saving it will be filterable at the Sequence Level.
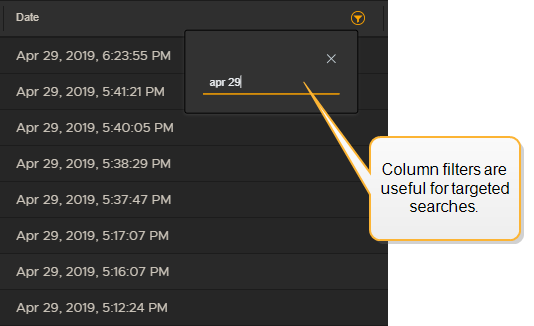
The User, Date and Comments columns each have their own filters, so you can narrow down your search results even further. See below.
Color Tagging a Sequence Revision
You can assign colors to Sequence Revisions to indicate ownership, state, purpose or use. For example the color yellow may be used to indicate sequence revisions that are currently in editorial.
-
Navigate to the Revisions level and click the kebab menu
on a sequence revision, then select a color.
-
Select the
button to remove a color tag. -
To filter a list of revisions by color, type the color name into the filter menu. For example, type "green" into the filter to display only revisions tagged with the color green.
Note: Color selection is also available when hovering over the Revision tab in the breadcrumb at the top of the user interface.
Hiding Sequence Revisions
-
Navigate to the Episodes level and click the kebab menu
, then select Hide.
-
Switch the Show Hidden toggle on in the UI to display hidden shows. From this view you can click the kebab menu
, then select Unhide to restore the show's visibility.
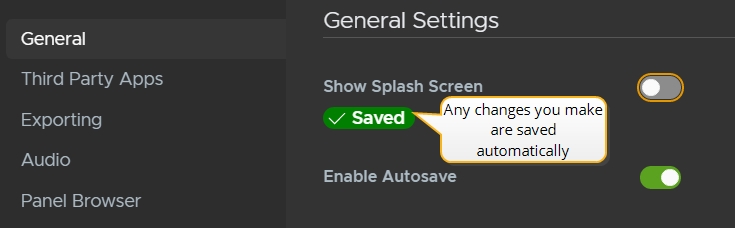
Managing Autosaves
Autosaves help when you need to revert back to a previous Sequence Revision, but they can lead to a list of hundreds of iterations. You may want to hide them to keep your list of revisions set to only display manual saves.
To automatically hide autosaves:
-
Navigate to Preferences > General Settings
Here you can enable or disable autosaves, set autosave frequency, and choose whether to hide autosaves automatically from view.
-
Toggle Automatically Hide Autosaves on.
Autosaves won't appear in your list of revisions until you toggle Show Hidden on the Revisions page.
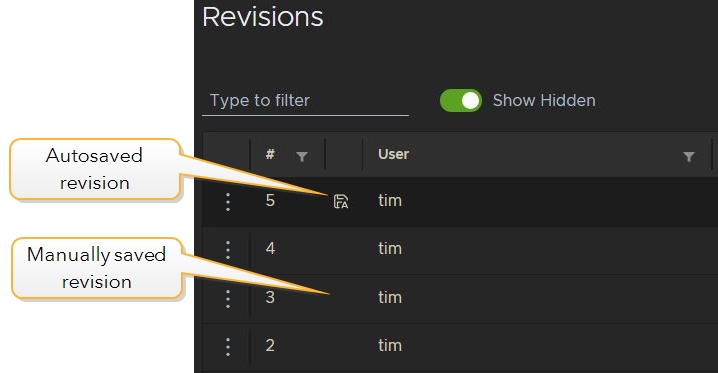
Autosaves are easily identified in the list of revisions by their autosave icon.
Settings & Preferences
Before starting work on a production, it is a good idea for an administrator to establish the settings for all Flix users first.
Note: Only administrators and users that are specifically granted permissions can make changes to the User Management, Group Management, and Studio Settings tabs in the Management Console. See Control User Access with Group and Role Permissions for more information.
Studio Settings
To set preferences at the studio level:
- Navigate to File > Management Console > Studio Settings.
- Edit the required preferences and enable their corresponding checkboxes under Enforce at Studio Level.
This overrides the preferences set in the File > Preferences dialog. They appear as read only in the Flix Preferences dialog.
Show Level Settings
To set preferences at the show level:
- Navigate to the Shows level, click the kebab menu on the required show and click Settings.
- Edit the required preferences and enable their corresponding checkboxes under Enforce at Show Level.
- On the Branding tab, you can select images and add a disclaimer to apply to any contact sheets you create during publish or export from the current show. See Customizing Contact Sheet Templates for more information.
This opens the Show Settings dialog for that specific show.
These settings override preferences set in the Flix Preferences dialog and at the studio level for that specific show, with the exception of the Branding settings, which only apply at show level.
Note: Studio and Show Settings can only be changed by administrators and users that are specifically granted permissions. See Control User Access with Group and Role Permissions for more information.
User Level Settings
To set preferences at the user level:
-
Navigate to File > Preferences.
-
Edit the required preferences, for example set your audio output device.
Setting Naming Conventions
Flix allows you to set naming conventions for file exports and publish directories using 'chips', which are placeholder shortcuts to metadata. They appear in the following format:
[date] [show_tracking_code] [show_title] [episode_tracking_code] [episode_title] [sequence_tracking_code] [sequence_title] [sequence_revision]
Note: Naming conventions can be enforced at the studio, show and user levels.
Tip: Environment variables can be used to construct publish and export paths. For example, %USERPROFILE% on Windows and ${HOME} on macOS.
Example 1
To set a default naming convention for exported sequences:
-
Go to File > Preferences > Exporting.
-
Click in the Filename Format field, then click on the chips at the bottom of the Preferences window to set your naming convention. The default is [show_tracking_code]-[sequence_tracking_code]-v[sequence_revision].
For example, if your show tracking code is 'THP', sequence tracking code is 'WED', sequence revision version is '25' and your default export path was /mnt/flix_publishes/ the full directory and exported file would be named /mnt/flix_publishes/THP-WED-v25.
All future exports follow this naming convention.
Example 2
To set a default naming convention for where Flix stores published files for Editorial:
-
Go to File > Preferences > Third Party Apps > General
-
Click in the Publish Directory field, then click on the chips at the bottom of the Preferences window to set your naming convention.
For example: Let's say your Publish Directory is set to /mnt/flix_publishes/[show_tracking_code]/[sequence_tracking_code]/[date]. If your show tracking code is 'THP', sequence tracking code is 'pilot' and the date is July 15 2020, the full directory would be /mnt/flix_publishes/THP/pilot/20-07-15/.
Note: The Publish Directory setting for both Windows and Mac is available at the studio or show level, for cases where multiple users might be on different operating systems.
Note: Flix will automatically create missing directories if they don't already exist.
Using the Panel Browser
The Flix Panel Browser is the workspace in which you'll spend most of your time. The video below gives a quick overview of how the Panel Browser works.
In the video:
-
Importing panels. For more information, please refer to Importing Panels into Flix.
-
Each panel displays a unique Panel ID and Index, or position number. If the panel has been updated, a new version is created and numbered.
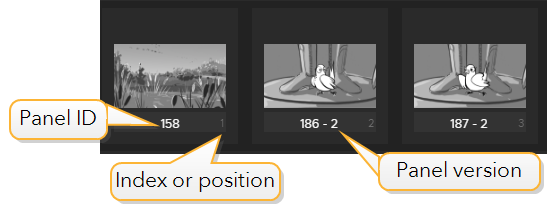
Note: You can swap the position of each panel's unique ID with its Index number. See Swap Panel ID with Index in Preferences.
-
Move panels around by selecting one or more, and dragging them where you want to place them. Hold Shift and click to select a sequence of panels, or Ctrl/Cmd and click to select individual panels.
-
Remove panels from your current edit by clicking the Trashcan icon in the Edit toolbar.
-
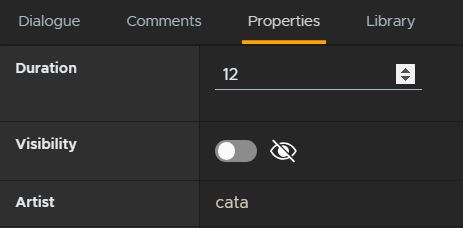
Hide panels by clicking on the panel and toggling Visibility in the Properties tab.
-
Re-use panels by using the Copy and Paste buttons in the Edit toolbar. This creates new panels re-using the same panel, timing, and dialogue.
-
Adding and versioning dialogue.
Tip: Duplicate selected panels with the  Duplicate button.
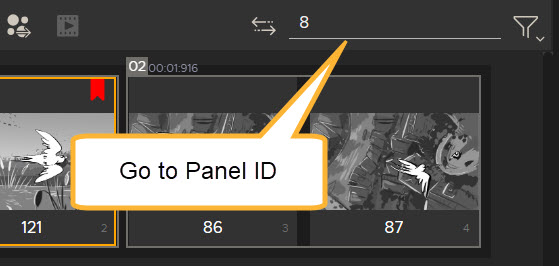
Quickly Locate Panels Using the Panel ID
A sequence can contain hundreds of panels, but you can search by panel ID in the dedicated search bar to quickly locate the panel you need. Enter a panel ID and press Enter to select any match in the sequence.
If no match is found, a warning icon  is displayed
in
the Go to panel ID field. Panel search does not hide other panels in the
revision
in the same way as the filter.
is displayed
in
the Go to panel ID field. Panel search does not hide other panels in the
revision
in the same way as the filter.
Highlighting Panels
To highlight panels in your sequence:
-
In your edit (sequence revision), select one or more panels.
-
In the left toolbar, click and hold the Highlight button and click on a color.
These selected panels are tagged with the chosen color.
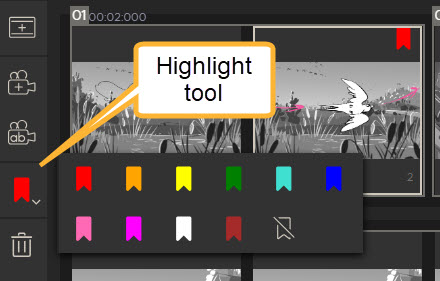
To remove highlights:
-
Select the highlighted panels.
-
In the left toolbar, click and hold over the Highlight button.
-
Click the No Highlight icon (
 ).
).This removes the highlight from the selection.
Filtering by Highlights
You can filter panels by highlights through the filter ( ) button in your sequence revision, and go to the Filter by highlights section.
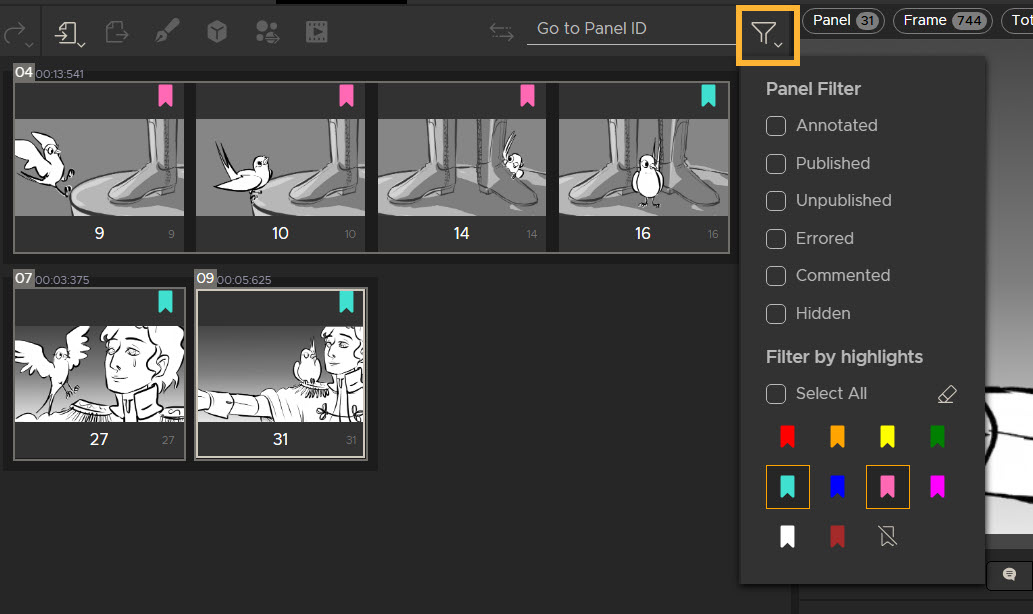
You can filter by a single color highlight, or alternatively select multiple highlights or no highlights. Click the erase button ( ) icon to remove all the currently-selected highlight filters.
Hiding Panels
Artists may have panels in a sequence that they need, but don't intend to send to editorial, such as reference artwork. Hidden panels are skipped during export, publish, pitch recording, and playback operations.
To toggle a panel's visibility:
-
Click on the panel.
-
Open the panel Properties tab.
-
Toggle the panel Visibility off.
Tip: It may be necessary to hide panels from visibility for troubleshooting purposes, like in cases where an artist needs to send a sequence to editorial that contains panels with errors. Hiding those erroneous panels means they are skipped in the export to editorial.
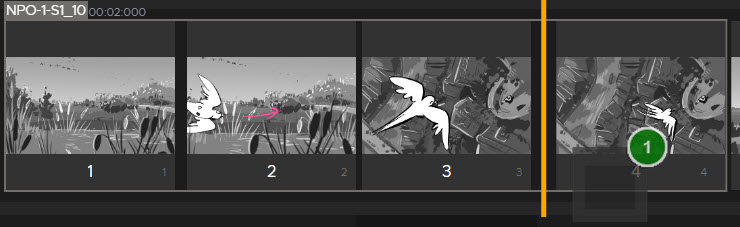
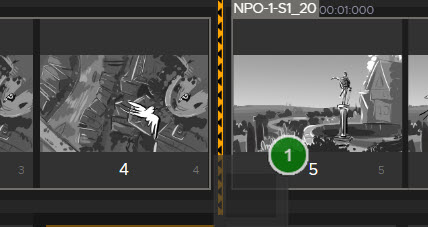
Using Shots in Flix
Shots are used to show certain sections of a sequence, such a character motion or camera move. In Flix you can create, modify and manage Shots within your Sequence Revision workflow. Shots work as a container for selected panels and can be exported to Storyboard Pro.
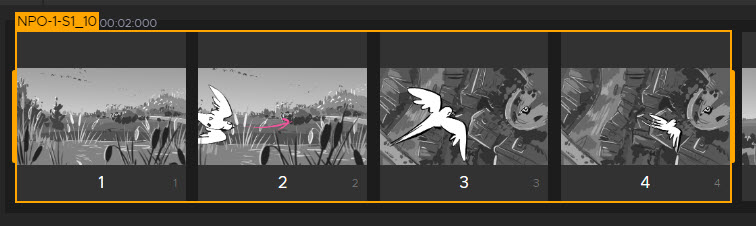
To create a new shot:
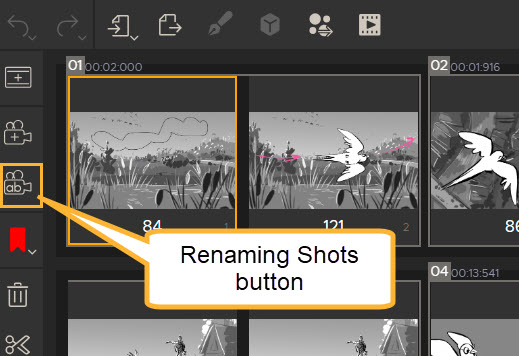
Select the panels you want to group into a shot using Shift+LMB. Then click the Shot icon in the Panel Browser’s left toolbar ( ). Alternatively, use the keyboard shortcut Ctrl/Cmd+Shift+N.
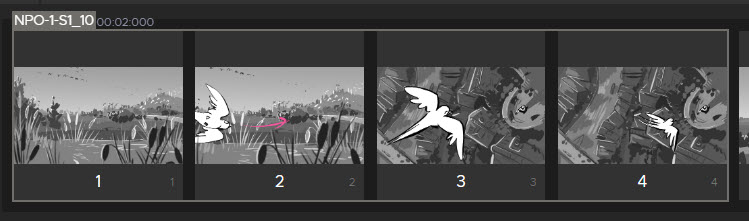
This creates a new Shot. Shots are represented as borders around the grouped panels. The border is yellow for selected shots and light gray for inactive ones.
Editing Shots
There are different tools to modify the panels that make up a shot.
• Reorder - You can reorder shots by selecting a shot and dragging it to the position you want it.
• Copy and paste - You can copy and paste shots. After copying, click the panel you want the shot to appear after, and then paste the Shot in.
• Add new panel to Shot - To add a new panel to the shot, click on the panel you want to add and drag it to the position you want it within the shot. A yellow line will appear to indicate where the new panel will be placed. Drop the panel in your desired location and it will now be part of the shot.
• Add panel to start/end of shot - To add a panel to the start or the end of a shot, drag the panel to the border of the shot and when the arrowed line appears, drop the panel in that position.
• Change Shot length - You can also drag the handles on either side of the shot border to include adjacent panels. If the handle reaches the start of a different shot, it cannot go any further.
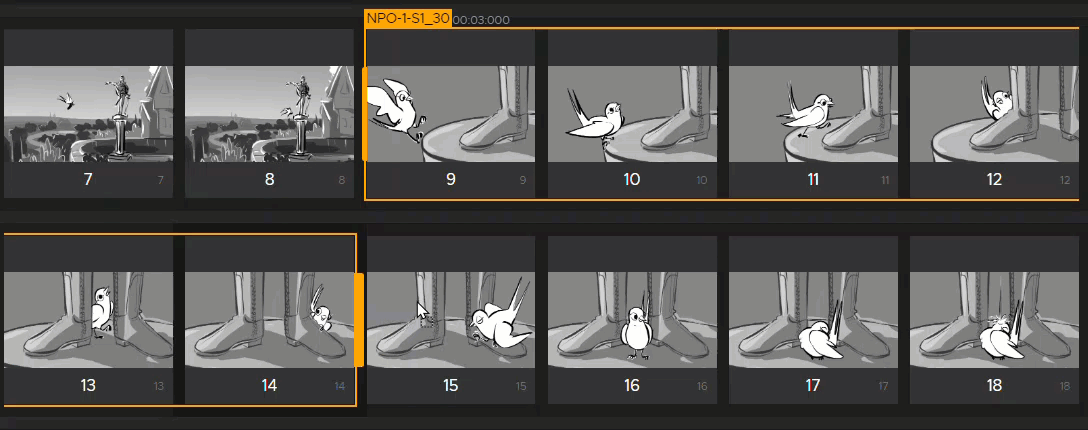
• Edit multiple shots - with two or more shots selected, a handle will appear between the start and end of each shot. Drag any of these intermediate handles to change the endpoint of the shots either side. Dragging the start handle of the first shot will change the start frame of that shot - this behavior also applies to the end handle of the last selected shot.
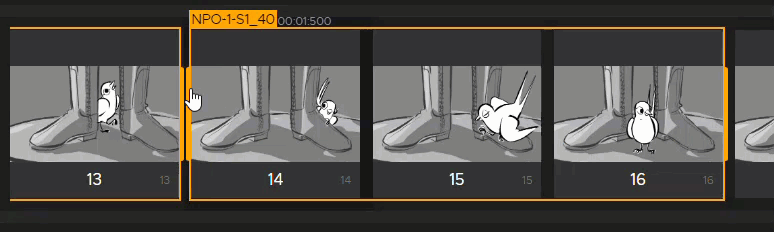
• Merge Shots - You can merge shots by selecting a shot and moving it inside of a different shot. This will place the added panels to the end of the existing shot.
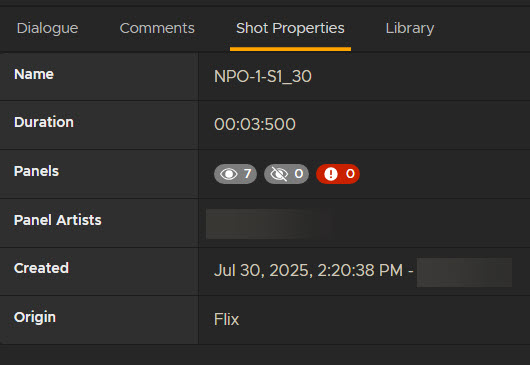
Shots Properties Panel
The Shots properties panel provides a centralized view of shot details. It includes a breakdown of the panels that make up each shot.
Custom Workflows
For custom workflows and automation, all shot functionality is fully accessible through the API.
Naming Shots
You can configure the naming convention for shots created in your Flix sequence to show information such as shot number and sequence title on a shot. Naming Shots in Flix is fully customizable. You can rename shots at any stage of the production.
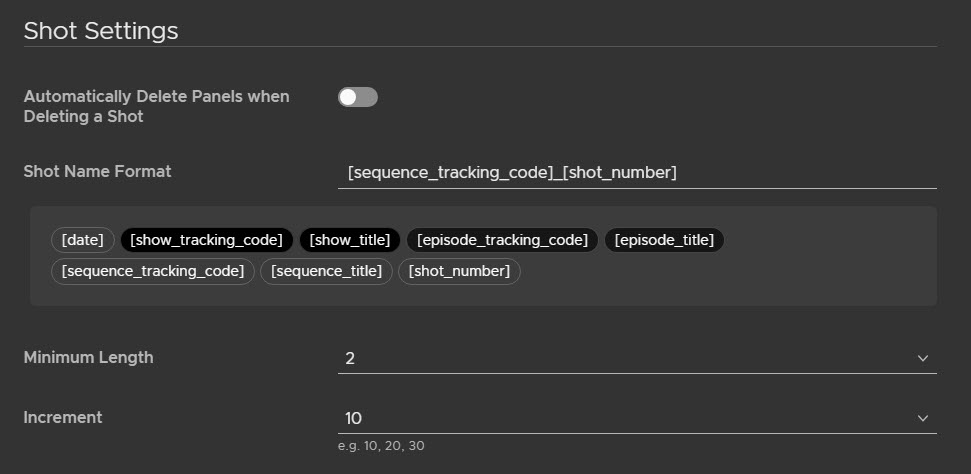
Shots are automatically named using a configurable Shot Name preference. You can define default naming conventions and incremental numbering at Settings > Panel Browser. You can also toggle whether to automatically delete panels when deleting a shot.
Shot data is saved per revision and is not contained in version history.
Setting Shot Number Format
• Navigate to Preferences > Panel Browser > Shot Number Format.
• Choose from the Minimum Length dropdown menu to set the minimum character length of shot numbers displayed.
• Choose from the Increment dropdown menu to set the increment for shot numbers displayed.
Example:
Shot numbers displayed as 01, 02... have a Minimum Length set to 2 and Increment set to 1.
Shot numbers displayed as 0010, 0020... have a Minimum Length set to 4 and Increment set to 10.
Renaming Shots
When you move shots around in your sequence, you can rename them sequentially. To do this:
| 1. | If you only want to rename certain shots, select the ones you want to rename. If you want to rename all shots, you do not need to select them all. |
| 2. | Click the Rename Shot(s) button. Alternatively, go to Edit > Rename Shot(s), or press F2. |
| 3. | Adjust the Shot Name Format , shot length and incrementation. A preview of the new shot names will appear in the Preview window. |
Note: The Shot Name Format must include the [Shot_number] option.
| 4. | Click Rename Selected Shots or Rename All in Sequence. |
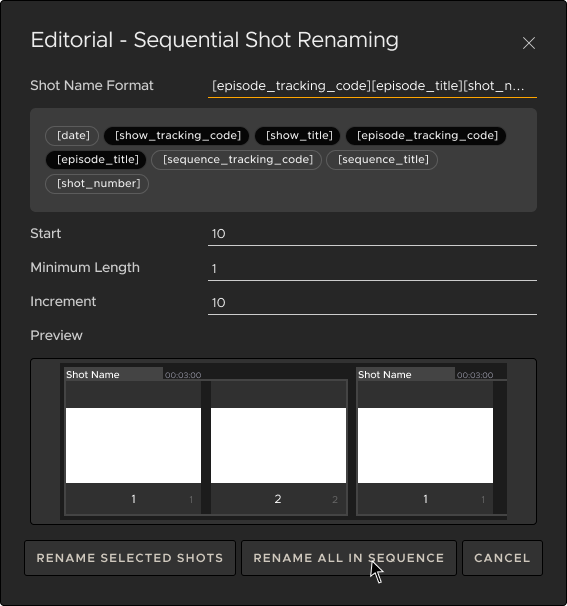
You can also rename shots by double-clicking on the Shot border name, or by pressing Enter when a shot is selected.
Exporting Shots During Publishing
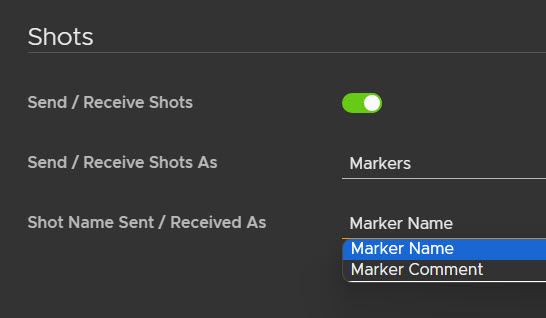
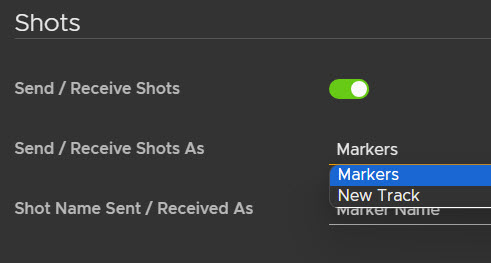
When publishing your sequence to Editorial software, the shot data can be exported as timeline Markers. If you are using Avid Media Composer, it can also be exported as a filler on a second track.
Using Markers, you can choose between having the shot name appearing in the marker name or the comment field. The input you don’t use for the shot name will have the name of the shot creator.
To edit this, go to User settings > Third Party Apps > Editorial Tools > Send / Receive Markers. This is ticked by default.
From here you can control whether the shot name or creator will appear as the Marker name or comment.
The default setting is Shot Name Sent / Received As = Marker Name. This will mean the Shot name → Marker name and Shot creator → Marker comment.
Alternatively, if you set the Shot Name Sent / Received As = Marker comment, the Shot Creator will be Marker Name and Shot Name → Marker comment.
If a shot is non visible (e.g. for handling gaps), it will be marked with a Null_Shot Marker name when exported to editorial.
When shots are returned to Flix they will have their naming and structure preserved.
Shot names are embedded in clip metadata, enabling them to be displayed as overlays in the edit and removing the need for manual labeling.
Avid Media Composer
There are two ways to import shots into Avid Media Composer.
• Export them as Markers, set to the current track.
• As Filler entities on a dedicated New track.
Adobe Premiere
You can export shots to Adobe Premiere as Timeline Markers.
Note: Second track is not an option for Adobe Premiere.
Shots and Storyboard Pro
You can export shots to Storyboard Pro, and they will be represented as Scenes.
When importing a Storyboard Pro project into Flix, Storyboard Pro scenes will automatically be converted to shots in Flix.
Note: Panels that aren’t part of a Shot in Flix will appear in Storyboard Pro as Null_Shot_(num). If there are multiple of these panels and they are non-sequential, each must have its own uniquely numbered Null Shot_(num), as Storyboard Pro does not allow multiple scenes with the same name in a sequence.