About the Media Spreadsheet
All events in a sequence are displayed in an easy to read format in the spreadsheet including status, the track it resides on, length, and the source file location.
After conforming, you can use the spreadsheet to locate source clips or replace shots in the timeline, as well as massage timecodes if they are invalid.
The media spreadsheet displays each entry’s current media state:
•
![]() - the media was successfully conformed and its timecode is correct.
- the media was successfully conformed and its timecode is correct.
•
![]() - the media was successfully conformed, but the timecode is currently incorrect.
- the media was successfully conformed, but the timecode is currently incorrect.
•
![]() - the media could not be conformed.
- the media could not be conformed.
Note: Any source or destination field highlighted in yellow indicates that the entry has been rounded down for display purposes.
See Managing Timelines for more information on importing tracks and reference media.
Sorting and Custom Columns
The spreadsheet can be organized in much the same way as accounting spreadsheets:
• Right-click the column headers to display the list of default columns available. Enable or disable each column using the checkboxes.
• Click the required column to sort the spreadsheet in ascending or descending order, as indicated by the arrow in the column header.
• Drag-and-drop column headers to reorder the spreadsheet as required.
• Add custom columns, such as Tags, using the Python API. See Help > Documentation for more information on the Python API.
Tip: Hiero's Project panel search functionality extends to the spreadsheet, allowing you to enter strings and apply searches on all or partial matches with the option to include metadata searches. Hiero searches for items that match any of the input string and displays only those items by default. See Sorting and Searching Media for more information.
Spreadsheet Controls
There are also a number of controls, accessed by clicking the cog icon, that determine the spreadsheet’s appearance and behavior.
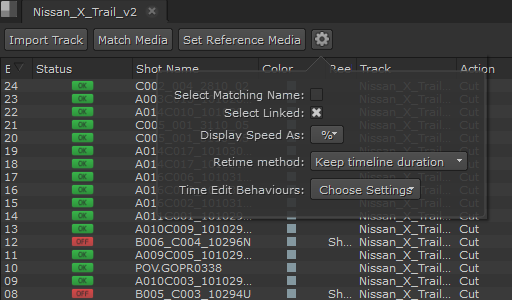
• Select Matching Name - when enabled, selecting an item in the spreadsheet highlights all items with the same name.
• Select Linked - when enabled, selecting an item in the spreadsheet highlights other items linked to it, such as audio tracks ingested with video tracks.
• Display Speed As - sets the unit used in the Speed column of the spreadsheet. Select either fps (frames per second) or % (the percentage of the media frame rate).
• Retime method - sets the type of Speed retime applied on the timeline.
• Time Edit Behaviors - sets how source and destination In, Out, and Duration are calculated.
See Retiming Shots for more information on retime methods and Timeline Editing Tools for source/destination calculations.
You can locate, display, reconnect, or rename shots directly from the spreadsheet.
• Hold Alt and click an entry to move the playhead to the shot’s In point on the timeline.
• Hold Alt and double-click an entry to move the playhead to the shot’s In point on the timeline and zoom to fit the timeline view.
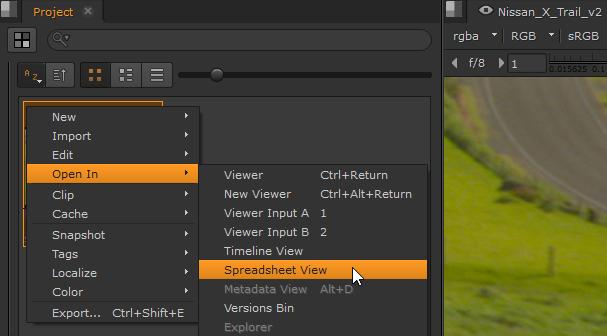
• Right-click a spreadsheet entry and select the required option:

• Open In - the associated source clip opens in the selected location, such as a Viewer.
• Project View - the associated source clip is highlighted in the bin view.
• Reconnect Media - attempt to reconnect the media from a specified location on disk, such as when the source was originally on a drive that is no longer connected.
• Replace Clip - replaces the selected entry with a specified source clip. Nuke Studio assumes that any source clip you choose is acceptable, regardless of timecode.
• Delete - deletes the selected entries from the spreadsheet and timeline.
• Version - access the powerful versioning system to control which version of the selected shot is visible in the sequence. See Using Versions for more information.
• Tags - add tags to your selection directly from the spreadsheet view. See Using Quick Tags for more information.
• Localize - control the localization of clips, tracks, and sequences from the spreadsheet. See Localizing Media for more information.
• Soft Effects - add soft effects to shots directly from the spreadsheet, see steps below.
Using the Spreadsheet View
You can add soft effects using the spreadsheet view in any workspace by doing the following:
| 1. | To open the spreadsheet view in any workspace, select Window > New Spreadsheet View. |
| 2. | Right-click a sequence in the bin view. |
This opens a context menu.
| 3. | If the spreadsheet view is not already populated in the context menu, select Open In > Spreadsheet View. |
This loads the sequence in the spreadsheet view that you previously opened.
| 4. | Right-click an event from the list in the spreadsheet view and select Soft Effects to open a list of all available soft effects. See Adding Effects on the Timeline for more information. |
| 5. | Select the required soft effect from the Soft Effects list. |
The sequence-level soft effect is then displayed above the shot and is color coordinated. For example, if the effect appears in green on the timeline, the corresponding effect properties are highlighted in the same color in the Properties pane.
When you insert a soft effect, its Properties open automatically. If you have it open, the effect properties panel displays in the Properties pane. If the Properties pane is not open, the effect's properties panel appears as a floating dialog.