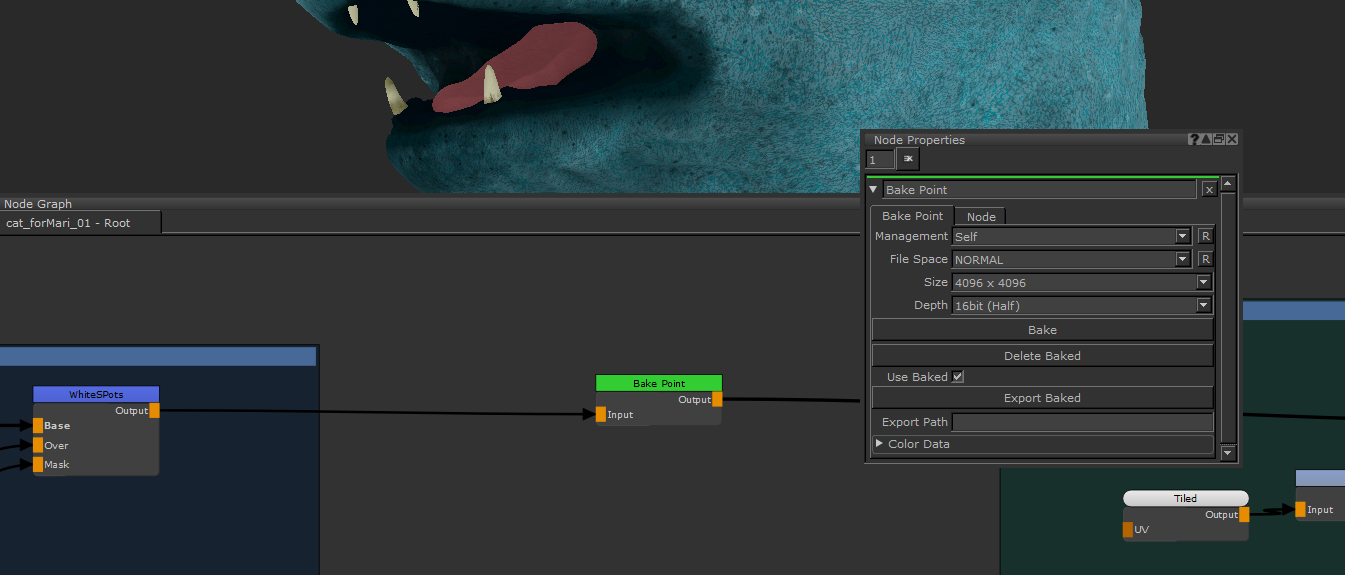
Bake Point
Node
Access: Nodes > Misc > Bake Point
Using a Bake Point node to optimize textures in a scene.
The Bake Point node is a great way to optimize your scene and keep it running even when your node graph and project gets overly complex or heavy.
When you first create a Bake Point you will be asked to select the settings of the bake. The same options are displayed as when creating a Paint node. After selecting the size, bit depth and any other settings you may want to change, the Bake Point will be created. From there you can bake anything you input into the node to cache the input and keep your scene running smoother.
The Bake Point can be essential if your machine is starting to run slow, and can also speed up your workflow if you know you don't need to change any nodes that come before it.
Tip: Geo-Channels can be used as an intermediate caching point with the Bake Point node to allow complex node sharing without the difficulty of navigating complex shared connections in the Node Graph, by exporting the current bake data to a Geo-Channel on the object. See Adding Geo-Channels to Objects and Syncing Bake Points to Geo-Channel Nodes.
Bake Point Node Inputs
Input: Bakes the input.
Bake Point Node Properties
Note: For more information on the Add Bake Point dialog, see Add Paint/Bake Point Dialog.
Bake Point Tab
|
Management dropdown list |
This option decides where the nodes properties come from. The default of Self allows the user to change them, the other option Channel defines the properties from the channel the Bake Point is connected to. |
|
File Space dropdown list |
This defines how values are imported or exported. The default of Normal changes nothing. For Vector, the data is treated as vector data and remapped. Vector_Y_Flip does the same but inverts the Y component. Normal_Y_Flip changes nothing but inverts the Y component. |
|
Size dropdown list |
Changes the size of the bake. Changing this scales the image up or down. |
|
Depth Dropdown list |
Changes the bit depth of the bake. Warning: Changing this converts the image and may result in lost texture information. |
|
Use Baked checkbox |
Displays the baked textures or ignore the bake. If this is enabled then any changes you make are not shown. |
|
Bake button |
Starts the baking process of the input into the node. Note: You can also bake Bake Point nodes directly in the Node Graph, right-click and select Edit > Bake Points > Smart Bake And Update or Bake Selected. |
|
Delete Baked button |
Clicking this button clears any information held in the Bake Point node. |
Limit Patch Baking
|
Limit Bake Range checkbox |
Enable to only bake paint data within the specified Patch Range with this Bake Point node, allowing you to reduce bake times by only baking required patches. Once enabled, the Bake Point node displays an icon Disable to bake all patches on your object with this Bake Point node. |
|
Patch Range text field |
Specify patches on your object to be baked by this Bake Point node by typing either a single patch number, or a range of patches. For example, if you want this Bake Point node to only bake patches 1001 to 1005, enter: 1001-1005 If you want this Bake Point node to only bake patches 1008, enter: 1008 If you want this Bake Point node to bake patches 1003 to 1006, and patch 1009, enter: 1003-1006 1009 |
|
patch selection button |
Click this button to view the following patch selection options: • Set to Current Patch Selection - The currently selected patch(es) is assigned to the Patch Range. • Set to Patch Selection Group - Opens a dialog allowing you to select a patch selection group from a dropdown. Once chosen, the selection group is added to the Patch Range. Tip:
• Select Patches in Range - Automatically selects all patches specified in Patch Range. |
|
reset button |
Click to reset the Patch Range. This resets to select all available patches on the object. |
|
Background Color color swatch |
Specify a background color onto which the baked image is composited. Note: Patches outside the specified Patch Range have a uniform, transparent background and are not affected by the Background Color. |
Color Data
|
Colorspace dropdown list |
If the Raw Data checkbox is disabled then the color space of the data stored in the bake is converted to the specified Colorspace. |
|
Tip: You can limit the number of colorspaces available to artists using the Python API registerConfigUiAllowlist() function or the MARI_COLORSPACE_OCIO_UI_ALLOWLIST environment variable. See Help > SDK > Python > Documentation from Mari's UI menus or Environment Variables That Mari Recognizes for more details. |
|
|
Raw Data checkbox |
Specify if the data is raw or is in a different colorspace. Note: Disabling this allows you to specify the colorspace in the Bake Point, resulting in a conversion to the bake. |
|
Scalar Data checkbox |
Enable Scalar Data to indicate that pixel data is not affected by color management. Enabling this changes the view transform to None. |
Export Tab
Geo-Channel
|
Geo-Channel dropdown |
Select which
The Bake Point node updates to display the |
|
Sync on Bake checkbox |
Enabling this automatically syncs the latest bake data to the selected |
|
Export Baked to Geo-Channel button |
Exports the latest bake data on the Bake Point node to the selected Geo-Channel. |
Disk
|
Export on Bake checkbox |
Enable to automatically export images every time a bake occurs. Warning: Enabling this option overwrites previously exported images on disk each time a bake is triggered. |
|
Export Path text field / button |
The path where bake data from the Bake Point node is exported. See Exporting Textures from Layers for more information on the Set Export Options dialog. |
|
A post process command which triggers once the bake point image(s) has been exported. For example, you can enter a post process command which moves your images to a different folder once they have been written to disk, or a command to convert the image(s) to Renderman, Arnold, or 3Delight texture map files. Enter the following command to move the written images to a different path: mv $EXPORTED "[drive:][path]" Note: Hover over the Post Process field to see a tooltip with the accepted command attributes. They are the same attributes used by the Export Manager. See Export Manager Dialog. |
|
|
Export Baked button |
Clicking this button brings up an Export UI window to let you export the baked image to disk. Note: An overwrite check is performed if there are already images on disk using the same name. |
Bake Point Node Workflow Examples
Node Tree Optimization with the Bake Point Node
In the example we have a heavy node graph to texture this asset. Even on a powerful computer this scene is heavy to compute. If you have a busy scene or computer that struggles to keep up, Bake Points can be great for optimizing your node tree. In the example, we are seeing the Node Graph and a nearly finished Base Color texture:
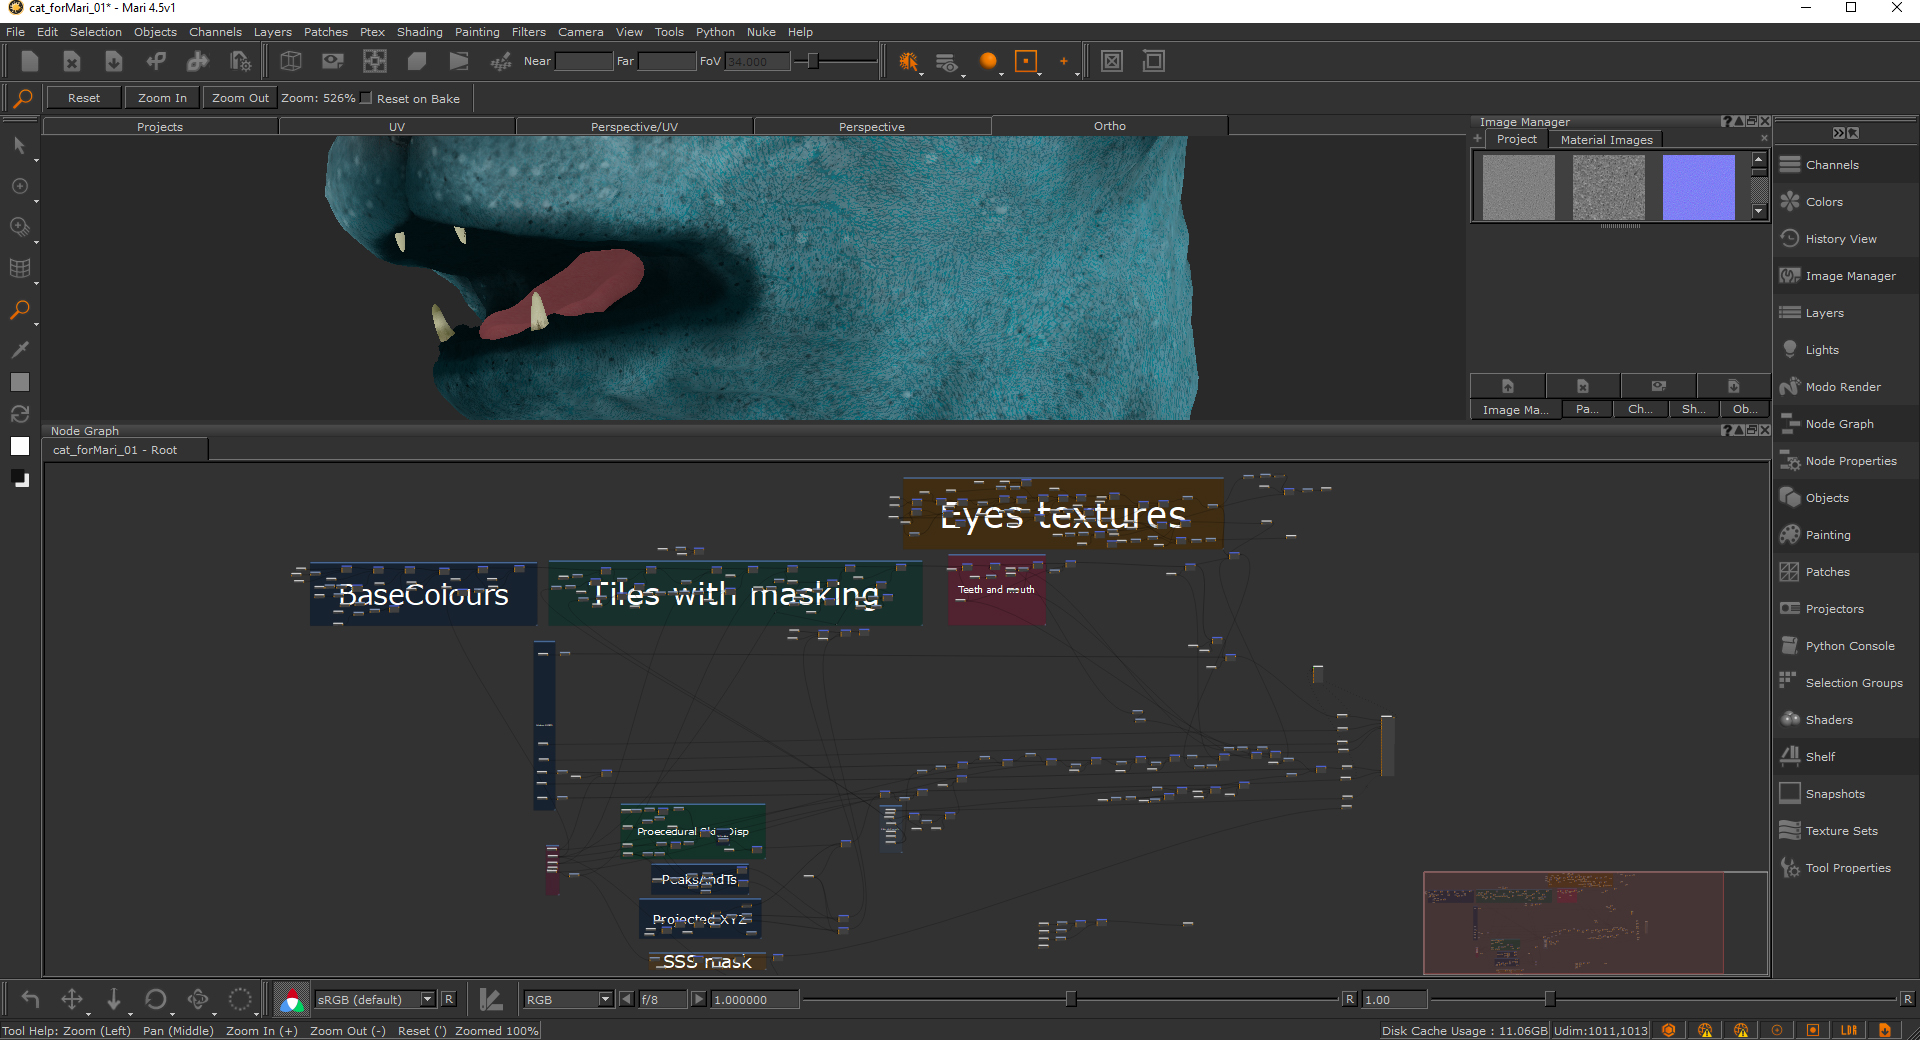
A nearly finished asset’s Node Graph.
Let’s use some Bake Nodes to optimize the BaseColours section on the left of this node tree. When you are finished with a part of your node tree, it can be good practice to use a Bake Point node to stop Mari calculating all the nodes that come before it. By doing this you can speed up your scenes.
Note: The downside to this workflow however is you need to either deactivate the node if you want to make changes or rebake it after.
Since the base colors of this object are working and we’re just finessing the smaller details which come after it in the Node Tree then a Bake Point can be placed to the right of this Backdrop node.
By placing down a Bake Point we will get the creation UI pop up. Since the UDIMs of this texture are 4k then we want to use that size but if you want to just use it for previewing or speed up your project even more you could select a size smaller than your patches. The rest of the settings will be dependant on your project and also the Channel this node will end up being used for. Since we have color data here we don’t want to select Scalar Data on.
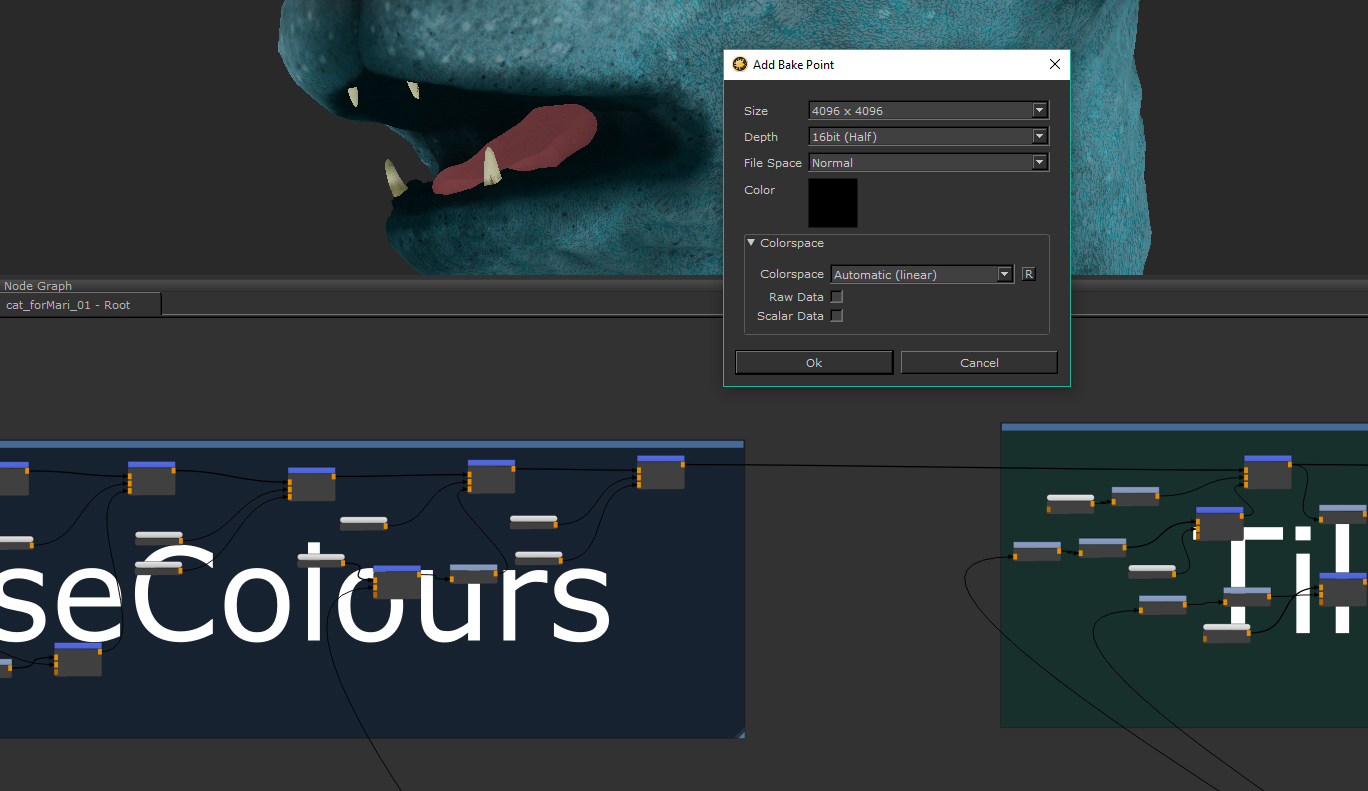
The Bake Point node Add Bake Point popup appears when first creating a Bake Point node.
After clicking OK the node will be created. It doesn’t bake until you plug something in and select the Bake button.
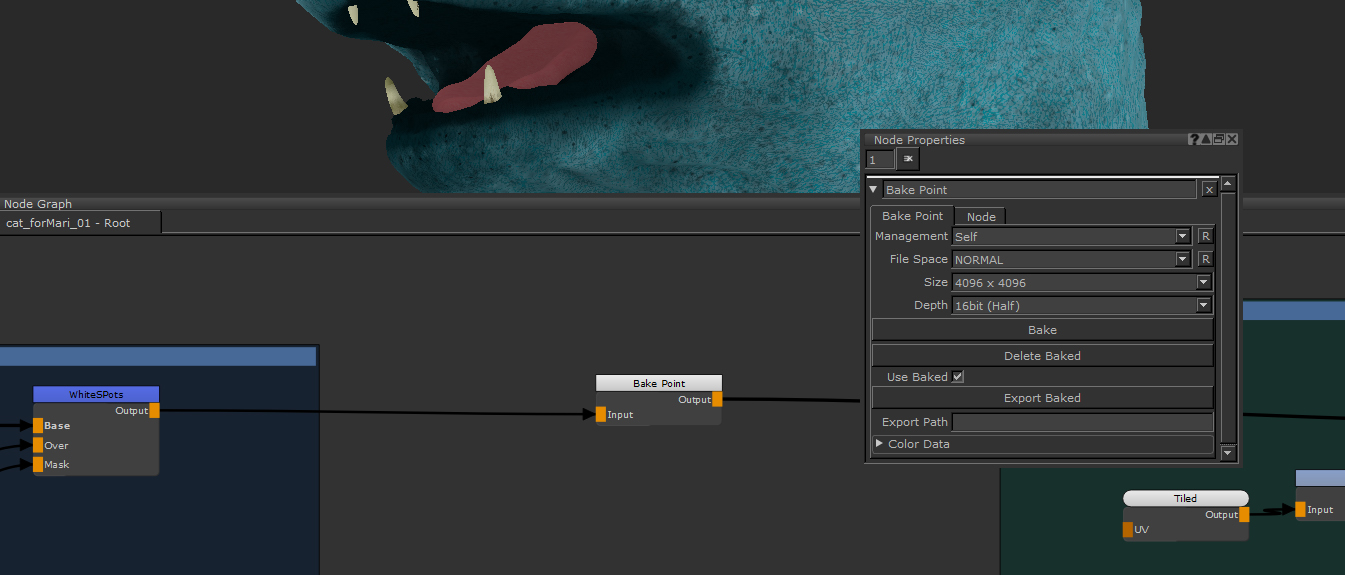
An unbaked Bake Point node appears gray on the Node Graph.
After you select an input for the Bake Point, Mari will perform a calculation, and depending on your scene this could take a while. When the calculation is done, the node will turn green to signify it has bake data inside of it that is up to date.
Once baked and up to date the Bake Point turns green.
If it has gone red that means something being plugged into it is out of date. You can either select it and click Bake again to update it, or you can shift and click multiple Bake Point nodes, right click and go to Edit > Bake Points > Update Selected to update multiple bakes at once.

When out of date the node turns red. You can update selected Bake Points by going through these menus.
When using Bake Points along your node tree you should notice your scene speeding up, especially when using a lot of nodes. Bake Points are a great tool for scene optimization.
Tip: Geo-Channels can be used as an intermediate caching point with the Bake Point node to allow complex node sharing without the difficulty of navigating complex shared connections in the Node Graph, by exporting the current bake data to a Geo-Channel on the object. See Adding Geo-Channels to Objects and Syncing Bake Points to Geo-Channel Nodes.
Limiting Patches in a Bake Point Node
You can reduce bake time in a Bake Point node by limiting the amount of patches/UDIMs being baked by that node to only patches that require a bake.
To limit patches/UDIMs in a Bake Point node:
| 1. | Double-click the Bake Point node to access the Node Properties. |
| 2. | Enable Limit Bake Range in the Bake Point tab. |
| 3. | Using one of the following methods, select a Patch Range: |
• Enter a value into the Patch Range field. The following example selects patches 1001, 1002, and 1003:
1001-1003
• If you have a patch already selected, click the patch selection button ![]() and select Set to Current Patch Selection.
and select Set to Current Patch Selection.
• If you have set up patch selection groups, click the patch selection button ![]() and select Set to Patch Selection Group.
and select Set to Patch Selection Group.
Tip: If you're not sure which patches are currently selected, click Select Patches in Range.
| 4. | Pick a color using Background Color onto which the baked image is composited. |
| 5. | Click Bake. |
The selected patches in Patch Range are baked.