Shaders
Shaders control how Mari displays the model on the canvas under certain, user-specified lighting conditions. Mari uses shaders to specify how different channels behave in the lighting module and how the paint on the model reacts to light. Mari always uses a shader to generate the surface displayed on screen.
The shaders are also highly dependent on the channels and layers in a project, and you can view current paint layers, targets, and channels specifically in the Shaders palette.
Mari's default shaders show the paint in either the Current Channel, Current Layer and Below, Current Layer, or Current Paint Target. You can also create your own custom shaders, called 'User Shaders', by combining diffuse and specular shader types then setting up channels in the shader component inputs to specify how they appear in the shader.
For more information on how shaders, channels, and layers integrate with one another, please refer to the Layers section in this guide.
Video: Watch Understanding Shaders and Channels for a brief overview about Shaders.
This video shows the workflow using Mari 3. Even though the Mari 4 workspace is different, the workflow remains the same. To have a look at the main UI differences, see Mari 3.3 vs 4.0.
Getting Started with Shaders
By default, when you create a project and do not make changes to the Channels tab, a principled BRDF shader is created with 4 channels. See Managing Projects. The default channels get plugged into the shader immediately to set up your project. You can create and assign additional channels to the fields in the shader components and build up complex textures on your model.
|
|
|
|
|
Color channel, plus... |
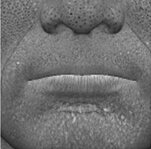
displacement channel, plus... |
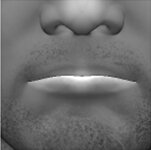
specular channel, equals... |
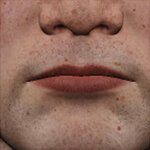
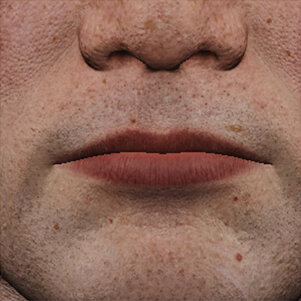
...this. Here the shader is pulling in all three channels to make a surface that gives a preview of what the final render may look like.
This lets you, for example, build a shader so you can paint onto the displacement or specular channels while getting a real-time view of how your changes affect the final render.
Tip: Shaders only control how Mari displays the model's surface. They do not affect the contents of the channels in your project.
Shaders include:
• basic lighting details, including ambient, diffuse, and specular light intensities.
• a method for quickly viewing paint in your current channel, layer, layer stack, or on your current paint target.
Mari generates the shaded surface by going through the components in the current shader. Each component takes an input from a channel and is adjusted according to relevant component sliders. These components are then added to the current surface. The final shaded surface as you see it on screen is the final result of these components.
For example, you could set up a shader by following the steps below:
| 1. | Create the initial shaded surface from the diffuse channel and set this in your shader’s Diffuse Color component. |
| 2. | Display specular or displacement previews using designated channels as the inputs, and adjust the sliders to give the shaded surface the desired look. |
| 3. | Adjust ambient light or apply environment images to further build up the preview of your final rendered image. |
As with channels, you set up shaders individually for Working with Objects.
Shaders and Lights
In Mari, shaders and lights are related - they both control how your project appears on screen, but neither affects the actual data in the channels.
• Shaders do include some basic lighting information, but mostly they specify what to show on the surface of the model. For example, shaders may include specular information, which describes how the surface interacts with the lights in your project.
• Lights provide control on how your project is lit on the canvas. You can set up four individual lights, each with its own color, intensity, and direction, by adjusting the settings in the Lights palette. You can also set an environment light that relies on an image for the lighting.
Once you have set up the shader, you can still opt to change the lighting on the model by changing the lights in the Project Controls toolbar, in the Lights palette, or in the Shading menu.
Shading and Channels
Mari has a few default shaders that show the contents of the current channel, layer, or paint target, you can always switch back to these to check your work in isolation to see which channels are being used in which shader inputs.
Tip: A useful way to keep track of which shader you're editing is to add it to the Heads-Up Display. From the Edit menu, select HUD Manager. Under Project, put a check in the box next to Current Shader. Mari now shows the name of the shader you are currently painting as part of the background information on the canvas. For more information, see the Configuring the User Interface section.
Shaders on Multiple Channels
If you want to copy a shader you’ve created for one object in your project to use on another object, you can use the keyboard shortcuts or the options in the context menu to cut, copy, and paste shaders between objects. Shaders are exclusive to each object, as are channels and layers. The only way to duplicate a shader for use on another object, is to cut or copy and paste it into the Shaders palette for each object in your project.
Physically Plausible Shaders
Physically plausible shaders differ from traditional shaders, such as the default Mari shaders, by obeying the law of conservation of energy. Unlike traditional shaders, changing different inputs, such as Specular or Specular Roughness, does not effect the overall brightness of the point or environment lights. The distribution of the light might have changed to be concentrated in one location or spread out across the shaded surface, but the sum total of the pixel values should come out to the same value.
Ambient Occlusion
Ambient occlusion can be set as a shader component input for all of the custom-created shaders. Using a component input for the ambient occlusion allows you to create your own occlusion map in a separate channel and plugging this channel into the shader input.
If you don’t want to create a channel specifically for ambient occlusion, you can opt to calculate the ambient occlusion for each individual object in your project. For more information, please refer to About Masking and Calculating Ambient Occlusion.
Shader Limits
Most shaders do not require texture slots, but if you exceed the amount of texture slots available you may encounter a rendering error. If this occurs, there are a number of causes that may have contributed to the error. To free up texture slots, try:
• turning off features that require extra texture units, such as painting masks in the Painting palette,
• turning off any filter previews that may be active,
• flattening or caching layers in long or complex layer stacks,
• changing the inputs on the current shader to use fewer texture slots.
Note: Even if there are remaining texture slots available, active features such as depth projection, paint masks, and shadows may not respect the texture slot limit if more expensive shaders components are in use. You can turn off these features to free up more texture slots. See About Masking and Shadow Settings for more information.