Multi-Channel Bake Point Node
Access: Right-click | Nodes > Layer > Multi-Channel Bake Point
Using a Multi-Channel Bake Point node to bake multiple channels
and optimize materials in a scene
Multi-Channel Bake Point nodes work in the same way as Bake Point nodes except they allow you to bake multiple channels using a single node. Multi-Channel Bake Point nodes can be used to optimize your scene by baking materials once you have finalized them, preventing your project from slowing down as you continue to work.
Multi-Channel Bake Point nodes create individual Bake Points for all channels belonging to your chosen shader model. These individual Bake Points are nested within the Multi-Channel Bake Point node so that only one node is required to bake an entire material. Each nested Bake Point can be added individually as an Export Item in the Export Manager. By default, the nested Bake Points are named in the following format:
Bake Point (<SHORTNAME>)
Where <SHORTNAME> is the stream channel, for example:
- Bake Point (Base)
- Bake Point (Spec)
If you rename the Multi-Channel Bake Point node, the nested Bake Points are renamed to match. For example, if you rename the Multi-Channel Bake Point node to PaintedPlaster_BP, the Bake Point (Base) Bake Point is renamed to PaintedPlaster_BP (Base).
Note: For more information, refer to the documentation for the Bake Point Node.
Bake Point Node Inputs
Input : Bakes the input.
The individual input channels depend on the selected shader model from the Create Multi-Channel Bake Point Node dialog.
Bake Point Node Outputs
Output : The baked input.
The individual output channels depend on the selected shader model from the Create Multi-Channel Bake Point Node dialog.
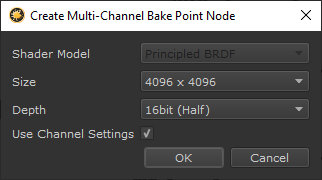
Create Multi-Channel Bake Point Node Dialog
When you create a Multi-Channel Bake Point node, the Create Multi-Channel Bake Point Node dialog is displayed and you can choose the settings to apply to the node and the elements that are baked from it. After choosing the appropriate options, click Okay and the Multi-Channel Bake Point node is created.
The Create Multi-Channel Bake Point Node dialog is similar to the dialogs shown when creating Paint or Bake Point nodes.
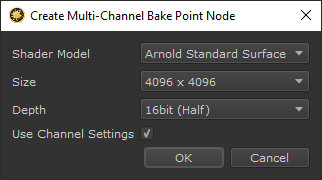
The Create Multi-Channel Bake Point Node dialog
|
Shader Model dropdown |
Choose the shader model you are using in your scene so that the correct input and output channels can be assigned to the Multi-Channel Bake Point node.
If you have selected a Multi-Channel node such as a Material before creating the Multi-Channel Bake Point node, then the Shader Model is pre-selected to match the Multi-Channel node. This is because the Multi-Channel Bake Point node needs to connect to the selected Multi-Channel node and therefore must be of the same Shader Model. In this case the Shader Model option is disabled. |
|
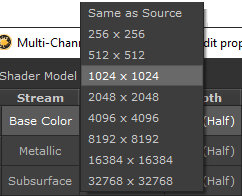
Size dropdown |
The patch size for the bake.
|
|
Depth dropdown |
The color depth for the bake.
|
|
Use Channel Settings checkbox |
Enable this option if you want the Size and Depth to be inherited from an upstream Channel node instead of the specified settings in this dialog. If there is no upstream Channel node and this option is enabled, the specified settings in this dialog are used. |
Multi-Channel Bake Point Node Properties
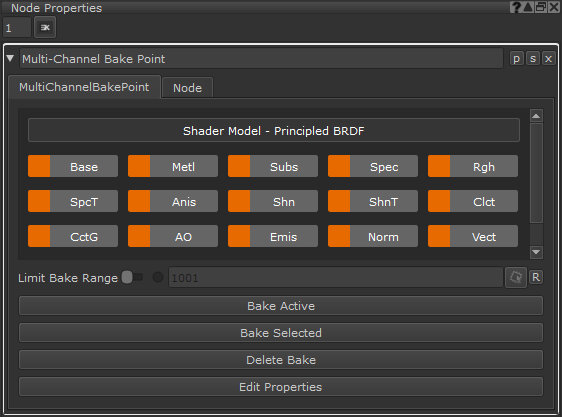
MultiChannelBakePoint Tab
|
Multi-Channel Properties |
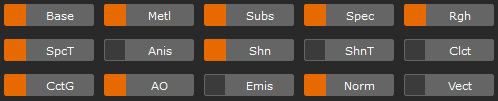
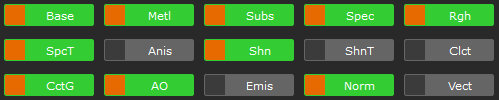
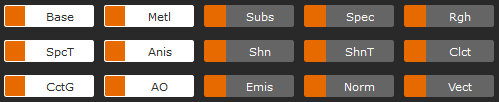
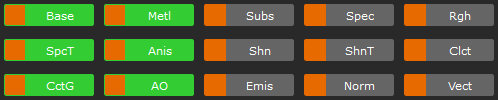
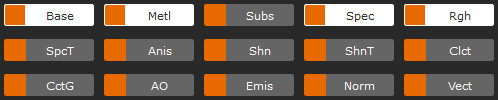
This section of the Multi-Channel Bake Point Node Properties allows you enable, disable, and select individual channels contained inside the Multi-Channel Bake Point node. From here you can choose which channels you want to create Bake Points for, by enabling those channels. If you only want to create Bake Points for a certain number of channels, you can select them in the Multi-Channel Properties, and use the Bake Selected button. All channels are enabled by default when a Multi-Channel Bake Point node is created. To disable a channel, click the orange button on the channel. Only enabled channels can be baked.
To select a channel, click on its name. Hold Ctrl + Click to select multiple channels. When selected, channels are highlighted white.
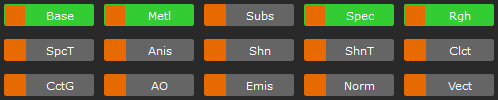
Base channel selected Once a channel is baked, it is highlighted green. If a baked channel is out of date because there have been upstream edits, that channel is highlighted red.
|
||||||||
|
Limit Bake Range toggle |
Enable to only bake data within the specified Patch Range with this Multi-Channel Bake Point node, allowing you to reduce bake times by only baking required patches. Once turned on, a green icon is displayed and the Patch Range option is enabled.
Turn off to bake all patches on your object. |
||||||||
|
Patch Range text field |
If Limit Bake Range is enabled, you can specify patches on your object to be baked by this Multi-Channel Bake Point node by typing either a single patch number, or a range of patches. For example, if you want to only bake patches 1001 to 1005, enter: 1001-1005 If you want to bake patch 1008, enter: 1008 If you want to bake patches 1003 to 1006, and patch 1009, enter: 1003-1006 1009 Click the Patch Range Actions
|
||||||||
|
Bake Active button |
Click to bake only the active, enabled channels connected to downstream shaders. A channel is active if there is a Channel node downstream. If a stream is disconnected from the Multi-Channel Bake Point node, or if there is no Channel node, that stream is not baked when using the Bake Active button.
The Bake Active dialog is displayed. Click Cancel to stop the bake.
Once active channels have been baked, they are displayed in green in the Multi-Channel Properties.
|
||||||||
|
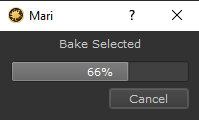
Bake Selected button |
Bake only channels that are selected and enabled in the Multi-Channel Properties. Selected channels are highlighted white. If a channel is selected but disabled, that channel is not baked.
The Bake Selected dialog is displayed. Click Cancel to stop the bake.
Once the selected channels have been baked, they are displayed in green in the Multi-Channel Properties.
|
||||||||
|
Delete Bake button |
Click to clear any information held in the Multi-Channel Bake Point node. Once the Bake is deleted, the channels turn gray in the Multi-Channel Properties and the Multi-Channel Bake Point node returns to its default color. |
||||||||
|
Edit Properties button |
Click to open the Multi-Channel Bake Point - Batch edit properties dialog. From here you can edit the individual Bake Points nested within the Multi-Channel Bake Point node. For more information, see the Multi-Channel Bake Point - Batch Edit Properties Dialog section in this topic. |


Node tab
|
Description text field |
Write a custom description for this node to explain its function. |
|
Export as Gizmo button |
Click to export this node as a gizmo in the .mng file format, so that other artists can use it to perform similar tasks. For more information, see Exporting Groups as Gizmos. |
Multi-Channel Bake Point - Batch Edit Properties Dialog
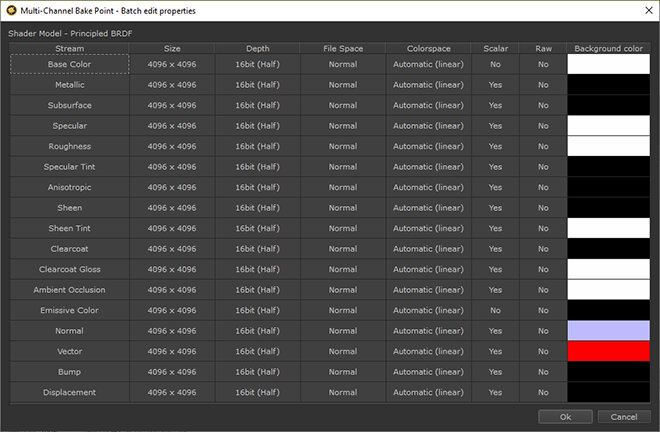
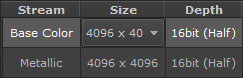
You can use this dialog to make batch edits to the individual Bake Points contained within a Multi-Channel Bake Point node. The Bake Points for each stream are listed on the left, and the properties you can edit are along the top.
To make an edit:
- Double click on the option you want to change and a dropdown menu is displayed.
- Click the dropdown menu and choose an option.
|
Size dropdown |
The patch size for the bake. |
|
Depth dropdown |
The color depth for the bake. |
|
File Space dropdown |
This defines how values are imported or exported.
|
|
Colorspace dropdown |
If the Raw option is set to No then the colorspace of the data stored in the bake is converted to the specified Colorspace. |
|
Scalar dropdown |
Enable this option to indicate that pixel data is not affected by color management. Enabling this changes the view transform to None. This option can be useful when working with channels that don't use color data, for example, bump or metallic maps. |
|
Raw dropdown |
Specify if the data is raw or is in a different colorspace. Disabling this option allows you to specify the colorspace using the Colorspace option, resulting in a conversion to the bake. |
|
Background Color dropdown |
Specify a background color onto which the baked image is composited. Note: Patches outside the specified Patch Range have a uniform, transparent background and are not affected by the Background Color. |
Multi-Channel Bake Point Node Workflow Example
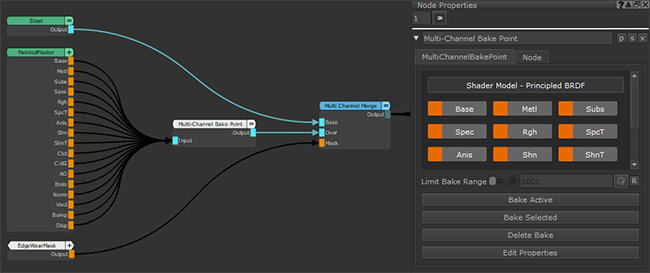
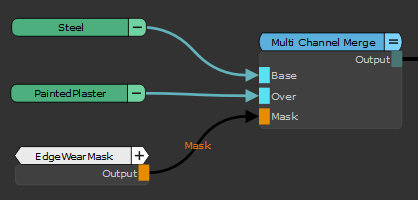
This example demonstrates how to place a Multi-Channel Bake Point node to bake certain channels from a material named PaintedPlaster, and optimize the scene so that further edits can be made to other materials more quickly.
Tip: This workflow example uses the Example Material Design Project that ships with Mari.
- In the Node Graph, select the PaintedPlaster material.
- Press Tab and type Multi-Channel Bake Point, then press Enter.
The Create Multi-Channel Bake Point Node dialog opens. The Shader Model is pre-selected as Principled BRDF to match the material.
- Choose the patch Size and color Depth to use for the bake.
- Click OK.
A Multi-Channel Bake Point node is created and is connected to the PaintedPlaster Material node.

Tip: Click the button to the right of the node name to expand the Multi-Channel Bake Point node and you'll see the inputs and outputs for each channel.
For more information about expanding and collapsing nodes, see Collapsing Nodes. - Double-Click on the node to open the Node Properties.
- In the Multi-Channel Properties, hold Ctrl/Cmd and click the names of the channels you want to bake.
- Click Bake Selected.
The selected channels are baked.
Note: For more workflow examples, you can also refer to the Bake Point Node Workflow Examples