Working With Patches
Models that you paint in Mari are divided into patches. You can change the properties of the patches, such as the patch resolution. You can also edit patches as a whole - by copying and pasting between patches, filling patches with color, or flipping the paint on them.
Video: Have a quick look at the Working with Patches in Mari video to learn more.
This video shows the workflow using Mari 3. Even though the Mari 4 workspace is different, the workflow remains the same. To have a look at the main UI differences, see Mari 3.3 vs 4.0.
Patch Resolution
Each patch on a channel is stored at a particular resolution. Resolution is a determination of how many pixels are used for an item. For example, a patch may have a resolution of 512 x 512. This patch is stored as an output file 512 pixels wide by 512 pixels high. Higher resolutions take more memory and require more storage, but provide more detail.
Resolutions available in Mari range from 256 x 256 to 32k x 32k (32768 x 32768). Resolutions in Mari are always “square”, with the width equal to the height.
You set the resolution for a channel when you create it. You can however change the resolution later, for example downsizing if you find the file's getting really big and you don't need so much detail, or upsizing if the shot focuses on something that you find needs more detail. You can either:
• change the resolution of the entire channel at once (that is, all patches in the channel), or
• resize specific patches within the channel.
Changing the resolution of a patch in one channel does not affect the resolution of the same patch in another
channel. For example, a particular patch could be at 512 x 512 in the bump channel and 2k x 2k in the diffuse channel. All layers in a channel or patch are resized when the channel or patch is resized, but you cannot resize individual layers.
Tip: For more details on working with channels, see Channels.
Patch Limit
Mari has a technical limit of how many patches it can accurately handle, which is primarily based on the graphics card you are using. For NVIDIA and AMD cards, the limit is 4096 patches, while for Intel the limit is 1024 patches. The patch limit primarily affects the visibility and locking ability of patches, as well as the ability to select through faces. You may be able to work with more patches than the stated limit, if you are not using this functionality but it isn't recommended and correct behavior cannot be guaranteed.
Changing Patches as a Whole
Mari lets you change patches as a whole. You can:
• copy textures from one patch to another
• fill patches with a single color
• rotate or flip the paint on a patch
• mirror paint from one side of a patch to the other
• link patches together.
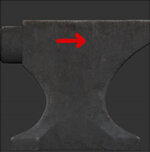
Here's an example.
|
|
|
|
|
The original patch. |
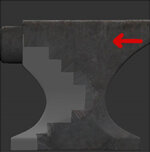
Flipped horizontally. |
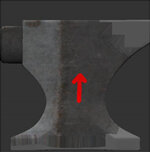
Rotated 90 degrees counter-clockwise. |
Tip: Edits to patches only apply to baked paint. Unbaked paint in the paint buffer is not affected.
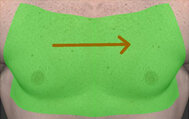
When you are copying patches onto other patches, unless your patches are identically shaped, you can see:
• blank areas at the edges, where the texture from the source patch runs out due to the change of shape, and
• traces of the “overpaint” around the edges of the patch.
You can also see these when transforming paint on patches unless your patches are square.
The overpaint is used to ensure that the patches fit together without visible gaps. You can view the overpaint for patches in the UV view. Turn the UV paint display on in the Display Properties dialog box (right-click on the canvas, select Display Properties from the dropdown menu, and turn on Render UV Image).
Note the blank patches and “bleed” from the overpaint areas.
|
|
|
|
The original patch. |
Rotated 90 degrees. |


Paint transforms only apply within each patch. If you have more than one patch selected, each patch transforms independently. For example, if you flip two side-by-side patches horizontally, each patch flips separately.
|
|
|
|
Two patches selected. |
Flipped horizontally. |
Copying and Pasting Patches
See Copying and Pasting Paint for details on how to copy and paste individual patches.
Limiting Patches in a Bake Point Node
You can reduce bake times in a Bake Point node by limiting the amount of Patches/UDIMs being baked by that node to only Patches that require a bake.