Working with Materials in the Node Graph
Materials are created from multiple texture files, procedurals, or plain colors, which can be used to accurately represent how light interacts with real-world materials. This method of shading is called Physically Based Rendering (PBR). You can apply these materials to your assets for a more realistic result as well as establishing a base line look for your asset before adding more bespoke paint and crafting details.
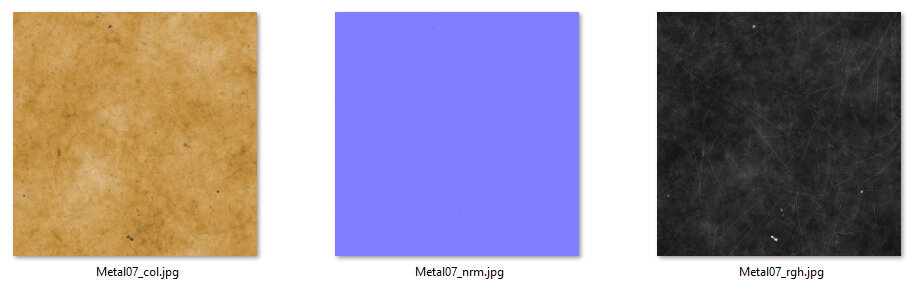
Here are examples of texture files:
You can create your materials manually using Material nodes and use them for texturing your assets. You can then export Material nodes as .mma files to share your materials with other texture artists.
Note: If you only want to create a material from a PBR texture set without any additional nodes, you can use the Material Ingest Tool to automatically create materials. Refer to Creating Materials with the Material Ingest Tool.
Creating a Material Node from Texture Files
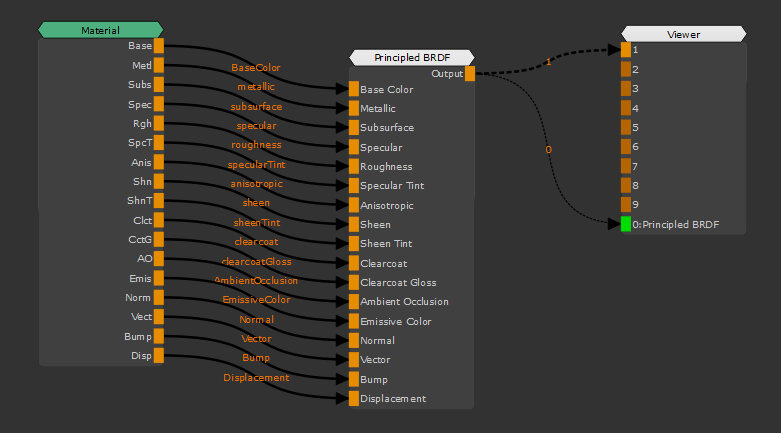
You can use a material template node called Material to create materials in Mari.
- Make sure that your texture files, which you need to create your material, are imported in the Image Manager palette.

- In the Node Graph, make sure you haven't selected any nodes.
- Press the Tab key and start typing 'Material'and select Material from the list of matches.
Alternatively, right-click in the Node Graph and from the menu that opens, navigate to Nodes > Misc > Material.
This opens the Create Material Node dialog.
- In the Select Shader dropdown, select the appropriate shader model for your material pipeline and enable the Create Shader Network checkbox if you want a new shader created to preview your material on the canvas.
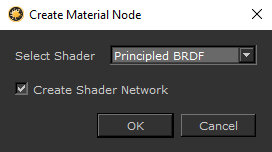
A Material node and a shader node are created in the Node Graph. The Material node automatically batch connects to the shader node.
- Select the Material node and press Ctrl+Enter.
This opens the Material node in a subgraph and displays the material inputs.
- In the Image Manager palette, tag your texture files as Scalar Data except the color textures, in this example: Metal07_col.jpg.
See Color Data and Scalar Data for more information on scalar data.
- From the Image Manager palette, drag each image making up your texture into the Material node's subgraph and connect them to the relevant material stream outputs.
Tip: First navigate to the required stream/material output and then drag the image. Once you dragged the image, you can rename the Tiled node for clarity.
Note: For image based textures, you can use Tiled or Tri Planar Projection nodes. Paint nodes are not supported for materials.
Your Material node is created, the texture is applied to your asset.
You can now export your material node, see Exporting a Material Node.
Note: To apply materials to your asset, refer to Applying a Material to an Asset.
Creating a Material Node from an Existing Material
In the Shelf palette, from the Mari Materials tab or a custom tab containing materials, drag a material into the Node Graph.

This creates a Material node.
The images making up the material are imported in the Image Manager palette in a tab called Material Images. If the material is solely made from procedurals, no images are added to the Image Manager palette.
Note: To apply your material to your asset, refer to Applying a Material to an Asset.
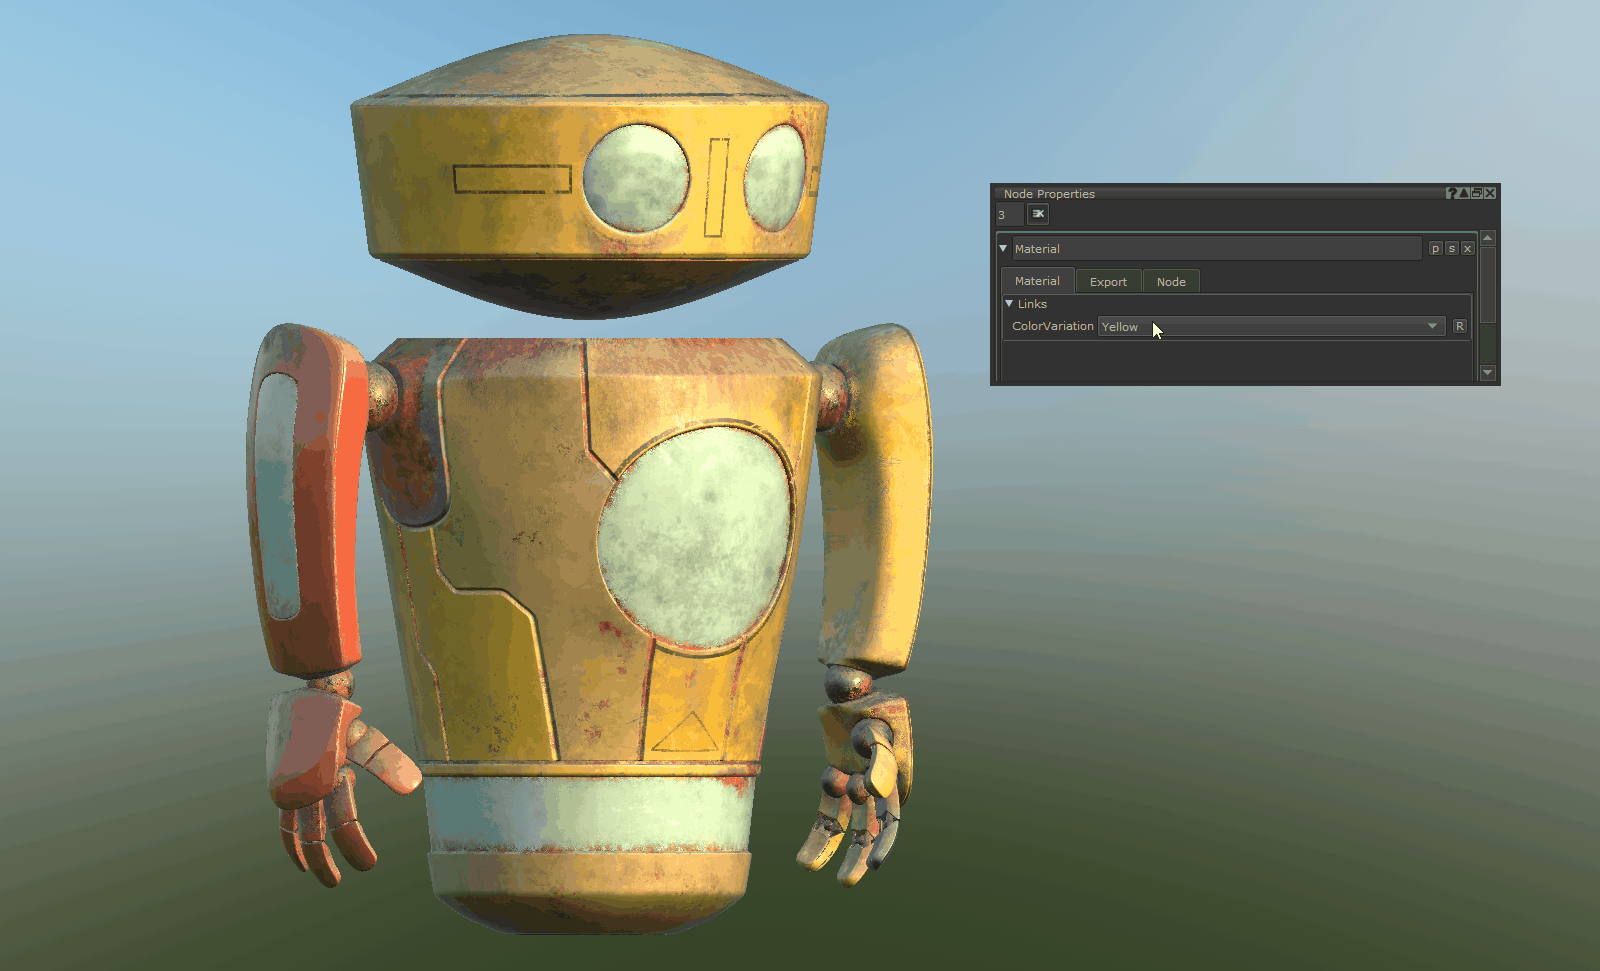
Exposing Material Properties Using the Promote Button
A Material node is a type of group node and you can expose node properties of a Group node by clicking the Promote  button. See Using Backdrops, StickyNotes, Groups, and Gizmos for more information on Group nodes.
Group nodes don't display any properties by default, other than those shared by all nodes. See Working with Node Properties for more information.
- Enter a Group node and then double-click the required nodes within this Group node.
Note: To enter a Group node, Ctrl+double-click the Group node to open its subgraph. Alternatively, select the Group node and press Ctrl+Enter or in the Node Properties palette, click the S button.
The properties of the nodes display in the Node Properties palette.
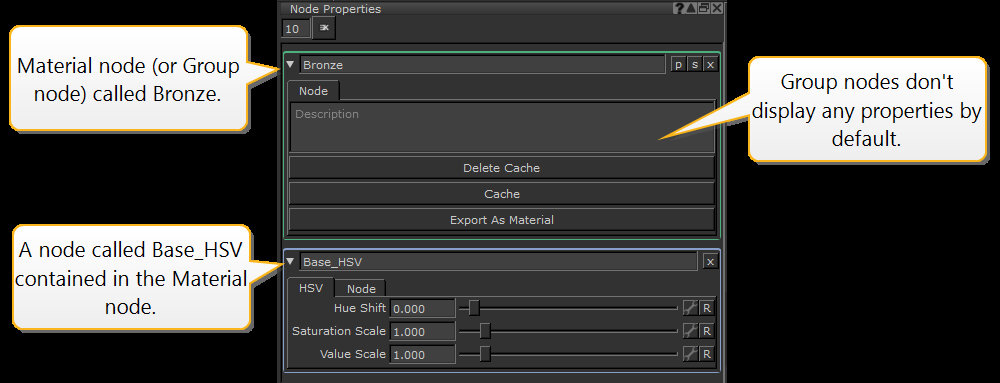
- Enable the Promote button.
The Promote button turns orange
 and the node properties are exposed at the Group node level.
Disable the Promote
button to unexpose the node properties.Note: You can link related exposed node properties together under one control (see Creating Knobs in a Material Node) but if you unexpose one or more node properties that are part of this control, this deletes the control at the Group node level as the control becomes irrelevant.
Creating Knobs in a Material Node
Similar to a Group node you can add knobs (controls) to your Material node, which is a type of group node, using the Group Node Knobs dialog. You first need to expose the properties of the nodes contained in your material node and then link them to create controls to change the Material node's properties.
- In the Node Properties palette, in the Material node's properties, click the P button.
This opens the Group Node Knobs dialog. - Click Pick.
This displays the node's properties of all the nodes in that group. - If you haven't exposed properties for that node, select the related properties and click OK.
If you already have exposed properties, skip this step.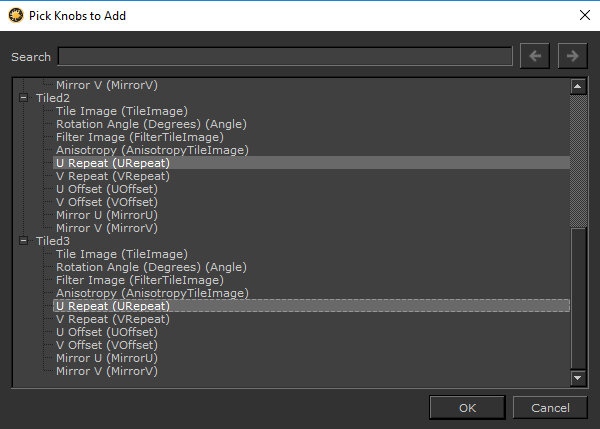
This exposes the node's properties at the Material node level.
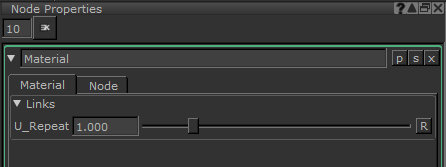
- Select the properties you want to group under one control and click Link.
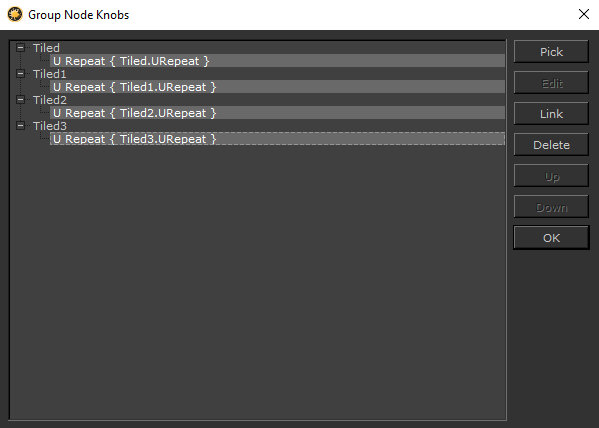
This opens the Link Knobs dialog.
- Enter the name of the new knob and click OK.
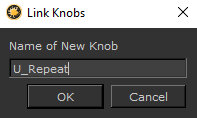
Note: Spaces are not allowed in knob names.
The exposed properties are linked under one knob (control) at the Material node level in the Node Properties palette.
- Click OK to close the Group Node Knobs dialog.
Note: Refer to Customizing Group Properties and Linking Exposed Properties on the Using Backdrops, StickyNotes, Groups, and Gizmos page for more details.
Copying and Pasting Node Knobs
You can copy and paste nodes within Material nodes that have promoted attributes. For example, you can have a Tiled node within a Material node that has its Rotation Angle (Degrees) property promoted as a knob on the Material node. Copying (Ctrl+C) and pasting (Ctrl+V) the Tiled node into the same Material, or a different Material, copies the promoted attribute over depending on where the node is pasted to, and whether the source node has links. See the table for a breakdown on this behaviour.
| Action | Result | Comments |
|
Pasting a node to the same Group If original node's knob is promoted |
Newly pasted node's attribute is promoted but unlinked. | The name of the pasted node matches that of the copied source, using number prefixes to identify the different nodes. |
|
Pasting a node to the same Group If original node's knob is promoted and linked |
Newly pasted node's attribute is promoted and linked to the copied node's linked knob. | The name of the pasted node matches that of the copied source, using number prefixes to identify the different nodes. |
| Pasting a node to a different Group
If original node's knob is promoted |
Newly pasted node's attribute is promoted but unlinked. | The name of the pasted node matches that of the copied source, using number prefixes to identify the different nodes. |
| Pasting a node to a different Group
If original node's knob is promoted and linked |
Newly pasted node's attribute is promoted and unlinked as the original node is not in the same Group. | The name of the pasted node matches that of the copied source, using number prefixes to identify the different nodes. |
| Pasting a node to a different Group
If original node's knob is promoted and linked to other nodes in the clipboard |
Newly pasted node's attribute is promoted and unlinked from the copied nodes not in the same Group, but linked to the sibling nodes pasted into the same Group. | The name of the pasted node matches that of the copied source, using number prefixes to identify the different nodes. |
| Pasting a node to the root Node Graph | All knobs linked or otherwise are removed. |
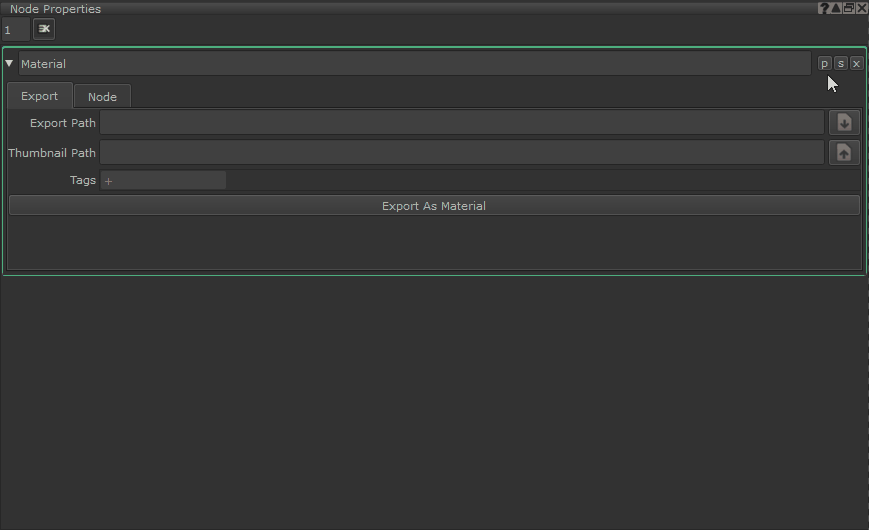
Exporting a Material Node
You can export your materials as .mma files to share with other texture artists.
- In the Node Graph, double-click the Material node.
This opens the Material node's properties in the Node Properties palette.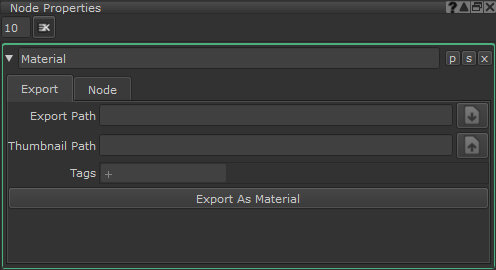
The Material Node Properties panel.
- Select the Export tab.
- Specify a file path in the Export Path field, or click
 to open a file dialog and browse to the export location.
The default File Name is the Material node name. - Specify a thumbnail image in the Thumbnail Path field, or click
 to open a file dialog and browse to the thumbnail image location.
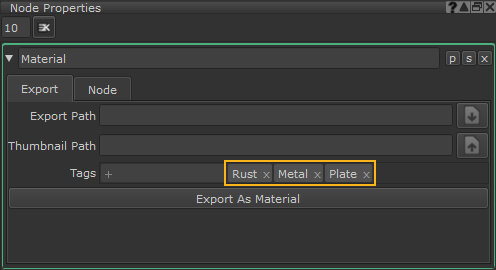
If you don't specify a Thumbnail Path, Mari creates one for you before the material is exported. - Add metadata tags to your material, if required. Start typing a description into the field to display a list of existing tags or create your own and press Enter to add the tag.
Tags enable Mari to display information about an .mma file before you apply the material. For example, if the material represents a rusty metal surface, you could added descriptive tags as shown to identify the material more easily.Note: Mari includes Python API commands to return information from tags in .mma files without actually importing the file. In Mari, go to Python > Documentation and search the index for tagList()for more information.
- You can also add User Attributes to Material nodes in the Node Properties > Node tab.
Click the icon to add an attribute.
User Attributes allow you to add information such as database references and version control information for asset management systems, such as Shotgun.
- Choose from a Boolean, Date, Float, Integer, or String attribute and give the attribute a name.
- Click Add to create the attribute. For example, you could add creation date and version information using the Date and String attributes.

- On the Export tab, click Export As Material.
The Material node is exported as an .mma file to the specified Export Path location. The .mma file contains all texture files used in Tiled or Tri Planar nodes within the Material node.
Importing a Material (.MMA File)
You can import materials (.mma files) in the Node Graph using the following methods:
Note: Mari includes Python API commands to return information from tags in .mma files without actually importing the file. In Mari, go to Python > Documentation and search the index for tagList()for more information.
You can import a material file directly in the Node Graph by dragging the .mma file from your file browser into the Node Graph.
This creates a Material node.
The images composing the material are imported in the Image Manager palette in a tab called Material Images. If the material is solely made from procedurals, no images are added to the Image Manager palette.
OR
- Right-click the Node Graph and navigate to File > Import Material.
This opens the Import Material from Archive dialog. - Browse to the material location, select an .mma file, and click Open.
This creates a Material node. The images composing the material are imported in the Image Manager palette in a tab called Material Images. If the material is solely made from procedurals, no images are added to the Image Manager palette.
Applying a Material to an Asset
Once your Material node is added to the Node Graph, you need to connect it to your scene to apply it to your asset. You can use two methods:
- Batch connection - where Mari connects multiple sibling pipes with one action. This speeds up the process.
- Manual connection - where you need to connect nodes manually.
Note: Material nodes must match the Shader Model of your project in order to apply them to your assets, meaning that material nodes' shader inputs must match the intended target shader input.
Note: To properly apply materials to your scene, ensure that:
• You've selected the required user shader in the Shaders palette, for example, Principled BRDF.
•You have channels created and connected to the appropriate inputs of the shader that match the streams/material outputs of your materials. See Creating Multiple Channels from Presets for auto-creating and connecting channels.
Note: To get the best visual result, ensure you have an environment light. See Configuring the Lighting.
Batch Connection Method
To apply a material to an asset using the Mari's batch connection method:
- Ensure a Material node is placed in the Node Graph.
- Select any Channel merge node.
- Press the Tab key and start typing 'Multi', then select Multi-Channel Merge.
This automatically batch connects the Multi-Channel Merge node to the Channel merge nodes and Channel nodes. - Connect any Material node's output to its corresponding Multi Channel Merge node's Over Input. For example, Metl to Over Metl.
This automatically batch connects the Material node's outputs to the Multi Channel Merge node's Over inputs.
This applies the material to your asset.
Note: You can also use the batch connection method to connect multi-channel nodes to Output nodes when working inside Material nodes. For more information, see Connecting Multi-Channel Nodes.
Note: A material node is not a paintable node but you can use masks to choose how to apply the material to your asset.
Manual Connection Method
To apply a material to an asset using Mari's manual connection method:
- Ensure a Material node is placed in the Node Graph.
- Press the Tab key, start typing 'Multi', and select Multi-Channel Merge.
Alternatively, right-click in the Node Graph and from the menu that opens, navigate to Nodes > Layer > Multi-Channel Merge.
This opens the Create Multi-Channel Merge Node dialog.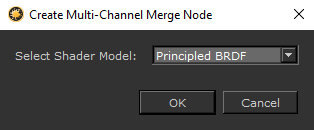
- Select the shader that matches the shader model of your project, and click OK.
This creates a Multi Channel Merge node. - Connect the first Material node's output to the Multi Channel Merge node's first Over Input.
This automatically batch connects the Material node's outputs to the Multi Channel Merge node's Over inputs.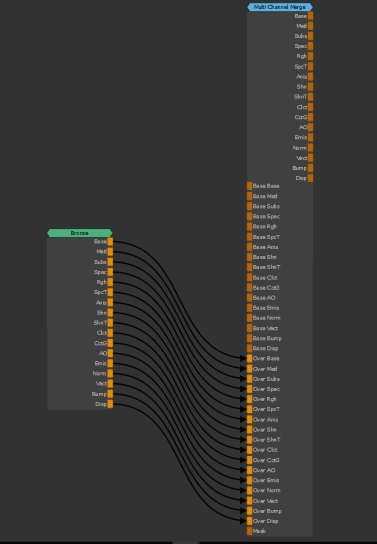
- Apply the following connections:
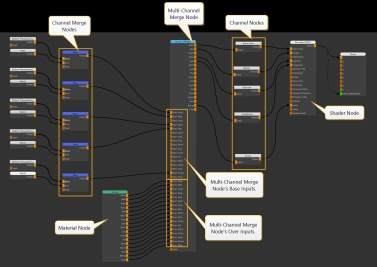
• Connect the Channel Merge node outputs to the relevant Multi Channel Merge node Base Inputs.
• Connect the Multi Channel Merge node outputs to the required Channel nodes' inputs. For example: connect the Multi Channel Merge node Base output to the Base Color Channel node.
• Connect the Channel nodes outputs to the Shader node inputs.
This applies the material to your asset.
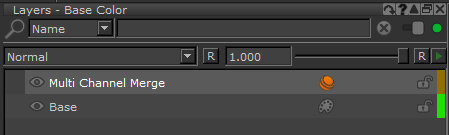
Notice that a Material layer is added in the Layers palette.
Note: A material node is not a paintable node but you can use masks to choose how to apply the material to your asset.


Merging Multi-Channel Material Nodes in the Node Graph
You can merge two multi-channel material nodes in the Node Graph by pressing M on the keyboard. This creates a new Multi-Channel Merge node.
Note: For more information on Multi-Channel Merge nodes, see Multi-Channel Merge Node.
To merge two multi-channel material nodes:
- Select two multi-channel material nodes of the same shader model in the Node Graph.

- Press M on the keyboard.
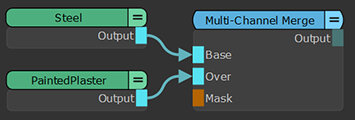
A new Multi-Channel Merge node of the same shader model is created.
The first node you selected is connected to the Base connections, and the second selected multi-channel material node is connected to the Over connections.
Note: If the two multi-channel material nodes are not of the same shader model, a new Multi-Channel Merge node of the same shader model of the first selected multi-channel material node is created. The first selected multi-channel material node is connected to the Base connections, and the second selected multi-channel material remains disconnected.
A Multi-Channel Merge node can also be created using the M shortcut when just one multi-channel material node is selected.
- Select one multi-channel material node in the Node Graph.

- Press M on the keyboard.
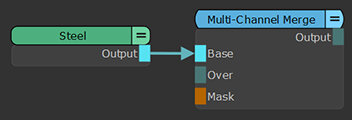
A new Multi-Channel Merge node of the same shader model is created.
The node is connected to the Base connections.
Authoring Material variations using the Switch node
You can use the Switch Node to switch between Material variations. To do this, you’ll need to set up multiple inputs in your node graph.
If you promote the activeInput knob to the top level of a group, material, or Smart Mask, the Active Input dropdown also appears within that node for easy access.
To learn about the Switch node, see Variations with the Switch node
To learn about promoting knobs, see Exposing Material Properties Using the Promote Button.
This example shows adding Switch node activeInput knobs to a Material node, linking them, and switching between them: