Search is based on keyword.
Ex: "Procedures"
Do not search with natural language
Ex: "How do I write a new procedure?"
Texture Falloff
A Texture Falloff allows you to use a texture to attenuate the effect of a tool, such as a bevel.
|
|
|
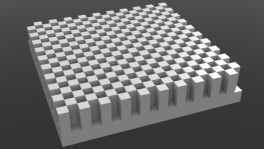
A cuboid using a polygon bevel to create a raised check pattern. |
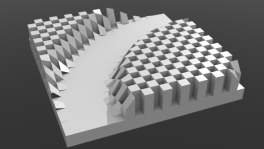
A texture falloff has been added to the bevel, using the Ring texture. |
The Texture Falloff has a constant value of 1 across its influence so as to affect a tool using only a given texture, and not by another means of attenuation. This is designed to make texturing falloffs easier when using the Mesh Operations List by making use of the falloff's texture input.
The Texture Falloff allows you to add a texture using the Mesh Operations List without using the Shader Tree.
Note: All falloffs have a texture input. You can use a different falloff for applying textures but it is less straightforward. For example, you could use the schematic texture input of the Linear Falloff, and position the linear falloff so that the geometry is only affected by the widest area of the falloff, and so remains unaffected.
Using the Texture Falloff
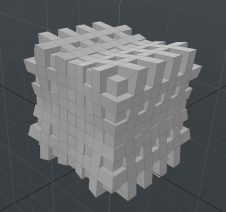
The Texture Falloff can be added using the Preset Browser. The instructions below show how to use the falloff to apply a Dimples texture to a polygon bevel tool in the Mesh Operations List. This indents the beveled polygons across the surface of the mesh. The steps assume a mesh already exists, and in this case we'll use a procedural cube with 9 segments across each axis as pictured below.
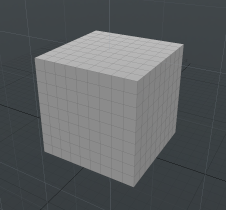
Note: If you already have a tool applied to a mesh that can be textured, skip to step 4.
| 1. | On the right panel open the Mesh Ops tab, click Add Item, and double-click Procedural > Polygon > Polygon Bevel. |
| 2. | Select polygons to bevel: Expand Selection in the Polygon Bevel and click (Add Selection). |

In this case, let's use Select by Index. Double-click on Select by Index in the Preset Browser to add it to the Polygon Bevel selection.
Select Polygons selection mode and click-select a number of polygons. When finished, click Set in the Select by Index properties. This populates the selection.
Note: In this example, a checkerboard pattern of polygons is selected across the surface.
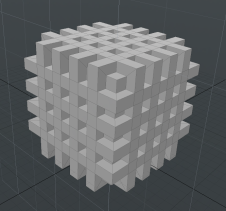
| 3. | Apply the bevel by clicking on Polygon Bevel in the list and adjusting the properties. In this case, we'll shift the polygons out by setting Shift to 90 mm. |
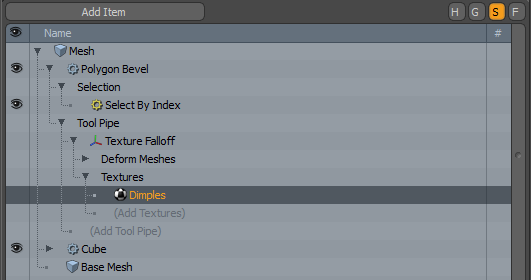
| 4. | You're now ready to apply a texture to the bevel tool. In the Mesh Operations List, expand the Tool Pipe for the Polygon Bevel and click (Add Tool Pipe). |
| 5. | Double click on Texture Falloff to add it to the stack. |
| 6. | Now choose a texture to apply to the falloff. In the Mesh Operations List, expand Textures under Texture Falloff and click (Add Textures). |
Choose a texture from the browser. In this case, let's use the Dimples texture.
| 7. | Set the Projection Type set to Cubic to indent the sides of the mesh. Edit the texture (Dimples) properties to adjust how the bevel is affected. |
| 8. | Edit the Texture Falloff Properties to customize the falloff behavior. |
Texture Falloff Procedural
The following procedural sub-tools are available:
• Deform Meshes - This allows you to use the falloff as a deformer on a mesh. You can connect a mesh to the falloff to transform the vertices, modulated by the falloff. SeeAdding a Falloff as a Deformer for more details.
Note: This offers a simple way to set up a deform with a falloff, without having a Transform Locator combined with the falloff.
• Textures - The source texture(s) used to attenuate the affected tool.
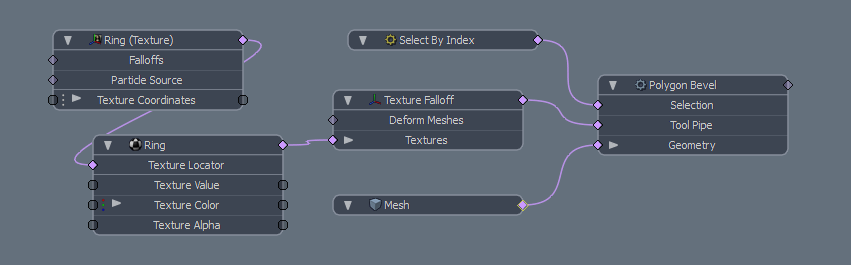
Texture Falloff Schematic
The schematic node has the same inputs as the procedural node.
Transform Properties
![]()
|
Name |
This displays the current item's name. You may change it by clicking the current name and typing a new name. |
|
Position XYZ |
Specify to position the item numerically in XYZ space. Position transforms originate from the Center position. |
|
Rotation XYZ |
Specify to set the rotation of the item numerically. Rotation transforms originate from the Center position. |
|
Order |
Sets the order that Modo applies rotations to the falloff item. By changing the order that Modo applies rotations you can sometimes reduce or eliminate gimbal lock. |
|
Scale XYZ |
Sets the size of the item numerically. Scale transforms originate from the Center position. |
|
Reset |
Resets the selected transform values to (0,0,0) and returns the items back to their default state. |
|
Zero |
Resets the selected transform property value to 0 and leaves the Center position and Item position intact. |
|
Add |
Use to add the selected set of transforms to the Channel list while keeping the default 0,0,0 values. (Keeping the default values is necessary for referencing. To be able to override a channel, it must first exist.) Note: Transform items are the channel groups associated with an item that store its transform values. These transform values control an item's position, rotation, or scale. By default, new items do not have any transform items associated with them (although they are visible within the Properties panel). Add only the necessary transforms on an as-needed basis to reduce scene overhead. If you don't use the Add function (as given here), you can transform the target item with one of the various transform tools (or by editing the values). When you do so, Modo automatically adds the transform item to the Channels viewport list. |
Texture Falloff Properties
|
Falloff Enable |
Toggles the influence of the falloff on or off. When disabled, the falloff has no effect on its target. However, Modo saves disabled layers with the scene, and the values persist across Modo sessions. |
|
Invert |
When enabled, reverses the influence area of the falloff. |
|
Strength |
Controls the maximum amount of influence the falloff has on its target. At a value of 50%, even areas that are affected fully by the falloff are only influenced half as much. |
|
Deformer Enable |
Connects the falloff to a mesh and use it as a mesh deformer. You can specify the initial rest state for the deformer if you select Setup Range as well and position the falloff appropriately. |
Easing Properties
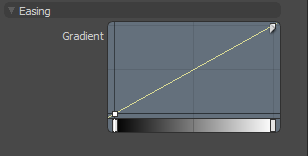
| Gradient | Allows you to re-map the weight of a falloff by creating a new custom falloff shape. In the Graph Editor, press Ctrl/Cmd + Alt and click on the graph line to add a new key point. Move the key points to create custom falloff shape. For more information, see Key Creation. |
Related Videos
Watch this video for an overview of the Gradient Editor.
Sorry you didn't find this helpful
Why wasn't this helpful? (check all that apply)
Thanks for your feedback.
If you can't find what you're looking for or you have a workflow question, please try Foundry Support.
If you have any thoughts on how we can improve our learning content, please email the Documentation team using the button below.
Thanks for taking time to give us feedback.