Search is based on keyword.
Ex: "Procedures"
Do not search with natural language
Ex: "How do I write a new procedure?"
Split, Move, and Sew UVs
The Split and Sew tools allow you to merge UVs together. The sew operation converts discontinuous UV data into continuous data to stitch UVs together. The move operation translates the entire UV island to facilitate the merger of separate UV shells. (A UV island is a connected group of polygons in a UV map.)
Use the Split and Sew tools to complete a number of operations:
• Separate one shell into multiple shells to correspond to different parts of a texture.
• Correct UV texture coordinates, which may be distorted or are overlapping shells in the UV Editor.
• Join small shells to reduce the number of seams to minimize distortion.
For more background information, see Working with UV Maps.
Watch this video for an overview.
To activate the Move and Sew tools:
| 1. | With your mesh already loaded, open the UV layout. |
| 2. | Under the layout tabs, click Edges. |
Tip: Alternatively, you can use the Vertices or Polygons selection modes.
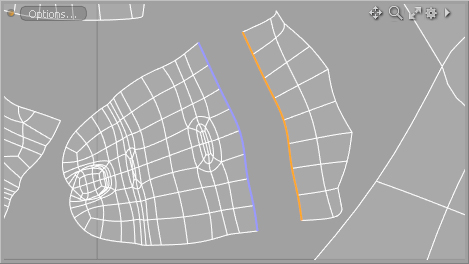
| 3. | Select a number of edges on one island in the UV Editor. |
The purple edges indicate that they are the geometric equivalent of the selected orange edges.
| 4. | In the Toolbox, select Split and Sew Tool. |
| 5. | Adjust the Split and Sew options. |
For more information, see Split and Sew Tool Options.
Using the UV Split and Sew Tool
The Split and Sew Tool allows you to change the layout of UVs by dragging your mouse over them. This tool acts like a brush, with the radius controlling the results. Applying the tool over vertices in the UV space, with the Mode set to Split, separates them apart, with the brush radius controlling how far they are offset from their starting position. Holding the Shift key while right-clicking and dragging your mouse on the vertices, sews the edges together. Alternatively, setting the Mode to Sew and clicking on vertices sews the edges together.
To activate the Split and Sew tool:
| 1. | With your mesh already loaded, open the UV layout. |
| 2. | Under the layout tabs, click Edges. |
Tip: Alternatively, you can set the selection mode to Polygons or Vertices to make a selection.
| 3. | Select a number of edges on one island in the UV Editor. |
The purple edges indicate that they are the geometric equivalent of the selected orange edges.
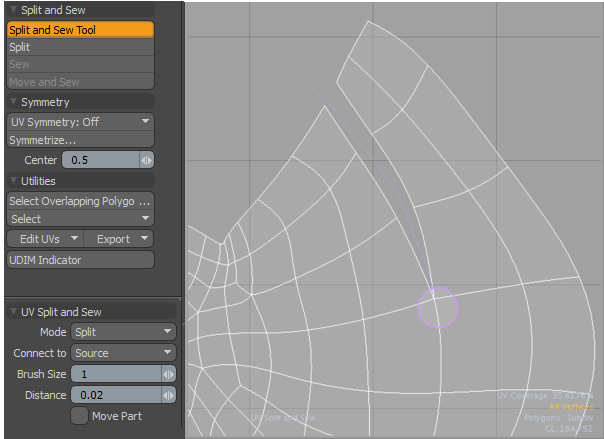
| 4. | In the Toolbox, select Split & Sew Tool. |
The UV Split & Sew options are displayed in the lower portion of the Toolbox.
To split and sew edges of an UV island:
| 1. | From the UV Split and Sew options, set the Mode to Split. |
| 2. | Right-click and drag the mouse to change the radius of the brush. |
For more information, see Customizing Paint Tools.
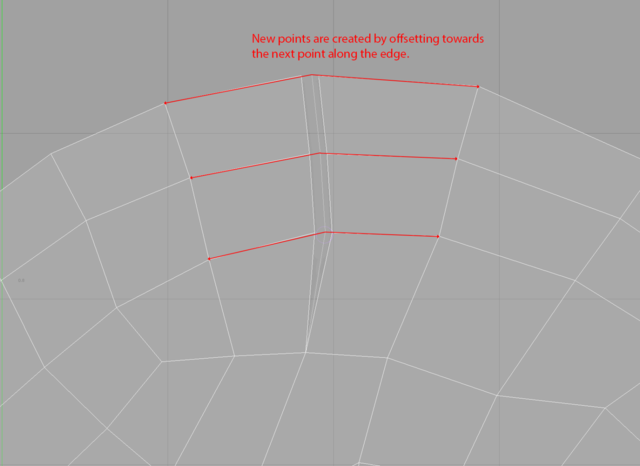
| 3. | With the Edges selection mode enabled, click and drag your mouse over a UV edge. |
The UV island splits apart, with the offset controlled by the brush radius. Newly created UV points are positioned along the connected edge that is perpendicular to the cut.
| 4. | From the UV Split & Sew options, set the Mode to Sew. |
| 5. | Click and hold the mouse on a UV edge and drag it along the split seam. |
Tip: Alternatively, to automatically switch from Split to Sew mode, hold the Shift key and click and drag on the vertices to sew the edges together.
The UV islands are sewn together.
Note: UV points within the brush radius are sewn together with other points for the same vertex, as long as they are also within the brush radius.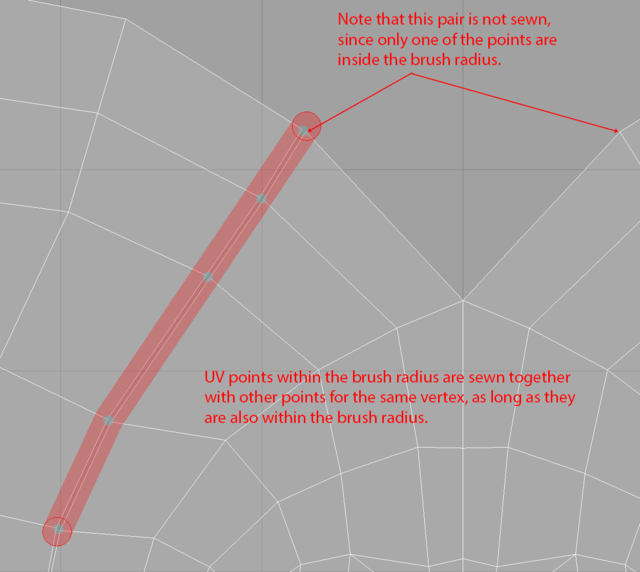
Click on the thumbnail to view the animation.
Note: If a brush stroke only covers a single vertex, or a set of unconnected vertices, those are split along all connected directions.
Click on the thumbnail to view an animation.

Split and Sew Tool Options
The following Split and Sew options are available:
Depending on the command key and option selected, the interface updates, allowing you to quickly adjust your UVs.
| Click the following | Results |
|
Shift + Move and Sew |
Connect to selected. |
|
Alt + Move and Sew |
Connect to unselected. |
|
Ctrl = Move and Sew |
Options dialog with scale toggle. |
|
Shift + Sew |
Connect to the center of selected. |
|
Alt + Sew |
Connect to the center of unselected. |
| Ctrl +Sew | Options dialog with move toggle. |
|
Option |
Description |
|
Split & Sew Tool |
Splits and sews UVs interactively with a brush by moving one shell towards another in the specified direction. • Mode - Sets the type of operation. The following mode options are available: • Split - Separates UVs from each other along the edges connected to the selected UV points, creating borders using brush strokes. The radius of the brush controls the offset. Right-clicking and dragging controls the brush radius. • Sew - Connects UV vertices along border edges using brush strokes. The radius of the brush controls the offset. Right-clicking and dragging controls the brush radius. • Connect to - Specifies how to sew UV vertices when the Mode is set to Sew. The following options are available: • Source - Moves paired edges to the border edges with brush strokes. • Average - Moves brush stroked source edges and the paired edges to the averaged position. • Destination - Moves border edges on brush strokes to paired edges. • Split from - Controls the split direction when Mode is set to Split. The following options are available: • Source - Aligns the split direction to the source side. • Average - Averages the split between the source and the destination. • Destination - Aligns the direction to the destination side. • Brush Size - Sets the size of the brush in pixels. • Distance - Sets the distance to split UV parts in UV coordinate space when the Mode is set to Split. • Move Part - Moves the entire UV seam to the border edges. By default, this option is off. |
| Split |
Allows you to splits UVs along the selected geometry (either along selected edges, around polygon selection boundaries, or on vertices). You can specify the distance of the UV split. Click Shift and then click Split on the Toolbox. The UV Split dialog displays. Specify the distance and then draw on the UVs to split. It doesn't offset the UVs but once split you can move the polygons independently.
Tip: Hold the Shift, Ctrl, or Alt key while you select the Split option to view other options. |
|
Connects matching pairs of discontinuous UVs. To use the tool, select an edge, vertex, or polygon that is currently discontinuous and click the Sew button. Modo moves both matching UVs to a set of averaged UV coordinates and converts the UVs into a single UV. For more information, see Sew UVs. When enabled the Sew UVs dialog displays.
• Connect to: • Center of Selected - Moves the unselected geometry to the center of the position and orientation of the selected geometry in the UV space. • Average - Moves and rotates both pieces to an averaged center position of the transform. • Center of Unselected - Matches the selected geometry to the center of the position and orientation of the unselected geometry. • Move Selected Only - Moves only the selected UVs to the position specified by the Connect to setting. Tip: Hold the Shift, Ctrl, or Alt key while you select the Sew option to view other options. |
|
|
Attaches UVs along the selected borders and moves them together in the UV space. When enabled the Move and Sew UVs dialog displays.
• Connect to: • Selected - Moves the unselected geometry to match the position and orientation of the selected geometry in the UV space. • Unselected - Matches the selected geometry to the position and orientation of the unselected geometry in the UV space. • Average - Moves and rotates both pieces to an averaged transform position in the UV space. • Scale - Modo scales the geometry as needed to create a stitched, continuous UV map. This option is enabled by default. Tip: Hold the Shift, Ctrl, or Alt key while you select the Move and Sew option to view other options. |
|
| Symmetry | |
|
UV Symmetry |
Mirrors corresponding components across the U or V axis. This allows you to quickly match component layouts you've made on one side of the mesh to another and to tidy up UV layouts to make texture mapping easier. • Off - Disables UV Symmetry. By default this option is disabled. • U - Uses the U position to apply a mirrored action. • V - Uses the V position to apply a mirrored action. |
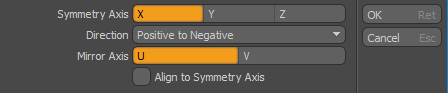
| Symmetrize... |
Allows you to select the how the symmetry is applied for the UV map.
|
|
Center |
Joins the discontinuous UVs at the line of UV symmetry. |
| Utilities | |
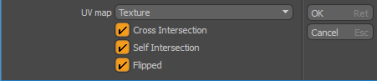
| Select Overlapping Polygons | Allows you to detect polygon errors in UV maps. This tool provides three options to assist you in locating these errors; Cross Intersection, Self Intersection, and Flipped. For more information, see Select Error UVs |
|
Select |
Specifies the type of selection mode. The following options are available: • Select UV Border - Modo takes the UVs that appear in the UV Editor and selects the border around the UV islands. It also selects the border edges on the geometry in the 3D viewport. In this way, you can see how the flattened sections fit together on the mesh geometry. • Invert Selection - Selects all of the UVs except your UV selection. • Convert - Changes the selection mode to Vertices, Polygons, or Edges. • More - Selects additional UVs. • Overlapping - Selects overlapping UVs. To use this tool, specify a texture you have added to your scene and specify how the overlapping is executed.
|
|
Edit UVs |
• Cut UVs - Cuts the selected UVs. • Copy UV positions - Copies the selected UV positions. • Paste UV positions - Pastes the selected UV positions. Select the mode Connectivity to respect polygon connectivity or select the mode Selection to respect selection order. • Transfer UV positions - Allows you to transfer all UVs from selected mesh items to another. This is useful when you want to copy the UVs you created for an original mesh to other duplicated mesh items in your scene. • Delete UVs - Deletes the selected UVs. • Set Value - Sets the Vertex Map value. Specifies the Vertex Map Type (UV or Position), Component (U or V), and specifies the Value. |
| Export |
Allows you to export your UVs using the following options: • Export UVs to EPS - The Save As dialog displays. For more information, see Importing and Exporting File Formats. • Export UVs to SVG - The Save As dialog displays. For more information, see Importing and Exporting File Formats. • Convert UVs to Mesh - The Convert UVs to Mesh dialog displays. For more information, see Convert UVs to Mesh.
|
| UDIM Indicator |
Allows you to target the current UDIM space to easily move UV elements around. For more information, see UDIM Indicator. |


Sorry you didn't find this helpful
Why wasn't this helpful? (check all that apply)
Thanks for your feedback.
If you can't find what you're looking for or you have a workflow question, please try Foundry Support.
If you have any thoughts on how we can improve our learning content, please email the Documentation team using the button below.
Thanks for taking time to give us feedback.