In Modo, the chief function of the Timeline is to control time in an animation. The Timeline, which usually appears below the main 3D Viewport, looks like a ruler with lines that represent individual frames. You can modify the current time position, which is represented by the white line and frame number, by dragging the white line left or right within the Timeline's numbered area. There is only one current time in an animation and modifying it in one viewport, changes it in all viewports so that there can be no confusion. To animate any item over time, you only need to set a specific value at a point in time (known as a keyframe) and then move to a different point in time to set a new keyframe. Modo smoothly interpolates the in-between values.
You can set keyframes in many ways. Within a Properties viewport, each item attribute shows a ![]() dot that you can click to set a keyframe. When set, the dot is red to signify the presence of a keyframe. You can also set keyframes by clicking any keyframing button under the Timeline. You may also choose Animate > Auto Key to have Modo set keys automatically whenever you modify an attribute. Additionally, you can set keyframes by clicking the far right column of the Channels Viewport or by selecting one or more channels in the Channels viewport and pressing the S key. Keyframe positions show as white dots on the Timeline with the interpolated in-betweens indicated by a green line connecting the various keys.
dot that you can click to set a keyframe. When set, the dot is red to signify the presence of a keyframe. You can also set keyframes by clicking any keyframing button under the Timeline. You may also choose Animate > Auto Key to have Modo set keys automatically whenever you modify an attribute. Additionally, you can set keyframes by clicking the far right column of the Channels Viewport or by selecting one or more channels in the Channels viewport and pressing the S key. Keyframe positions show as white dots on the Timeline with the interpolated in-betweens indicated by a green line connecting the various keys.
The Timeline, itself, represents a specified length of time, which is the result of dividing the number of frames by the frame rate. By default, Modo displays 120 frames at the default frame rate of 24 frames per second (FPS) to show 5 seconds of time (120/24 = 5). For longer or shorter sequences, you can adjust the length several ways. A 12-second sequence requires 288 frames (12 s x 24 fps = 288 frames). The scene's frame range represents the length of the total sequence. You can indicate a different sequence length in the Scene Itemproperties panel as the Scene Range or in the Timeline's Settings dialog where you can specify Scene Start and End.
Modo indicates a fraction of the scene length by using the current frame range. You can adjust the current frame range to concentrate on a specific interval without needing to preview the entire sequence. In the gray bar directly below the Timeline, you see two handles indicating the current frame range. Dragging either of those handles adjusts the current frame range.

The Timeline has a toolbar directly below it.
![]() Opens the Audio dialog. You can see more information about using audio with animations in the Animation Interface topic.
Opens the Audio dialog. You can see more information about using audio with animations in the Animation Interface topic.
![]() Opens the Graph Editor.
Opens the Graph Editor.
![]() Opens a dialog for setting auto-key behavior.
Opens a dialog for setting auto-key behavior.
Auto Key: When enabled, Modo generates a keyframe for any modification (position, rotation, or scale) made to an item at the currently selected time. Use this with caution because, although this can save you time from setting keyframes manually, you may find that you can inadvertently modify an item and overwrite previous values.
All- Sets a keyframe for any and all changes made to an item. Be aware that with this setting Modo may add keyframes where you may not intend to have them.
Animated- Sets a keyframe only for channels that have existing keyframe values. For example, if you set a keyframe only for the position channel an item and you move the time slider and change the position and rotation, Modo only sets a new position keyframe. You need to explicitly set a key for a channel for auto-keying to be effective.
Off- Turns off the automatic keyframing function.
![]() Sets the current time position to the first frame of the current frame range. (Keyboard shortcut: Shift+Up Arrow)
Sets the current time position to the first frame of the current frame range. (Keyboard shortcut: Shift+Up Arrow)
![]() Moves the current time position backwards one frame. (Keyboard shortcut: Shift+Left Arrow)
Moves the current time position backwards one frame. (Keyboard shortcut: Shift+Left Arrow)
![]() Displays the current time position. You can type a value to manually specify the current time.
Displays the current time position. You can type a value to manually specify the current time.
![]() Moves the current time position forward one frame. (Keyboard shortcut: Shift+Right Arrow)
Moves the current time position forward one frame. (Keyboard shortcut: Shift+Right Arrow)
![]() Sets the current time position to the last frame of the current frame range. (Keyboard shortcut: Shift+Down Arrow)
Sets the current time position to the last frame of the current frame range. (Keyboard shortcut: Shift+Down Arrow)
![]() Plays the animation sequence forward based on the current frame range. (Keyboard Shortcut: /)
Plays the animation sequence forward based on the current frame range. (Keyboard Shortcut: /)
![]() Stops sequence playback while playing. This button replaces the Play button. (Keyboard Shortcut: /)
Stops sequence playback while playing. This button replaces the Play button. (Keyboard Shortcut: /)
![]() Plays the animation sequence backwards from the current time. (This is on the submenu of the Play button.)
Plays the animation sequence backwards from the current time. (This is on the submenu of the Play button.)
![]() (Play Keys) Plays only the keyframes for the current actor, (This also supports the Range time markers.)
(Play Keys) Plays only the keyframes for the current actor, (This also supports the Range time markers.)
![]() Removes a frame and moves all following keyframes one frame backwards. (Keyboard shortcut: , [comma])
Removes a frame and moves all following keyframes one frame backwards. (Keyboard shortcut: , [comma])
![]() Adds a frame and moves all following keyframes one frame forward. (Keyboard shortcut: . [period])
Adds a frame and moves all following keyframes one frame forward. (Keyboard shortcut: . [period])
![]() Sets the current time position to the first keyframe of the currently selected item. For multiple items, Modo uses the time for the first selected item. (Keyboard shortcut: Ctrl+Up)
Sets the current time position to the first keyframe of the currently selected item. For multiple items, Modo uses the time for the first selected item. (Keyboard shortcut: Ctrl+Up)
![]() Moves the current time position to the previous keyframe that is nearest the current keyframe. (Keyboard shortcut: Ctrl+Left Arrow)
Moves the current time position to the previous keyframe that is nearest the current keyframe. (Keyboard shortcut: Ctrl+Left Arrow)
![]() Assigns a keyframes to all currently selected channels.
Assigns a keyframes to all currently selected channels.
![]() Assigns a keyframe to all animated channels belonging to the currently selected items.
Assigns a keyframe to all animated channels belonging to the currently selected items.
![]() Assigns keyframes to all animated channels belonging to the items in the actor and also any channel members.
Assigns keyframes to all animated channels belonging to the items in the actor and also any channel members.
![]() Assigns keyframes to all animated channels belonging to the items in the group. (This is on the submenu of the Keyframe Actor button.)
Assigns keyframes to all animated channels belonging to the items in the group. (This is on the submenu of the Keyframe Actor button.)
![]() Moves the current time position to the next keyframe that is nearest the current time. (Keyboard shortcut: Ctrl+Right Arrow)
Moves the current time position to the next keyframe that is nearest the current time. (Keyboard shortcut: Ctrl+Right Arrow)
![]() Sets the current time position to the last keyframe of the currently selected item. For multiple items, Modo uses the first selected item. (Keyboard shortcut: Ctrl+Down)
Sets the current time position to the last keyframe of the currently selected item. For multiple items, Modo uses the first selected item. (Keyboard shortcut: Ctrl+Down)
![]() Sets a keyframe for position channels for selected items.
Sets a keyframe for position channels for selected items.
![]() Sets a keyframe for rotation channels for selected items.
Sets a keyframe for rotation channels for selected items.
![]() Sets a keyframe for scale channels for selected items.
Sets a keyframe for scale channels for selected items.
![]() Sets a keyframe for the pivot positions for selected items. (Keyboard shortcut: Ctrl)
Sets a keyframe for the pivot positions for selected items. (Keyboard shortcut: Ctrl)
![]() Assigns the current World Position value to the local item. (Keyboard shortcut: Shift).*
Assigns the current World Position value to the local item. (Keyboard shortcut: Shift).*
![]() Assigns the current World Rotation value to the local item. (Keyboard shortcut: Shift)*
Assigns the current World Rotation value to the local item. (Keyboard shortcut: Shift)*
![]() Assigns the World Scale transform value to the local item. (Keyboard shortcut: Shift)*
Assigns the World Scale transform value to the local item. (Keyboard shortcut: Shift)*
* These are useful when retaining the position of driven items and when removing a constraint or modifier.
![]() Opens the Settings dialog that has options similar to those found in the Scene Item properties.
Opens the Settings dialog that has options similar to those found in the Scene Item properties.
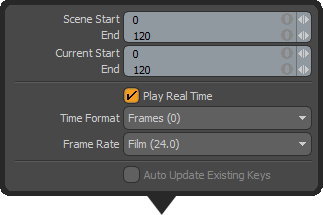
Scene Start/End: Sets the sequence length from the starting and ending frame numbers.
Current Start/End: Sets the current length from the starting and ending frame. When animating, you may want to concentrate on a single area of a scene for fine tuning. By adjusting the current range, you can temporarily crop the rest of the scene and concentrate on one section. Double-click the Timeline to reset the current range to the full scene range.
Play Real Time: When enabled, plays the scene in an OpenGL viewport using the Frame Rate setting as best as can be done. (If necessary, frames may be skipped.) When disabled, Modo plays every frame in the sequence at the fastest speed possible. (Depending on the scene's complexity, this may be slower or faster than the specified frame rate.)
Time Format: Specifies which standard to use when displaying individual frame numbers.
Frames- Indicates frames as sequential numbers by using a standard numbering format.
Seconds- Indicates frames as a passage of time by using the 0.0s format.
SMPTE- Specifies frames with a shorthand method 00:00:00:00 that represents hours:minutes:seconds:frames.
Film Code- Specifies frames by a linear measurement (the length of film if the animation were filmed) in feet by using 0.0 + 0 format.
Frame Rate: Specifies a frame rate by standard definitions: Film (24), PAL (25), and NTSC (29.97). The rate is in fames per second (fps), which is the number of still images that playback in sequence in one second of time.
Auto Update Existing Keys: When enabled, updates existing keys automatically. This is only available when Auto Key is disabled (Off). Normally, when Auto Key is off, any edits that you make are discarded when the current time changes unless you have manually keyed them. By enabling this option, you can have Modo update existing keyframes automatically (if changed) and you don't have to manually key them. Modo still discards un-keyed changes when the current time changes.
If you right-click the Timeline itself, a menu opens with relevant commands.
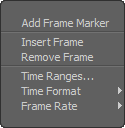
Add Frame Marker: Adds a frame marker to the Time Marker area above the Timeline. See the Time Markers section below for more information.
Insert Frame: Inserts a single, additional frame for all selected items at the current time positions. Modo pushes subsequent keyframes away from the added frame's position. This is useful in adjusting keyframe positions for selected elements.
Remove Frame: Removes a single frame for all selected items at the current time positions. Modo moves subsequent keyframes toward the removed frame's position. (It does not delete keyframes.) This is useful in adjusting keyframe positions for selected elements.
Time Ranges: Opens a dialog for you to numerically define either the scene range or the current range.
Time Format: Specifies the Timeline's display format. (For details, see the Time Format section below.)
Frame Rate: Specifies the playback frame rate. (For details, see the Frame Rate section below.)
Key time represents the time at which you create a keyframe. Some Modo functions that take a time input also use it (for example, the Insert Frame and Remove Frame commands). By default, the key time is the same as the current time. If you click or drag a marker in the Timeline, you set both the current and key times.
By middle-clicking or dragging with the middle button pressed, you can set the key time independently from the current time. If you do this, Modo shows a green marker in the Timeline. By pressing S to keyframe selected channels, Modo reads values from the current time, but it creates keyframes at the key time. This makes it easy when you copy item transform values from one point in time to another time in the scene or when you create a looping animation and the end frame needs to match the first frame.
You can use the Insert Frame and Remove Frame commands (possibly with the comma and period shortcut keys) with the key time to adjust the timing of animations. The key time does not change when you play an animation, and you can set it by middle-clicking the Timeline during playback. By positioning the key time marker between keys, you can quickly adjust the timing with the Insert Frame and Remove Frame shortcuts while viewing the results in the 3D Viewport.
Modo provides a number of keyboard shortcuts to help you set keyframes while working with the Timeline in the Animation view. You can quickly set keyframes on an entire item or specifically on the various transform elements or selected channels. When using the Key Selected Items command, Modo creates keys on any channels for an item that already contains at least one keyframe. Modo does not key other channels for that item.
Shift-Y = Key transforms
Shift+E = Key Rotations
Shift+W = Key Positions
Shift+R = Key Scale
S = Key Selected Channels
Shift+S =Key Selected Items
These two shortcuts quickly slide any keyframes forward or backward that are after the current time. This is useful for quickly retiming portions of your animation.
, (comma) = Time Offset Forward
. (period) = Time Offset Backward
TIP: These Animation keyboard shortcuts are part of the Item mode keymap. When Modo is in a component selection mode (such as Vertices, Edges, or Polygons), many of these keys perform important modeling tasks. Because of this, Modo provides an efficient workflow for both processes.

Directly above the Timeline, Modo provides an area where markers can be added to call out specific locations or to indicate certain areas of a sequence. You can also add tags to denote information or reminders about a sequence with special types of markers. By default, the Time Marker is only visible in the Animation layout. In the other layouts that show the Timeline, Modo hides it to maximize the 3D Viewport space. By dragging the top edge of the Timeline area upward, you can reveal the Time Marker.
You can add markers anywhere along the Timeline by middle-clicking in the Time Marker to adding a new marker at the nearest whole frame location. You can also add a marker at the current time marker position by pressing M on the keyboard when the Timeline, itself, has input focus or by right-clicking the Timeline area and choosing Add Frame Marker. Modo attaches time markers to items in the scene, depending on what you selected before you added the marker.
• If you selected a locator-type item (such as mesh, camera, or light items), Modo attaches the marker to it.
• If there is an active actor and action, but you have not selected an item, Modo attaches the marker to the action.
• If there is an active actor but no active action or selected item, Modo attaches the marker to the actor.
• If there is no active actor, action, or selected item, Modo adds the marker to the marker to the scene.
When not a part of the scene, markers only appear when you select the associated elements. Scene markers always appear. The left column of the Time Marker shows an icon that indicates which type of item Modo adds new markers to: a clapper board for scene markers, a cube for locator item markers, a standing actor in brackets for actor markers, and a running actor for action markers.
![]()
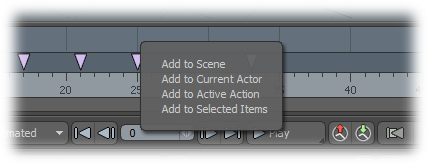
You can also add time markers to specific items by selecting the target markers and right-clicking in an open area of the Time Marker and choosing the relevant command: Add to Scene, Add to Current Actor, Add to Active Action, or Add to Selected Items.
You can move time markers in the Time Marker are after you create them by dragging them to a new position. You can select and move multiple markers by pressing the Shift key as you select additional markers and then dragging them to the new location. (You can also drag across multiple markers to select the entire range.) Clicking an open area on the Time Marker clears the selection. By right-clicking directly over a marker, you can specify the marker's position as well as customize how the marker looks in the Time Marker.

Set Time: Opens the Time Marker Time dialog for you to define a new time location for the target marker. (If you have selected multiple markers, then Modo moves all to the specified Time value.)
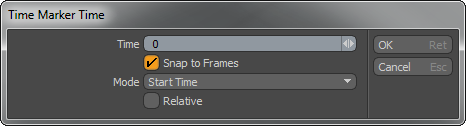
Time: Defines the position on the Timeline that the marker is moved to or defines an offset amount if Relative is enabled.
Snap to Frames: Moves all frame markers to the nearest whole frame location.
Mode: Determines what the Time value relates to.
• Start Time- Defines the marker location or the start position for a range marker.
• End Time- Defines the end position for a range marker.
• Shift- Defines an offset amount from the marker's current location. (The shift can be positive or negative.)
Relative: When enabled, shifts markers by the Time value relative to their current position. When disabled, markers move to the absolute time position along the Timeline.
Set Range: Opens the Time Marker Time dialog (as does the Set Time option), but the dialog defaults to the End Time mode with Relative enabled.
Frame Limits: When enabled, identifies range markers that have limits by an arrow. (If the marker has a label, then Modo does not draw the graphic.) Modo has some commands that use range markers with limits.
• Frame Next/Previous- When stepping through frames the range marker with limits restricts the steps to the range of the marker. If you step through, the stepping loops back to the start or end of the range depending on the direction. This could be useful for rolling poses.
• Animation Playback- Animation playback looks for range markers with limits and only plays within the range of the marker. This only applies when the current time is within the range of the marker when playback is first started. If you start playback outside the range of the marker, the animation plays normally.
• GL Preview- When generating GL preview, Modo uses range markers with limits assigned if the current time is within the range of the marker when the recording starts. If the current time is outside the marker range, then Modo uses the current, normal scene range.
Shape: Provides several default shape types that you can assign to a given marker or selection of markers. These include: Default (a downward triangle), Square, Diamond, and Bar.
![]()
Color: Use to color code the marker (or markers) from the list of standard available colors. You can also color bar range markers.
Label: Opens a dialog for you to assign a short text string to the marker. This text string shows as a Tooltip for the marker. If Show Label is enabled, the text appears above the marker, itself.

Delete: Removes all selected markers from the Timeline.
Range markers are time markers that have a length of time associated with them. To create a range marker, add a time marker and then drag it with the right mouse button. Modo changes the marker to a range marker and determines the length from how far you drag. You can edit the starting time of a range marker by dragging with the left mouse button and the end time by dragging with the right mouse button. When editing a single range marker, use the left mouse button to change the start or end time by dragging near the start or end of the marker. If you press the Shift key as you drag, you move the whole marker. If you move a time marker into the range of a range marker, the time marker shows on top of the range marker. You can adjust the end time of a range marker by right-clicking it and choosing Set Range. See the description for the Time Marker Time dialog described previously.
The Spacing Chart tool assigns its own special markers. See the Spacing Chart topic for detailed information.

In the Timeline Viewport Settings menu, you can adjust the display of the Timeline to customize it for your needs. To view this menu, click the triangular icon in the upper-right corner of the Timeline.
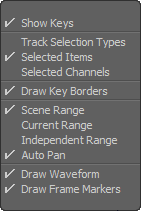
Show Keys: Shows or hides the keyframe markers in the Timeline, itself.
Track Selection Types: When enabled, displays the keyframes for either animated items or animated channels as appropriate.
Selected Items: When enabled, shows Timeline keyframes only when you select an item that is animated.
Selected Channels: When enabled, shows Timeline keyframes only when you select a channel that is animated.
Draw Key Borders: Shows or hides a black outline around the keyframe icons in the Timeline.
The following settings pertain to the Track view when the Timeline is extended upward to display additional keyframe handles for easily adjusting animation timing.
Scene Range: When enabled, the Track view displays the entire range of frames defined by the scene item.
Current Range: When enabled, the Track view displays only the current range as defined in the scene item.
Independent Range: When enabled, the Track view can show an independent frame range from that of the Timeline, itself.
Auto Pan: When enabled, Modo automatically pans the Timeline so that the current time marker stays in the center of the Timeline when you work with a limited range view.
Draw Waveform: Shows or hides a waveform displayed in the background of the Timeline.
Draw Frame Markers: Shows or hides the Frame Marker area above the Timeline.