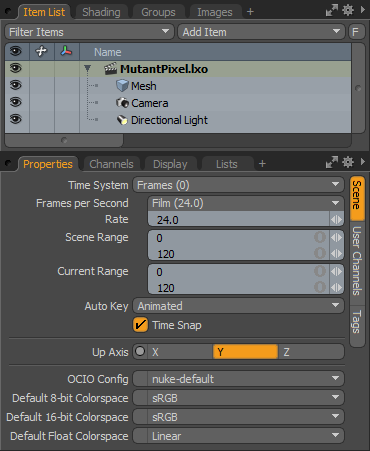
The Scene Item is the topmost layer of any file within Modo: all items within the scene are children of the scene itself. A scene item is always named by the file it represents. To change the name of a scene, you need to use the Save As command to assign a new file name to the scene. There are a number of attributes that are associated to scenes. You can select the scene item in the Item List and access them in the Properties viewport.
|
Option |
Description |
|---|---|
|
Time System |
Allows you to specify which standard is used to display individual frame numbers. • Seconds: Indicates frames as a passage of time, using the 0.0s format. • Frames: Indicates frames as sequential numbers, using standard numbering format. • SMPTE: Specifies frames utilizing a shorthand method 00:00:00:00; representing hours:minutes:seconds:frames. • Film Code: Specifies frames by the length of the film in feet (linear measurement), using 0.0 + 0 format. |
|
Frames per Second |
You can specify a frame rate by standard definitions, such as Film (24 FPS), PAL (25 FPS), and NTSC (29.97 FPS). Frames per Second, usually referred to as FPS, is the number of still images that play back in sequence in one second of time. |
|
Rate |
The actual frame rate value is displayed here, change this value for specific nonstandard frame rates. |
|
Scene Range |
This value specifies the total length for animated scenes. |
|
Current Range |
Allows you to temporarily crop out the rest of the scene so you can concentrate on one section. This is useful when you are fine-tuning a single area during animation. |
|
Auto Key |
Automatically creates keyframes when items are moved in a scene. The different settings specify how keyframes are created. • All: Generates keyframe data for all channels associated with the modified item. • Animated: Only keyframes those values that have been edited or modified. • None: Disables the auto-keyframe functionality. |
|
Time Snap |
Snaps the current time indicator and keyframes to whole frame values. |
|
NOTE: These setting can also be modified in the Timeline Options dialog. For more information, see Working with the Timeline. |
|
|
Up Axis |
By default, the Y axis represents up in Modo's virtual world. The up axis indicator allows you to specify an alternative axis. |
|
OCIO Config |
This option controls which configuration type can be used to define the various colorspaces in the scene (as different config files contain different combinations of possible colorspaces). The initial values in this dialog are defined in System > Preferences > Rendering > Color Management. |
|
Default Colorspace |
For the various bit depths of images (8, 16 and 32bit float), this determines the scene-wide working colorspace for all images (per bit-depth). As images are imported into a scene for various purposes (background, textures, and so on) color management is automatically applied to ensure consistent color throughout the workflow. Within each texture layer, under the Image Still sub-tab, there is a Colorspace setting. By default, this option is set to Default, which means that the setting itself defers to the scene-wide setting defined here in the scene item. You can also change from the Default value within the texture item to another colorspace, which then overrides the scene-wide designation. For more information on color management, see Color Management. |