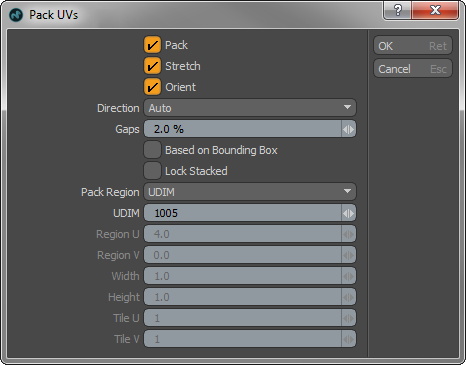
The Pack UVs tool automates the process of organizing UV island data to fit into the desired UV space. The command includes options for Pack, Stretch, and Orient, as well as a Gaps percentage setting and a Pack Region. The command could be thought of as an automated puzzle solver. With the default settings, the command moves, scales, and rotates each individual UV island until they all fit neatly within the designated grid space, as if solving a complex jigsaw puzzle.

The Pack UVs command option is found in the menu bar under Texture > UV Operators > Pack.... It can also be found as a button in the toolbox of the UV layout workspace. The command modifies the currently-selected UV map, selected in the Lists viewport, or the first one selected, in the case of multiple selections. Invoking the command opens the Pack UVs dialog with a variety of options to control the packing.
• Pack - controls whether the UV islands can be moved from their current location.
• Stretch - controls whether pieces are kept rigid or if they can be stretched (distorted) for a better fit.
• Orient - controls whether the UV islands can be rotated as they are packed.
• Direction - offers three options for controlling the main orientation of the UV islands: Auto orients them in the direction that best fits, Horizontal orients UV islands in a mostly wide proportion, and Vertical orients them in a mostly tall proportion.
• Gaps - controls the final spacing between the islands. Greater values increases the spacing between neighboring UV islands.
• Based on Bounding Box - when enabled, treats each island as a rectangular shape, based on the overall width and height.
• Lock Stacked - when enabled, keeps stacked islands intact when packing. Overlapping islands must share vertex positions, such as when UV mapped geometry is copied, pasted, and moved in the 3D Viewport, or half of a model is mirrored for symmetry.
• Pack Region - defines the location within the UV space to position the packed UVs.
• Normalized - packs the UVs into the base 0 to 1 region. It has no options for control.
• Nearest - packs the UVs into the closest UV region based on its initial location. It has no options for control.
• UDIM - allows you to define a specific UDIM region. When selected, the specific UDIM is specified in the input field below. For more information, see UDIM Workflow.
• Manual - allows you to manually designate a UV space region as a packing area. When selected the region is specified using the Region and Width/Height input fields below.
• Tiles - defines a maximum rectangular area by number of full regions wide and high, defined with the Tile U and Tile V values. This targets the packing to fill all the tiled sections within the defined region (without crossing the tile boundaries).
• UDIM - when the Pack Region option is set as UDIM, this option allows you to designate the specific UDIM region as the target for packing the UVs into.
• Region U/V and Width/Height - when the Pack Region option is set as Manual, the Region and Width/Height values designate the target area for packing the UVs into. The Region U/V values define the lower-left corner of the packing region and the Width and Height values define the portion of that area that is used for packing, originating from the defined region position.
For example, to fill all of the standard 0-1 UV space, the region would be set to 0,0 and the Width/Height would be set to 1.0, 1.0. If the region is set to -1,-1 and the Width/Height were set as 2.0, 2.0 then the UVs would fill the entire -1 to 1 on both axes, treating it as one giant UV area to pack into.
• Tile U/Tile V - defines the rectangular tile region by U (width) and V (height) when using the Pack Region's Tiles option.