Procedurally Project Planar Decals with The Decal Planar MeshOp
In addition to hand paint decals onto a mesh with Mesh Paint Replica, you are able to manually set up and project planar decals. While limiting you to creating a single decal at a time, this method gives granular control over the decal and how it's projected.
Note: For more information on painting multiple decals onto a mesh with Mesh Paint Replica, see Create and Hand Paint Decals With Mesh Paint Replica.
To procedurally create a planar decal:
- Make sure you have a decal and a mesh to apply it to in your scene.
- Create a new Mesh Item and keep it empty.
- In the empty Mesh Item, create a Decal Planar MeshOp.
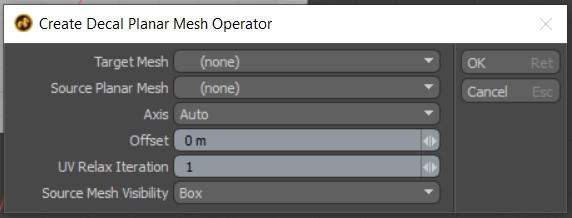
- In the Target Mesh parameter, assign the model you want the decal to be projected onto.
- In the Source Planar Mesh parameter, assign the decal that you want to project onto the Target Mesh.
- Increase the Offset to 1 mm.
- Axis, UV Relax Iteration and Source Mesh Visibility can be left as is.
- Click OK.
Note: For more information on creating decals, see How to Create a Projectable Decal.
The following window opens:

Note: You can use a Replicator item as a source. The local UVs, Depth and Offset per source plane are stored in special weight maps in the source mesh item. Modo automatically converts the Replicator item to internal source mesh to get the local per plane weight attributes. This allows you to use the Replicator item as a decal source without freezing it into the mesh with per source plane weight attributes.
Offset controls how far away from the mesh the decal sits. If the decal is left at 0 m, it'll be sat in the mesh and may look distorted. By placing the decal 1 mm away from the mesh, the decal is stilling slightly offset from the surface of the mesh allowing the decal to be seen in full.
To project the decal onto your mesh:
- Select the decal in the items list.
- Left-click and drag the decal in the items list and hold it over the model you want to apply it to.
- In the menu that appears, click Align and Place.
- The decal is placed on the mesh.
As long as the Mesh Item containing the decal is selected, you are able to translate and scale your decal as you would were it not projected onto a mesh. When repositioning a decal, it's recommended that the decal is first selected while in item mode, and then selected using a component mode such as Polygon Selection. This is so that item-level transformations are left as their default, preventing any unexpected results when the decal is projected.
The Target Mesh of your decal should also have item-level transformations left as their default. This can be done by freezing your mesh, so that all transforms are at zero. For more information on freezing transformations and different selection modes in Modo, see Freezing Geometry and Selection Modes.
Decal Planar Settings
There are a number of settings available in the Properties tab for the Decal Planar MeshOp.
| Control | Type | What it Does |
|---|---|---|
| Enable | checkbox |
When check, it enables the MeshOp. When unchecked, it disables the MeshOp. Enable only impacts the MeshOp that enabled/disabled on. If there are multiple Mesh Operations in a stack, they will remain active but enabling or disabling a MeshOp may impact the order of operations. |
| Use World Transform | checkbox | Enabled by default. Calculates transforms based on the World Position of the Mesh Operation. In most cases, this provides expected results. |
| Axis | button |
Controls which axis the decal is projected along.
|
| Offset | text field | Determines how close to or how far away form the surface of the mesh the projected decal sits. |
| UV Relax Iteration | text field | Determines how many times the UVs belonging to the projected decal are relaxed. Useful for preventing image distortion along a surface. |
| Relax Mode | dropdown |
Allows you to choose from various modes that control how the UVs of your decal are relaxed.
|
| Positive Depth | text field | Allows you to determine how far into your asset the Decal is projected. |
| Negative Depth | text field | Allows you to determine how far away from the surface of your asset that the projector projecting the decal is sat. |
| Remove Coplanar Edges | checkbox | Simplifies decal polygons by removing coplanar edges from the decal mesh. |
| Include Hierarchy | checkbox | Allows a set of stacked decals to be used. Useful when layering multiple decals on top of each other. |
| Show Depth Handle | checkbox | Makes visible depth handles that can be used to manipulate Positive and Negative Depth parameters. |
