Working With Vertex Maps Procedurally
You can create Vertex maps and assign weight values, seams, and RGBA values to them non-destructively using mesh operations. The tools are accessible from the Mesh Operations List.
Tip: For more information on procedural modeling and mesh operations, see Procedural Modeling with MeshOps.
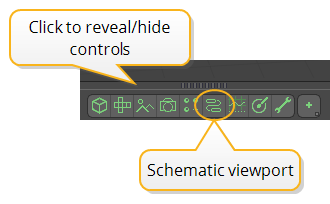
The easiest way to access the Mesh Operations list is using the Modo layout.
- Click the thin bar above the 3D viewport, indicated by a small arrow in the middle.
This reveals additional controls.
- Click the Mesh Operations list button.
The Mesh Operations List opens on the right.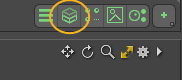
Creating a New Vertex Map Procedurally
The Create Vertex Map mesh operation allows you to create a new vertex map from the Mesh Operations list.
- In the Mesh Operations list, click Add Operator, and under Mesh Operations > Vertex Map, double-click Create Vertex Map.
The Create Vertex Map mesh operation is added to the list and its Properties are displayed on the right pane.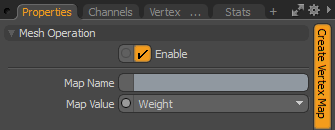
- In the Create Vertex Map Properties, enter a new Map Name and Map Value.
You have the following Map Value options:• Weight - Stores weight strength values for falloffs and texturing.
• UV Seam - Stores information on the seam edges from a UV map.
• RGB - Defines a vertex color map based on red, green, and blue color values.
• RGBA - Defines a vertex color map based on red, green, and blue color values and an additional transparency (Alpha) value.
Your new Vertex Map is created and listed in the Vertex Map List.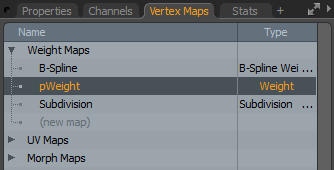
Tip: You can select the vertex map associated with the selected mesh operation by clicking Select Map, so you don't have to manually select vertex maps from the Vertex Map List.
Setting Weight Values
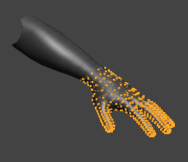
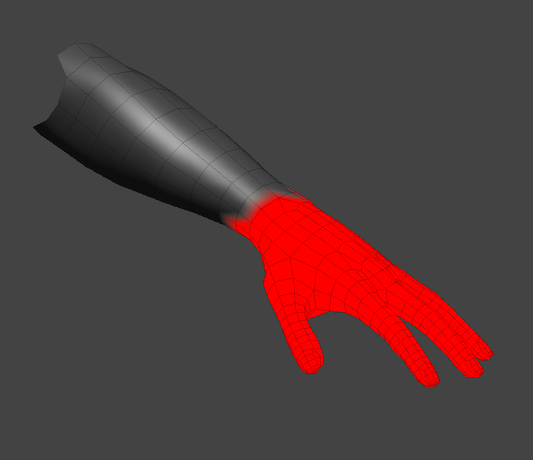
You can set weight values to a specified Weight map using the Set Weight mesh operation.
Tip: Enable the Show Weightmaps ![]() button at the top of the 3D viewport to see the weight values in the viewport, or press O and ensure Show Weightmaps is selected in the Active Meshes tab.
button at the top of the 3D viewport to see the weight values in the viewport, or press O and ensure Show Weightmaps is selected in the Active Meshes tab.
You need to create a Weight map for your mesh, as described in Creating a New Vertex Map Procedurally. Then set weights the following way:
- In the Vertex Maps list on the lower right, under Weight Maps, select the weight map you created.
- In the Item List, select your mesh item and in the 3D viewport, select the vertices, edges, or polygons for which you want to set weights.
- In the Mesh Operations list, under Mesh Operations > Vertex Map, double-click Set Weight.
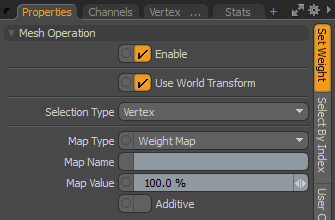
This adds the Set Weight mesh operation to the list and opens its properties in the Properties panel on the right pane. - In the Set Weight Properties, select the Map Type you want to use. A Weight Map is embedded on the mesh, while a Weight Container is a separate item.
Note: For more information on Weight Maps and Weight Containers, see Working with Weight Maps.
- Set Map Name to the name of the Weight Map you want to use, in our example, 'pWeight'.
If you have Show Weightmaps enabled in the Default view, the selected part of the mesh is colored red in the 3D viewport, indicating that the default 100% map value is assigned to it.
- Adjust the Map Value to set the weight value.

Set Weight Properties
|
Enable |
Enables/disables the Set Weight mesh operation. |
|
Use World Transform |
Sets the coordinates from Local Space to World Space where vertices are defined relative to an origin common to all the objects in a scene. |
|
Selection Type |
The element type selected. This mesh operation can take a Vertex, Edge, or Polygon selection. |
|
Map Type |
Set if you want to use a Weight Map or a Weight Container. For more information on the differences, see Working with Weight Maps. Note: If Map Type is set to Weight Map and the map can't be found, a new Weight Map is created. |
|
Map Name |
The name of the Weight Map to edit. |
|
Map Value |
The weight value to be applied to the selected elements. |
|
Additive |
When enabled, the Map Value is added to the current map value. When disabled, the current map value is set to the amount specified in Map Value. |
Setting Edge Weight Values
You can set edge weight values on a subdivision map using the Set Edge Weight mesh operation.
- In the Item List, select your mesh item and in the 3D viewport, select the edges for which you want to set weights.
- In the Mesh Operations list, under Mesh Operations > Vertex Map, double-click Set Edge Weight.
This adds the Set Weight mesh operation to the list and opens its properties in the Properties panel on the right pane. - In the Set Edge Weight Properties, set the Map Value to the required percentage.
The edges are modified in the viewport.
|
|
|
|
|
Map Value 0% |
Map Value 25% |
Map Value 50% |

Mesh Operation Inputs
The procedural vertex map operations all have inputs you can edit in the Mesh Operations list. You can expand them in the list by clicking the arrow ![]() in front of them. This reveals the inputs the operation uses.
in front of them. This reveals the inputs the operation uses.
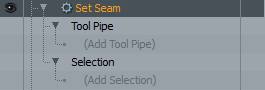
The Inputs of Set Seam
• Tool Pipe - Add falloffs and sub-tools to the operation. For example, instead of selecting vertices, edges, or polygons, you can use falloffs to create a selection.
• Selection - Select vertices/edges/polygons or modify your existing selection. For more information on procedural selection, see Procedural Selection.
The following procedural vertex map operations are available.
Flood Weight
The flood weight operation searches each island on vertex maps for the lowest and highest weight value, and then floods each island with the lowest or highest value found. This gives you the option to create flatter surfaces in situations where you might not be able to easily achieve rigid effects.
Note: An island in Modo is referring to a single piece of geometry in the vertex map.
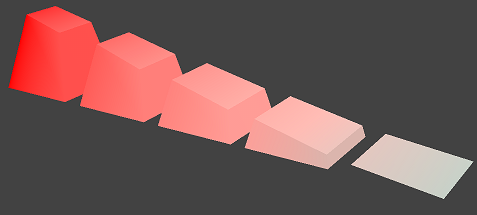
The original mesh, with a weight map, a linear falloff, and a polygon bevel operation applied. There are five islands on this mesh.
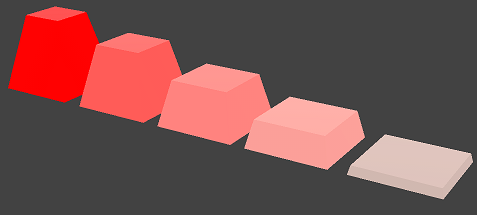
A flood weight operation assigned to the mesh with High/Low set to High.

A flood weight operation assigned to the mesh with High/Low set to Low.
Flood Weight Properties
|
Enable |
Enables the flood weight operation. |
|
Map Type |
Specify if the flood weight operation should be assigned to the following weight map types:
|
|
Map Name |
The name of the weight map or weight container where the flood weight operation should be assigned. This operation must be assigned to an existing map or container. |
|
Select Map |
Selects the map specified in Map Name so you can view it in the viewport and make edits if required. |
|
High/Low |
Select High to flood the island with the highest weight found, or select Low to flood the island with the lowest weight found. |
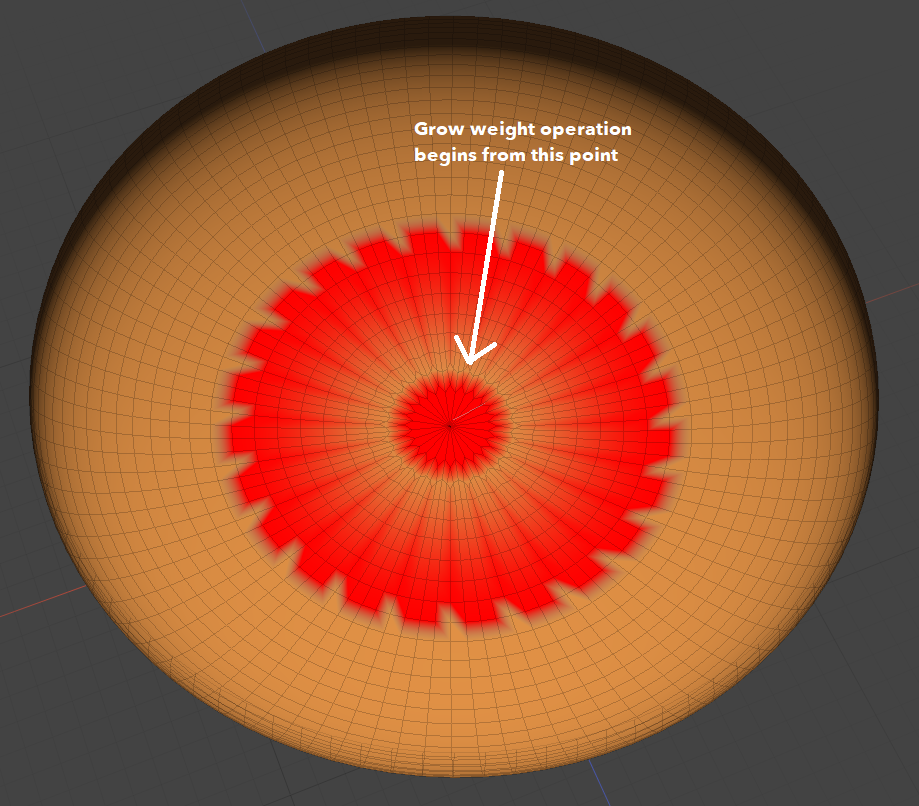
Grow Weight
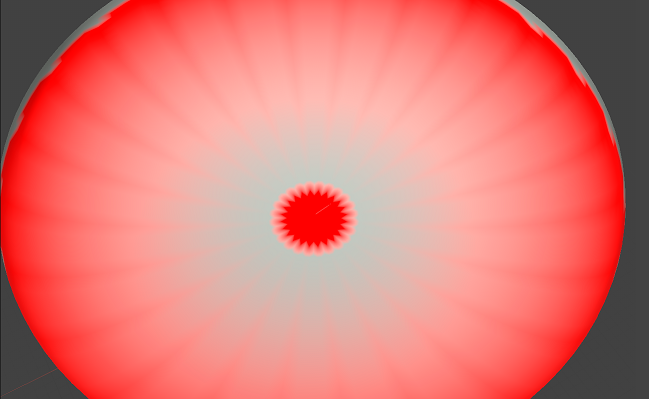
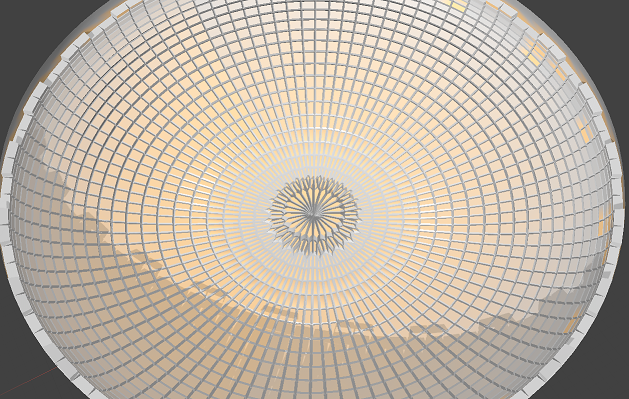
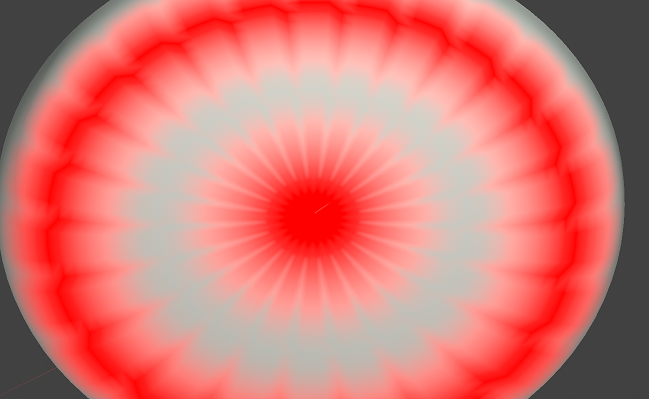
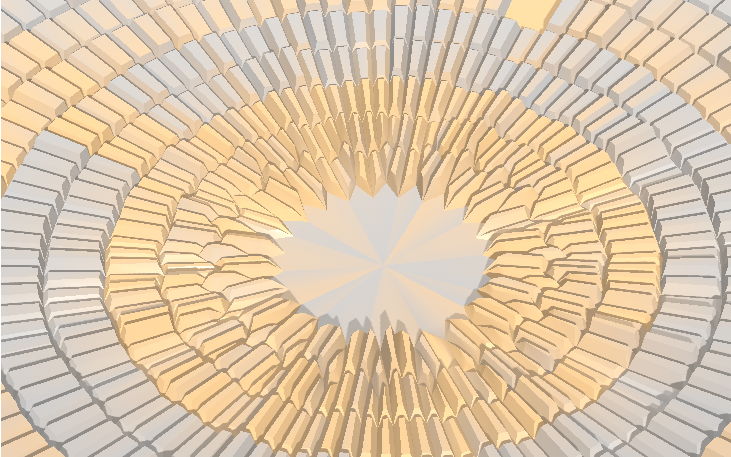
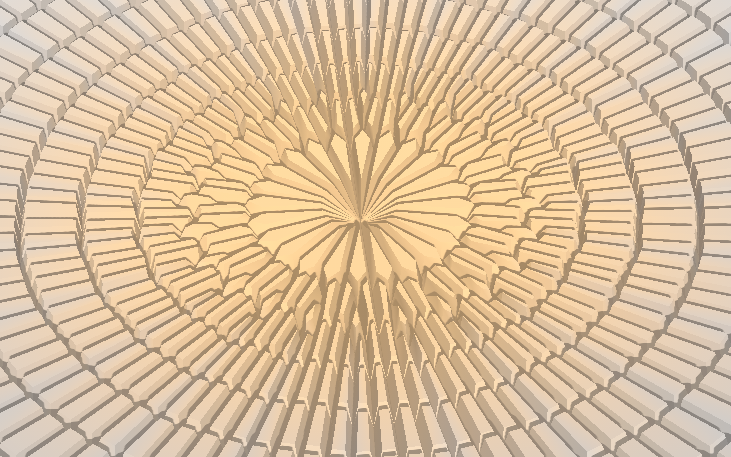
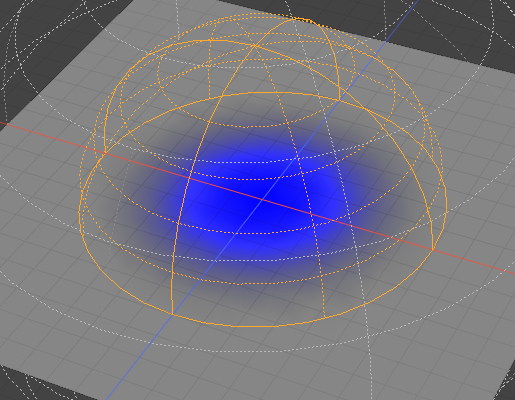
The grow weight mesh operation grows or shrinks a weight map based on a gradient value and an amount of steps. This operation searches the mesh for weight values, and grows the weight map from the vertex (or vertices) which use the highest weight value. In the following example, the vertices in the center of the mesh have the highest value of 1, so the grow weight operation grows the map out from there.
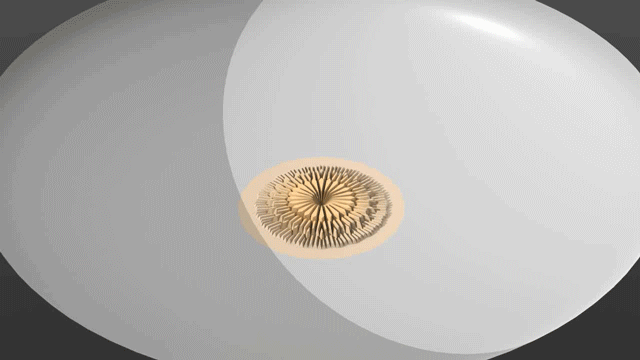
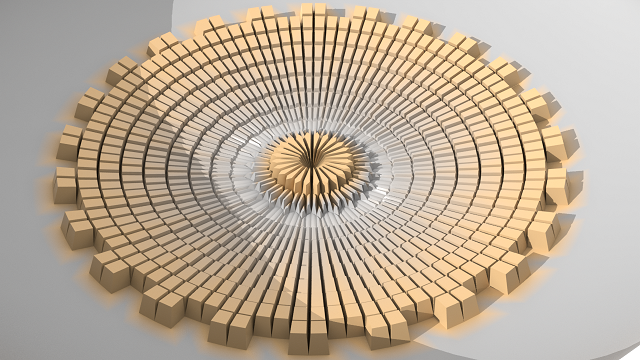
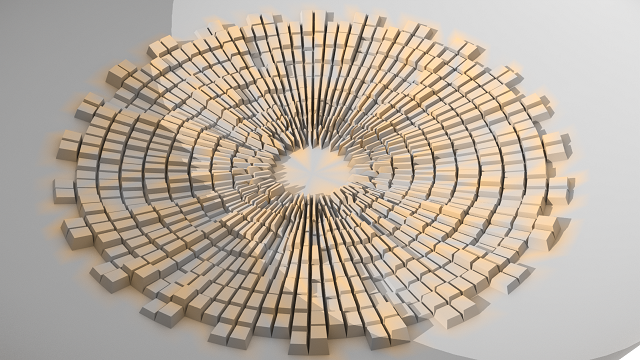
The result of a grow weight operation used with a polygon bevel that has been animated.
To add a grow weight operation to your weight map:
- Ensure a weight map exists on your mesh. To learn how to add a weight map procedurally, see Creating a New Vertex Map Procedurally and Setting Weight Values.
- In the Model layout, go to the Mesh Ops tab and click Add Operator.
- Type Grow Weight into the search and double-click the Grow Weight operation.
- In the Grow Weight Properties, select from the following in the Map Type dropdown:
- Type the name of the weight map or weight container that you would like to grow in Map Name.
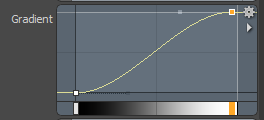
- Increase the Steps value to grow the weight map based on the Gradient values.
- Move the Gradient handles to watch how the different values in the gradient affect the grow weight result. Press Ctrl+Alt and click to add handles to the gradient.
• Weight Map - the grow weight operation looks for weight maps on the selected mesh, instead of weight containers in the scene. Select this option if you are using a weight map on the selected mesh. See Weight Maps.
• Weight Container - if you are using a weight container instead of a weight map, make sure to select Weight Container. See Creating a Weight Container.
To see the list of available vertex maps in your scene, click Vertex Map List in the Modo layout, or the Lists tab in all other layouts.
You can then assign other mesh operations to your mesh operation stack, such as a polygon bevel, and see how the new weight map affects the bevel.
Tip: You can add a Select By Index operation in the Selection menu of the grow weight operation to select a vertex index number to start the grow operation from. For more information on procedural selection, see Procedural Selection.
Grow Weight Properties
|
Enable |
Enables and disables the operation. |
||||||
|
Use World Transform |
Sets the coordinates from Local Space to World Space where vertices are defined relative to an origin common to all the objects in a scene. |
||||||
|
Map Type |
Specify if the grow weight operation is assigned to the following weight map types:
|
||||||
|
Map Name |
The name of the weight map or weight container the grow weight operation is being assigned to. This operation must be assigned to an existing map or container. |
||||||
|
Selects the map specified in Map Name so you can view it in the viewport and make edits if required. |
|||||||
|
Steps |
The amount of steps to grow or shrink your weight map. |
||||||
|
Grow/Shrink |
Select whether you want the operation to grow or shrink the existing weight map:
|
||||||
|
Grow Connection Type |
Select whether the grow weight operation grows to all vertices on a connected polygon, or connected vertices only:
|
||||||
|
Threshold |
When the grow operation finds the initial weights to grow from, you can add a threshold value to also include weights which are a % of the highest weight value found. For example, if the highest weight on your mesh is 1.0, and the Threshold is 10%, the grow weight operation also includes vertices with a weight of 0.9 and grows from them too. If the highest weight on your mesh is 1.0, and the Threshold is 50%, the grow weight operation also includes vertices with a weight of 0.5 and grows from them. |
||||||
|
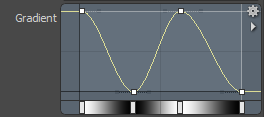
Gradient |
Define the gradient used by the grow weight operation to grow the values across the vertices on the mesh. Drag the gradient handles to move the gradient and press the middle mouse button on the gradient to add new handles. The following examples show the effect the grow weight gradient has on the weight map and mesh with a polygon bevel applied.
|
||||||
|
Allows you to input a weight map to be used as a border map for the grow weight operation. When the grow weight operation hits a value in the border map that is greater than the grow value, it stops growing. |
|||||||
|
Select Border Map |
Selects the map specified in Border Map Name so you can view it in the viewport and make edits if required. |
||||||
|
Flood Border |
When enabled, once the grow weight operation hits the border defined in Border Map Name, vertices outside the border are flooded with the highest weight map value. |
||||||
|
Use Falloff |
Enable to use a falloff. The falloff can be selected in the Tool Pipe menu of the grow weight operation. The operation applies the grow, then applies the falloff weight after the grow. |
||||||
|
Start Falloff |
If the step where the vertex was found is equal or above the percentage defined here, the falloff is applied. |
||||||
|
Save Step Map |
When enabled, creates a new weight map called StepMap that shows where the first vertices were found to grow from for the grow weight operation. The step map stops assigning weights at the value defined in Steps.
|

Jitter Weight
The jitter weight operation adds random number jitter to your vertex maps. This allows you to introduce more organic looking shapes and animations to your work, especially if you feel your work is looking too rigid. In the following example, a jitter is applied to a rigid and uniform looking mesh to add texture.
|
|
|
|
A polygon bevel using a weight map with no jitter operation assigned. |
A polygon bevel using a weight map with a jitter weight operation assigned. |
Jitter Weight Properties
|
Enable |
Enables or disables the operation. |
||||
|
Use World Transform |
Sets the coordinates from Local Space to World Space where vertices are defined relative to an origin common to all the objects in a scene. |
||||
|
Map Name |
The name of the weight map or weight container where you want to apply the jitter weight operation. This operation must be assigned to an existing map or container. |
||||
|
Select Map |
Selects the map specified in Map Name so you can view it in the viewport and make edits if required. |
||||
|
Map Type |
Specify if the grow weight operation is assigned to the following options:
|
||||
|
Seed |
The seed for the random number generator. |
||||
|
Minimum |
You can set the minimum amount of jitter you would like on your weight map using the gradient editor. If you would like your weight map to have jitter everywhere, ensure the Minimum is set to a value above 0. With the gradient editor, you can define the minimum jitter for current weights on the weight map. For example, at position 1 on the graph, you can define the minimum jitter applied to vertices with a weight of 1 applied. Note: You can see the most amount of jitter when Minimum is 0, and Maximum is 1.
Note: See Gradient Editor for more information on using the gradient editor. |
||||
|
Maximum |
Set the maximum amount of jitter you would like on your weight map using the gradient editor. This is useful if you want to limit the amount of jitter across your weight map. With the gradient editor, you can define the maximum jitter for current weights on the weight map. For example, at position 1 on the graph, you can define the maximum jitter applied to vertices with a weight of 1 applied.
|

Remap Weight
The remap weight operation takes an existing weight map, and remaps the values based on a gradient input. If a target map is specified, it remaps the weights to a new weight map, otherwise it overwrites the existing weight map.
|
Enable |
Enables or disables the operation. |
|
Use World Transform |
Sets the coordinates from Local Space to World Space where vertices are defined relative to an origin common to all the objects in a scene. |
|
Map Type |
Specify if the remap weight operation is assigned to the following options:
|
|
Map Name |
The remap operation is assigned to the map name you provide here. It must be a map that already exists in the scene. |
|
Select Map |
Selects the map specified in Map Name so you can view it in the viewport and make edits if required. |
|
Target Map Type |
If a target map is provided, the remap is stored to the target map. If no target map is provided, the remap operation overwrites the map provided in Map Name. The options are:
|
|
Target Map Name |
Enter the name of the target map. If a map with that name does not exist, a new map is created. If a target map is provided, the remap operation is stored to the target map. If no target map is provided, the remap operation overwrites the map provided in Map Name. |
|
Select Target Map |
Selects the map specified in Target Map Name so you can view it in the viewport and make edits if required. |
|
Falloff Type |
You can specify if falloffs applied to the remap operation are applied before or after the remap:
Note: You can add falloffs to your remap weight operation by clicking Add Tool Pipe in the Tool Pipe under the Remap Weight operation in the Mesh Ops list. |
|
Use Inputs |
Choose how to apply the remap to the given weight map values:
|
|
Input Minimum |
The minimum input value of the existing weight map that should be remapped. For example, if your existing weight map has a lowest weight value of -1.0, you might want to specify that the Input Minimum is -1.0. Or, if you want to limit the remap range, you can specify a weight value higher than -1.0. |
|
Input Maximum |
The maximum input value of the existing weight map that should be remapped. For example, if your existing weight map has a highest value of 1.0, you might want to specify that the Input Maximum is 1.0. Or, if you want to limit the remap range, you can specify a weight value lower than 1.0. |
|
Output Minimum |
The minimum value of the remapped weights. The Input Minimum is remapped to the Output Minimum. For example, if your Input Minimum is -1.0, you can remap all weights with that value to 0.0 by entering 0.0 in Output Minimum. |
|
Output Maximum |
The maximum value of the remapped weights. The Input Maximum is remapped to the Output Maximum. For example, if your Input Maximum is 1.0, you can remap all weights with that value to 0.5 by entering 0.5 into Output Maximum. |
| Automatic Input: Min |
Automatically finds the minimum weight on the weight map specified in Map Name. For example, if the lowest weight on your given weight map is -1.0, it automatically remaps that weight to the Output Minimum. |
|
Automatic Input: Max |
Automatically finds the maximum weight on the weight map specified in Map Name. For example, if the highest weight on your given weight map is 1.0, it automatically remaps that weight to the Output Maximum. |
|
Remap Value |
When Use Inputs is set to Gradient or Both, you can edit the gradient using the gradient handles to remap the weight values. Note: See Gradient Editor for more information on using the gradient editor. |
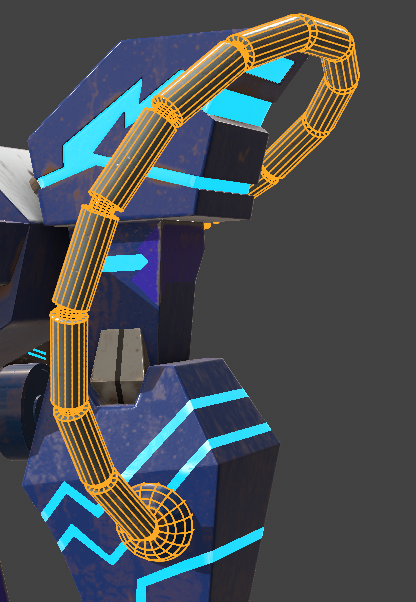
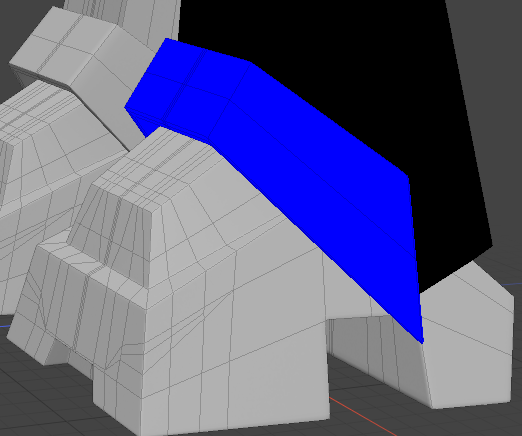
Set Seam
You can use the Set Seam mesh operation to set the values of a UV Seam (Cut) map. This is the procedural version of the direct modeling Cut Map tool.
Note: For more information on the Cut Map tool, see Creating Seams.
You need to create a UV Seam map for your mesh, as described in Creating a New Vertex Map Procedurally. Then set seam values the following way:
- In the Vertex Maps list on the lower right, under Other Maps, select the UV Seam map you created.
- In the Item List, select your mesh item and in the 3D viewport, select the edges for which you want to set seam values.
- In the Mesh Operations list, under Mesh Operations > Vertex Map, double-click Set Seam.
This adds the Set Seam mesh operation to the list and opens its properties in the Properties panel on the right pane. - In the Set Seam Properties, set Map Name to the name of the UV Seam map you want to use.
Seams are added along the selected edges. In the 3D viewport, the seams are highlighted in blue.
You can then use the UV Unwrap mesh operation to create UVs cut along the new seams. For more information, see Procedural UV Unwrap.

Set Seam Properties
|
Enable |
Enables/disables the Set Seam mesh operation. |
|
Use World Transform |
Sets the coordinates from Model Space to World Space where vertices are defined relative to an origin common to all the objects in a scene. |
|
Map Name |
The name of the UV Seam map to edit. |
Set RGB
You can set values on RGB/A maps using the Set RGB mesh operation.
You need to create an RGB or RGBA map for your mesh, as described in Creating a New Vertex Map Procedurally. Then set the values the following way:
- In the Item List, select your mesh item and in the 3D viewport, select the vertices, edges, or polygons for which you want to set the values.
- In the Mesh Operations list, under Mesh Operations > Vertex Map, double-click Set RGB.
This adds the Set RGB mesh operation to the list and opens its properties in the Properties panel on the right pane. - In the Set RGB Properties, set the relevant Map Type, set Map Name to the name of the RGB or RGBA map you want to use, and edit the Map Values.
The color of the selected vertices is updated in the 3D viewport.

Set RGB Properties
|
Enable |
Enables or disables the Set RGB mesh operation. |
||||
|
Use World Transform |
Sets the coordinates from Model Space to World Space where vertices are defined relative to an origin common to all the objects in a scene. |
||||
|
Selection Type |
The element type selected. This mesh operation can take a Vertex, Edge, or Polygon selection. |
||||
|
Map Type |
Choose between RGB and RGBA maps. For more information on the differences, see Working with Weight Maps. Note: If a map of the set type can't be found, a new map is created. |
||||
|
Map Name |
The name of the map to edit. |
||||
|
Map Value -R/G/B/A |
The red, green, blue, and alpha values. Note: Map Value - A is only used if Map Type is set to RGBA. |
||||
|
Alpha Uses Falloff |
If you're using a falloff with this option enabled, the falloff weight is applied to the Alpha value. When disabled, Alpha is a set value.
|
||||
|
Additive |
When enabled, the Map Value is added to the current map value. When disabled, the current map value is set to the amount specified in Map Value. |
||||
|
Weight Method |
Determines how the red, green, blue, and alpha component is defined.
|
||||
|
Gradient |
When Weight Method is set to Gradient Mapped, use this gradient to define the RGBA values of the RGB map. Note: See Gradient Editor for more information on using the gradient editor. |
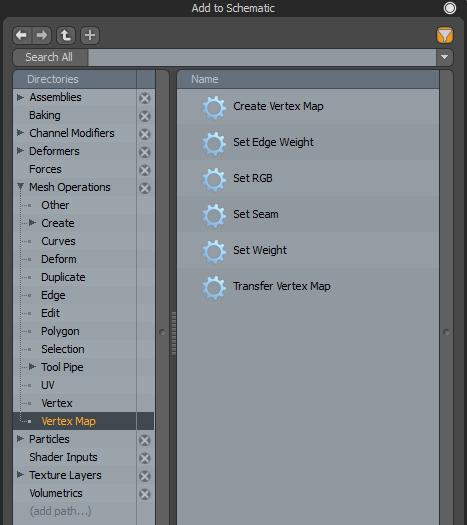
Vertex Maps in the Schematic Viewport
The Vertex Map mesh operations are also available in the Schematic viewport.
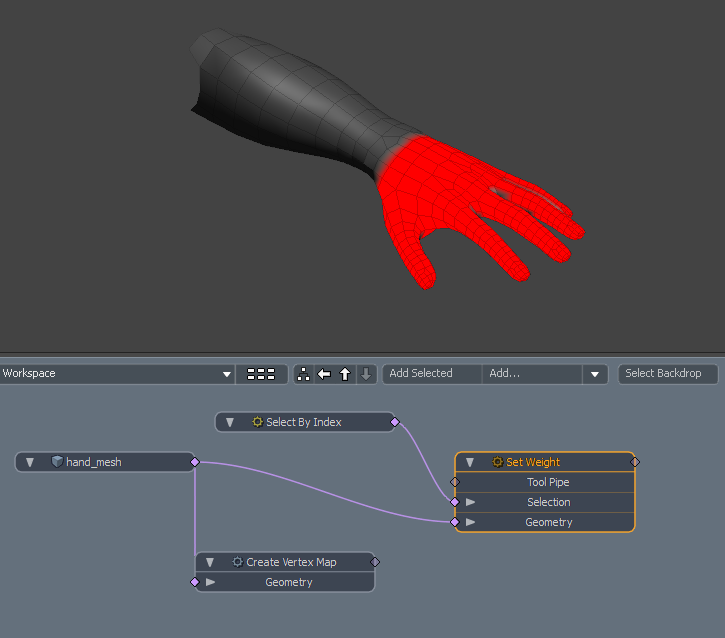
Create Vertex Map and Set Weight in the Schematic
To open the Schematic viewport:
• In the Modo layout, click the thin gray line below the 3D viewport, and click the Schematic viewport ![]() button.
button.
>
MadCap:conditions="Default.NoTranslate">OR
• Switch to the Setup layout from the menu bar by clicking Layout > Layouts > Setup.
To access the Vertex Map tools, click Add... . The Vertex Map tools can be found under Mesh Operations > Vertex Map.