Rendering in the New 3D System
The ScanlineRender node operates in the same manner as the ScanlineRender you’ve always known and used, but can be used in conjunction with the New 3D System Nodes.
ScanlineRender has had updates to sampling and projection options, motion blur, AOV controls, and offers a new ray-tracing architecture under the hood.
ScanlineRender remains a utility renderer at heart, so a lot of focus has gone into providing and expanding on the workflows and controls artists expect, while providing new functionality.
Note: ScanlineRender's classic 3D system equivalent is also named ScanlineRender. For New 3D System scenes, make sure you are adding the New 3D System node (found in right click node menu under 3D > 3D), not the Classic one (3D > 3D Classic).
Workflows and Usage
The workflow problems we want to solve are when you’ve comped in new elements into your shot, like explosions, fire, particle sims and need a way to better ground these comped elements by generating new render passes. The goal is that you can bring in as much of the scene geo as you need, set up your comp elements where you need them, add any additional lighting required for those new elements to interact and then render with reflection and refraction from ScanlineRender.
As a utility renderer ScanlineRender is not intended to render entire production shots and instead focuses on what compositing artists need most to give them the ability to generate new render passes at the late stages of production, without having to go back to other departments.
Rendering with ScanlineRender
To render a New 3D System scene, you need three things: your scene, a camera, and a ScanlineRender node.
To render out a scene:
| 1. | Set up your 3D scene as normal, including geometry, materials, lights, etc. Make sure you have a Viewer node. |
| 2. | Add a ScanlineRender node and connect the scene to the obj/scn input, usually via a GeoScene node. |
| 3. | Make sure the camera is connected to the render node's cam input. |
| 4. | Add a background to the bg input, if required. You can use the bg input to composite a background image into the scene and to determine the output resolution. |
Note: If the bg input is not used, the render node output defaults to the root.format or root.proxy_format defined in the Project Settings.
| 5. | Toggle the Viewer back to 2D. This shows you a representation of the render in the Viewer. |
| 6. | Connect the output of the ScanlineRender node to the Write node in order to render to disk. |
Note: Take a look at the ScanlineRender reference guide page to learn more about its controls.
Ray-tracing
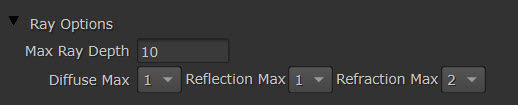
You can now render reflections, refractions and more via ray-tracing. In the Properties panel, you can adjust Ray Options, including the ability to control your Ray Depth and adjust the options to the complexity you need.
See more at Ray-tracing with ScanlineRender.
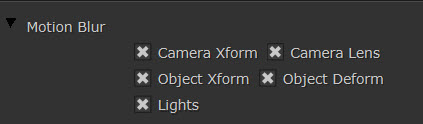
Motion Blur
In the Motion Blur section of the Properties panel, there are options to adjust different types of camera, object and light motion blurs.
See more at Motion Blur with ScanlineRender.
Projection Modes
In the Camera/ Projection Properties, the Projection knob lets you set the lens projector mode you want to use to output your render data.
• Render Camera: use the setting from the Camera node Projection knob
• Perspective: renders with objects in front of the camera having the illusion of depth defined by the camera's focal-length and aperture
• Orthographic: renders objects as if viewed using a parallel projection
• Spherical: renders the entire 360 degree world as a spherical map
• Cylindrical: renders the entire 360 degree world as a cylindrical map
• UV Unwrap: Every object renders its UV space into the output format. Used for creating texture maps
Note: The Camera node now no longer has UV Unwrap mode, because this is actually a special render mode, not a projection.
All the above options are now lens projector plugins, which means you can create as many as you want and add to this list. This means if you have a specific lens distortion map, you can add that as a plugin to undistort footage from a particular lens.
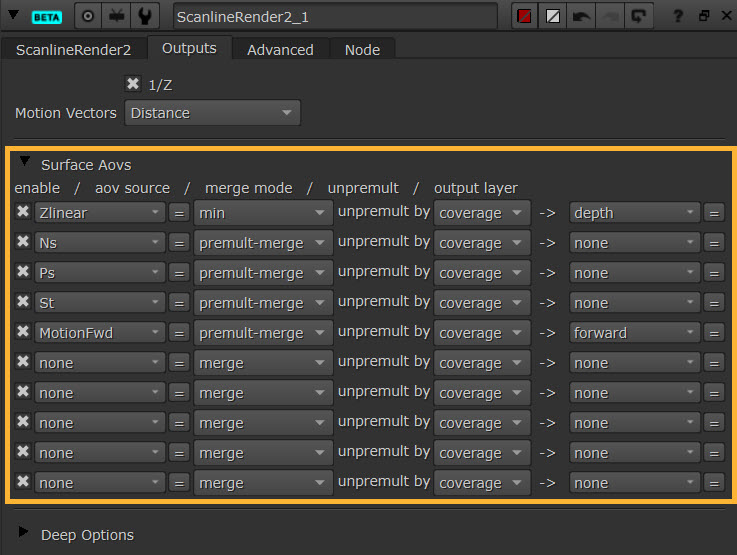
AOV controls
In the Properties > Outputs tab, you can edit the AOV outputs.
See more at Outputting AOVs with ScanlineRender.
Render Nodes
Renders the result of all upstream nodes and saves the result to disk.
Emulates real world cameras and can also project 2D textures.
Combines objects into a single scene for rendering.
Projects an input image through a camera on to a prim.
Renders all the objects and lights in a scene.