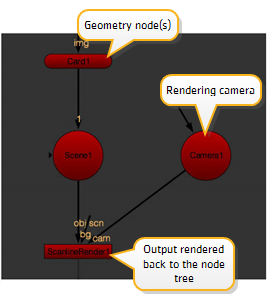
Each 3D scene includes the following objects: a Scene node, a Camera node, one or more geometry nodes (i.e., card, sphere, obj), and a ScanlineRender node. Examples of 3D scenes are shown in Script with 2D and 3D operators and the figure below. In the example shown in Script with 2D and 3D operators, the Scene node receives the output from two geometry nodes (Card1 and Card2) and sends the composite of those objects to the ScanlineRender node, where the output is converted back to 2D.
|
|
| Core nodes for a 3D composite. |
Your script may contain multiple Scene nodes, cameras, and 3D render nodes. All 3D objects loaded in the Properties Bin appear in the 3D Viewer, regardless of whether they are connected to the same Scene node.
Regardless of its location in your script, the Scene node is the highest-level node in the scene hierarchy because it references all the elements in a 3D workspace - all the geometric objects, cameras, and materials.
Select 3D > Scene from the Toolbar.
Every Scene node in a script should be connected to a ScanlineRender node, which tells Nuke to render the results of the scene. The ScanlineRender node also allows you to toggle between a 2D and 3D view of the scene.
| 1. | Select the Scene node. |
| 2. | Select 3D > ScanlineRender from the Toolbar. |
| 3. | Connect the obj/scn input to a Scene or geometry node. |
| 4. | Connect the cam input to the main camera. |
| 5. | Connect the optional bg input to composite a background image into the scene. |
| 6. | Press Ctrl+I (Cmd+I on a Mac) to open a new Viewer to display the output of the ScanlineRender node. |
When an image is connected to the bg input, its resolution becomes the output resolution for the ScanlineRender node.
Cameras may be connected to either the Scene node or the ScanlineRender node. The camera connected to the ScanlineRender node is the camera used for rendering.
| 1. | Select 3D > Camera to insert a camera node. |
| 2. | Drag an output connector from the Camera node to a Scene node or connect the Camera node to a ScanlineRender node’s cam input. |
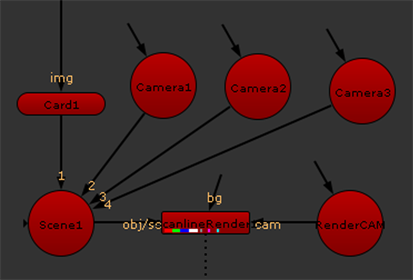
When connecting cameras for the 3D scene, the camera you want to use for rendering should be connected to the ScanlineRender node, like this:
|
|
| Connecting cameras to the scene. |
Any additional cameras should be connected to the Scene node. When you have multiple cameras associated with a 3D scene, you can switch between them by selecting the viewing camera from the dropdown menu at the top of the Viewer. See the next section, Using the 3D Viewer, for more information.