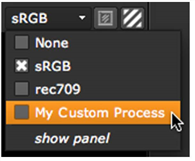
Viewer Processes can be
applied from the Viewer
Process dropdown menu.
Using look-up tables (LUTs) in Viewer Processes, you can adjust individual Viewer displays to simulate the way the image looks on output to film or some video display device. Nuke includes some predefined Viewer Process gizmos, but you can also add your own processes by registering a node or gizmo as a Viewer Process. You can register as many custom Viewer Processes as you like. If you want to use one of the 1D LUTs listed in the Project Settings in your Viewer Process, you can use the built-in gizmo called ViewerProcess_1DLUT.
TIP: There are a couple of commented out examples in the installed init.py file demonstrating how to use a 3D LUT and a Truelight for a Viewer Process. You can find this file in the following location:
On Windows:
drive letter:\Program Files\Nuke8.0v7\plugins or
drive letter:\Program Files (x86)\Nuke8.0v7\plugins
On Mac OS X:
/Applications/Nuke8.0v7/Nuke8.0v7.app/Contents/MacOS/plugins
On Linux:
/usr/local/Nuke8.0v7/plugins
All available Viewer Processes (both custom and predefined ones) can be applied from the Viewer Process dropdown menu in the Viewer controls.
|
|
| Both predefined and custom Viewer Processes can be applied from the Viewer Process dropdown menu. |
Note that Viewer Processes are part of a built-in, fixed pipeline of nodes that are applied to images before they are displayed in the Viewer. This pipeline is either:
• gain > Input Process > Viewer Process > gamma > dither > channels > cliptest (if viewer input order has been set to before viewer process in the Viewer settings)
OR
• gain > Viewer Process > Input Process > gamma > dither > channels > cliptest (if viewer input order has been set to after viewer process in the Viewer settings).
However, depending on what the Viewer Process is doing, this may not be the correct order. Therefore, if your Viewer Process (or an Input Process) has controls that also exist for the Viewer, such as controls named gain, gamma, or cliptest, then the Viewer drives them from the corresponding Viewer controls and does not do that image processing itself. This allows you to implement these controls in your Viewer Process using whatever nodes and order you want. If your Viewer Process does not have these controls (and they are not found on any Input Process in use either), then the Viewer applies the effects in its normal way according to the built-in pipeline.
In the built-in pipeline, dither is applied to diffuse round-off errors in conversion of floating point data to the actual display bit depth. Although the cliptest is drawn at the end, it is computed on the image as input to the Viewer.
For more information on Input Processes, see Input Process and Viewer Process Controls in the Getting Started Guide.