The following nodes under the Transform menu have their own controls for adding motion blur to transformations:
• Transform
• TransformMasked
• Card (3D)
• CornerPin2D
• Reconcile3D
• Tracker
• Stabilize2D.
These controls allow you to create motion blur without adding a separate node for it. The output is similar to a TimeBlur node (see Applying the TimeBlur Filter), but rather than averaging the results of several whole images computed at steps over the shutter period, a number of samples are taken at many random times over the shutter period. This effectively gives many more "steps" and thus a smoother-looking result for a smaller total number of computations.
|
|
|
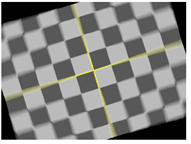
| Before rotation and motion blur. |
After rotation and motion blur. |
When using several of these nodes in a row, the motion blur is concatenated, and the last transform in the chain defines the motion blur applied.
| 1. | Open the transform node’s controls. |
| 2. | Create a transform and animate it. |
| 3. | In the motionblur field, enter the sampling rate. This affects the number of times the input is sampled over the shutter time. The higher the rate, the smoother the result. In many cases, a value of 1.0 is enough. Setting the value to 0 produces no motion blur. |
| 4. | In the shutter field, enter the number of frames the shutter stays open when motion blurring. For example, a value of 0.5 would correspond to half a frame. Increasing the value produces more blur, and decreasing the value less. |
| 5. | From the shutteroffset dropdown menu, select when the shutter opens and closes in relation to the current frame value: |
• to center the shutter around the current frame, select centered. For example, if you set the shutter value to 1 and your current frame is 30, the shutter stays open from frame 29.5 to 30.5.
• to open the shutter at the current frame, select start. For example, if you set the shutter value to 1 and your current frame is 30, the shutter stays open from frame 30 to 31.
• to close the shutter at the current frame, select end. For example, if you set the shutter value to 1 and your current frame is 30, the shutter stays open from frame 29 to 30.
• to open the shutter at the time you specify, select custom. In the field next to the dropdown menu, enter a value (in frames) you want to add to the current frame. To open the shutter before the current frame, enter a negative value. For example, a value of -0.5 would open the shutter half a frame before the current frame.

Another way to add motion blur to your image is to use the VectorBlur node. VectorBlur takes each of your image’s pixels and blurs them in a straight line, using the u and v channels to determine the blur direction.
VectorBlur expects the values from your input plates to be pixel space screen units, in other words one unit should be equal to one pixel. Nuke uses this information to calculate the distance that one pixel travels between two frames. So, in order to get a working motion blur result, you should make sure Nuke is getting correct values to work with. You might have files using varying values, particularly if you’ve used a third party application to create your input files. The following is an example of creating motion blur with the VectorBlur node using files written from a third party application.
| 1. | Read in your footage and motion blur files, for example an .exr file with a spinning donut and a .sgi file with motion blur vectors that are normalized to have values between 0 and 1. |
| 2. | Using the ShuffleCopy node, select which channels VectorBlur should read from your motion vector file (node input 1) and color image file (node input 2). In this case, you would use the motion vector file’s red and green channels as the motion u and v channels, and its alpha channel as the alpha channel. Meanwhile, the image file would output the red, green and blue channels for the main color image. |
With this setup, your ShuffleCopy node controls would look like this:
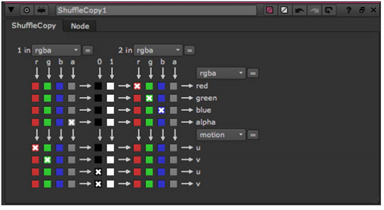
| 3. | Connect the VectorBlur node to the ShuffleCopy node. You also need to tell VectorBlur which motion vector channels to use, so change the uv channels control to motion. |
| 4. | If your motion vectors have been normalized to be between 0 and 1, you can set the u and v values in the add control to -0.5 to offset the motion blur center. This is usually necessary for any motion vectors stored in an integer file format like 16 bit TIFF or TARGA. Vectors that go to negative x or y directions use half the numbers in the range and vectors that go positive use the other half. |
| 5. | With the multiply and offset controls, you can further adjust the amount of motion blur you want to produce. The offset value allows you to correct for normalization of your vector values, and the multiply value controls the magnitude of them. |
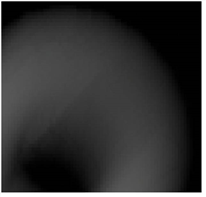
| 6. | If the vectors have been premultiplied with the alpha channel, their value is not accurate in places where the alpha is not 1.0. You’ll want to check the alpha checkbox to use the input image’s alpha channel to help VectorBlur to deal with motion vectors that have been premultiplied by this alpha channel. |
|
|
|
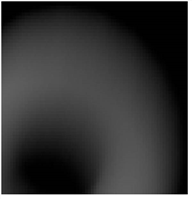
| Alpha disabled. | Alpha enabled. |
| 7. | Getting a good, even motion blur result largely depends on selecting the right calculation method. In the method dropdown, select: |
• backward - backward method is effective and fast but may not be accurate if you don't have motion vector values at all pixels throughout the whole frame
• forward - the forward method is slower, but it gives you a more accurate result, especially in cases where the vectors don't cover the whole frame. In this case, we know the motion vectors are not continuous, so selecting forward is a good option.