Open topic with navigation
Morphing One Image into Another Using the GridWarp Node
To morph one image into another using the GridWarp node:
|
1.
|
Select Image > Read to import the two images you want to morph together. |
|
3.
|
Select Transform > GridWarp to insert a GridWarp node into your script. |
|
4.
|
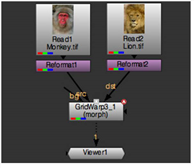
Connect the source image (the image you want to turn into another image) to the src input of the GridWarp node, and the destination image (the image you want the source image turned into) to the dst input. Connect a Viewer to the GridWarp node. |
|
5.
|
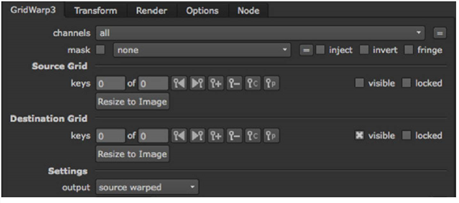
To make the grids the same size as the input images, click the Resize to Image buttons under both Source Grid and Destination Grid. |
|
6.
|
In the GridWarp Settings controls, set output to source to display the source image and grid. |
|
7.
|
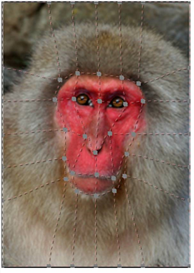
Adjust the grid to follow key features on the source image. For example, if you’re morphing an animal, you might consider the eyes, nose and mouth. |
|
8.
|
In the GridWarp Settings controls, set output to destination to display the destination image and grid. |
NOTE: If the source and destination images are similar, you can copy the source grid onto the destination grid using the copy and paste  buttons.
|
9.
|
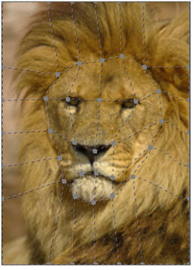
Adjust the grid to follow key features on the destination image. |
|
10.
|
In the GridWarp Settings controls, set output to morph to display both grids and activate the warp and mix sliders. |
|
11.
|
Scrub to the frame where you want the morph to begin. Bring the warp slider down to 0 (the source image). Click on the animation button  and select Set key. Then, scrub to the frame where you want the morph to end and set warp to 1 (the destination image). and select Set key. Then, scrub to the frame where you want the morph to end and set warp to 1 (the destination image). |
|
12.
|
Animate the mix control in the same way. Scrub to the frame where the morph starts, and set mix to 0 (the source image). Click the animation button and select Set key. Scrub to the frame where the morph ends, and enter 1 (the destination image) as the mix value. |
Play through the sequence in the Viewer and you’ll see that the source image is morphed into the destination image.