Using a Gizmo as a Custom Viewer Process
To create a custom Viewer Process, you would typically create a gizmo that includes some color correction like a look-up table (LUT) and register it as a Viewer Process using Python. (For more information on gizmos, see Sourcing Custom Plug-ins and Generic Tcl Scripts.)
If you want to use one of the 1D LUTs listed in the Project Settings in your Viewer Process, you do not need to create a custom gizmo. Instead, you can simply register a built-in gizmo called ViewerProcess_1DLUT. This gizmo takes a parameter for which LUT to use, but does not allow it to be edited. For more information, see To Register a LUT in the Project Settings as a Viewer Process.
If you want anything more complex than a 1D LUT that can be found on the LUT tab of the Project Settings, you need to create your own gizmo and register that. For more information, see To Create a Viewer Process Gizmo and To Register a Custom Viewer Process.
To Register a LUT in the Project Settings as a Viewer Process
| 1. | Create a file called init.py in your plug-in path directory if one doesn’t already exist. For more information on plug-in path directories, see Loading Gizmos, NDK Plug-ins, and Python and Tcl Scripts. |
| 2. | To register one of the LUTs in the Project Settings as a Viewer Process, use, for example, the following function in your init.py: |
nuke.ViewerProcess.register("Cineon", nuke.createNode, ("ViewerProcess_1DLUT", "current Cineon"))
This registers a built-in gizmo called ViewerProcess_1DLUT as a Viewer Process and sets it to use the Cineon LUT. The registered Viewer Process appears in the Viewer Process dropdown menu as Cineon.
Note that you can set the built-in gizmo to use any 1D LUT in the Project Settings. For example, to set it to use the Panalog LUT, use the following function:
nuke.ViewerProcess.register("Panalog", nuke.createNode, ("ViewerProcess_1DLUT", "current Panalog"))
To Create a Viewer Process Gizmo
| 1. | Create the node(s) you want to use as a Viewer Process. For example, you can use a ColorLookup, Vectorfield (3D LUT), or Colorspace node. |
| 2. | Select the node(s) you want to include in the Viewer Process and select Other > Group. |
| 3. | To select which controls the users of your Viewer Process can adjust, right-click on the dark gray background of the Group properties panel and select Manage User Knobs. For more information on how to add controls to your gizmo, see Creating and Accessing Gizmos. |
If you expose controls with the same name as the controls in the Viewer (such as gain or gamma), then the controls in the Viewer are used to drive these. However, if an Input Process that exposes the same controls is also in use, the Input Process takes precedence and the Viewer controls drive it, ignoring the same-named Viewer Process control(s). For more information on Input Processes, see Using the Viewer Controls > Input Process and Viewer Controls.
| 4. | Once you are happy with the modified Viewer Process group, export it to a gizmo by clicking export as gizmo on the Node tab of the group controls. |
| 5. | In the file browser that appears, click Home. Type .nuke/ after the path displayed at the bottom of the file browser. Enter a name after the path, and append a .gizmo extension after the name. The name should begin with a capital letter. Finally, click Save. |
| 6. | Proceed to registering the gizmo as a custom Viewer Process, described below. |
Tip: If you like, you can test your Viewer Process gizmo as an Input Process before registering it. Do the following:
1. In the top right corner of the Viewer, set the Viewer Process dropdown menu to None.
2. Select the gizmo in the Node Graph.
3. To toggle the Input Process on or off, click the IP button in the Viewer controls. If you are happy with the result, proceed to registering the gizmo as a Viewer Process.
For more information on Input Processes, see Using the Viewer Controls > Input Process and Viewer Controls.
Tip: If you want to view or modify the internals of an existing Viewer Process, you can do the following:
1. Select the Viewer Process that you want to modify from the Viewer Process dropdown menu.
2. Select Edit > Node > Copy Viewer Process to Node Graph. This inserts the Viewer Process gizmo you selected in the Node Graph.
3. Double-click on the gizmo to open its controls. Go to the Node tab and click copy to group. This gives you an editable group version of the gizmo.
4. In the Group controls, click the S button to show the internals of the group. They are shown on a new tab in the Node Graph.
5. Make your changes and export the group to a gizmo by clicking export as gizmo on the Node tab of the group controls.
Tip: If you use the ViewerLUT node in a Viewer Process gizmo, you can toggle rbg_only in the ViewerLUT controls to define whether the LUT is applied to all channels or only the red, green, and blue channels. You can also expose this control in the Viewer Process gizmo's controls, so that users can set it themselves.
To Register a Custom Viewer Process
| 1. | Create a file called init.py in your plug-in path directory if one doesn’t already exist. For more information on plug-in path directories, see Loading Gizmos, NDK Plug-ins, and Python and Tcl Scripts. |
| 2. | To register a gizmo or a node as a Viewer Process, use the following function in your init.py: |
nuke.ViewerProcess.register()
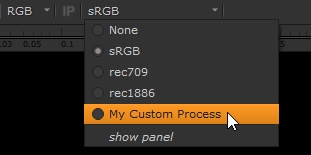
For example, to register a gizmo called MyProcess.gizmo as a Viewer Process and have it appear in the Viewer Process dropdown menu as My Custom Process, you would enter the following:
nuke.ViewerProcess.register("My Custom Process", nuke.Node, ("MyProcess", ""))
Your Viewer Process should now appear in the Viewer controls.
If you need to unregister a Viewer Process, you can use nuke.ViewerProcess.unregister(). For example:
nuke.ViewerProcess.unregister("My Custom Process").
To get help on the use of these statements, you can enter help (nuke.ViewerProcess) in the Script Editor.
Tip: You can also pass arguments to nuke.ViewerProcess.register(). For example, to register a Blur node with its size knob set to 10, you would enter the following:
nuke.ViewerProcess.register("Blur", nuke.createNode, ("Blur", "size 10"))
Tip: You can easily register any LUT defined in the project settings as a Viewer Process. For how to do this, see the installed menu.py file where the built-in Viewer Processes are registered. You can find menu.py in the following location:
On Windows:
drive letter:\Program Files\Nuke17.0v3\plugins
On Mac:
/Applications/Nuke17.0v3/Nuke17.0v3.app/Contents/MacOS/plugins
On Linux:
/usr/local/Nuke17.0v3/plugins