Flipbooking Sequences
Flipbooking a sequence refers to rendering a range of images (typically at proxy resolution), then playing them back in order to accurately access the motion characteristics of added effects.
You have a few options for flipbooking within Nuke:
• You can enable automatic disk caching of rendered frames, then play these frames back using Nuke’s native Viewer. This option does not let you define a specific playback rate.
• You can render out temporary image sequences using the default flipbooking tool, a RAM-buffering playback utility, which is displayed in its own Viewer and plays back sequences at the defined frame rate.
If you have a license for HieroPlayer or Nuke Studio, you can flipbook using HieroPlayer rather than the default flipbook that ships with Nuke. See Anaglyph - displays the views simultaneously using a red hue for left and green hue for right, and adds selection controls above the Viewer. for more information.
• You can also set up an external flipbooking application in Nuke using Python. For more information, see the Nuke Python documentation (Help > Documentation).
The Nuke Viewer automatically saves to disk a version of every frame it displays. When you play through sequences in the Viewer, it reads, where possible, from this cache of pre-rendered images, making real-time play back possible (depending, of course, on image resolution and your hardware configuration). You can define the location and size of the Viewer cache in the Preferences.
Depending on what viewer buffer bit depth has been set to in the Viewer settings, the cache can contain 8-bit (byte), 16-bit (half-float), or 32-bit (float) image data. This offers a trade-off between speed and quality. Half-float and float modes provide higher precision than byte, but are also slower to process.
Setting the Viewer Cache Location and Size
| 1. | Click Edit > Preferences to display the Preferences dialog. |
| 2. | In the Performance > Caching section, there is a Disk Caching – temp directory field. Use this to enter the path name of the directory in which you want to store the flipbook images (for example, c:/temp). |
| 3. | Using the comp disk cache size control, specify the number of gigabytes you want to allow the image cache to consume. |
| 4. | Click OK in the bottom-right corner of the Preferences dialog to update preferences and then restart Nuke. |
The Viewer now caches each frame it displays in the directory specified. When you click the playback buttons on the Viewer, or drag on the scrub bar, Nuke reads in images from this cache.
Note that the cached images have unique names reflecting their point of output location in the script. This means that you can cache images from multiple nodes in the script without overwriting previously cached images. For more information on caching, see Image Caching.
Flipbooking a Sequence
To flipbook an image sequence, do the following:
| 1. | Select the node that you want to flipbook the output of. |
Note: If you select a Write node in the step above, you must first click its Render button in order to manually render its output to the destination defined in the file field. This step is necessary only in the case of Write nodes.
| 2. | Select Render > Flipbook selected (or press Alt+F). |
Alternatively, you can click the Flipbook this Viewer button ![]() at the bottom-right of the Viewer. This flipbooks the nodes that are connected to the Viewer.
at the bottom-right of the Viewer. This flipbooks the nodes that are connected to the Viewer.
A Flipbook dialog opens.
| 3. | Check that your settings are correct in the dialog. The default values are copied from the Viewer you currently have active. You can change them if necessary: |
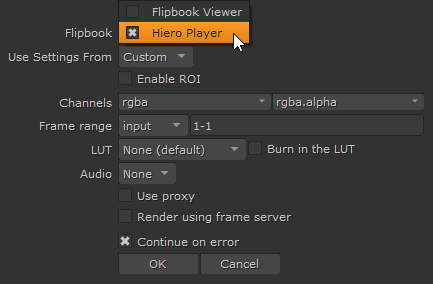
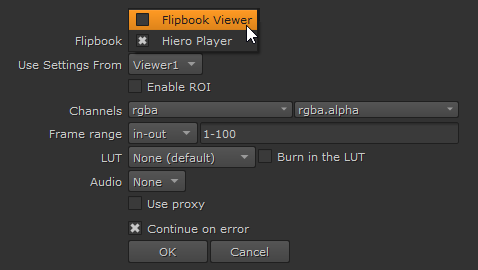
• Flipbook - set the flipbooking application you want to use.
• Use settings from - set which Viewer should be used to draw default values from.
• Enable ROI - Check to define your region of interest.
• Channels - select which layer to display in the flipbook result.
• Frame range - set the frame range you want to flipbook.
• Delete existing temporary files - Check to delete any existing temporary files with the same file name before flipbooking.
• LUT - select the LUT appropriate for viewing. By default, the flipbook renders your files with a linear colorspace and attempt to pass a LUT file to the flipbook.
• Burn in the LUT - If you check this box the flipbook files are rendered with the LUT applied. If you uncheck it, the flipbook is displayed using it's equivalent LUT (based on the LUT’s name). If you have an equivalent LUT available in the flipbook program, then it's better not to check the Burn in the LUT box. This way, when you measure pixel values in the flipbook application they match what you get in the Nuke Viewer.
• Audio - if you want to flipbook an audio file with your clip, select the AudioRead node you need in this dropdown. For more information on audio files in Nuke, see Audio in Nuke.
• Buffer - set which buffer you want include.
• Views - check the view(s) to output, if you're working in a multi-view comp.
Note: The Views control is only available in multi-view comps. See Stereoscopic Scripts for more information.
• Use proxy - check to use proxy mode.
• Render using frame server - check to render in the background using Nuke's frame server.
• Continue on error - check to keep rendering even if an error occurs during the process.
| 4. | Click OK. |
Nuke renders as a temporary sequence the output of the selected node using the frame range and resolution defined in the script’s settings. This may take a few moments.
After the render is complete, Nuke launches Flipbook Viewer and loads in the temporary sequence. You can play it back and view it using Flipbook Viewer controls.
If you flipbooked a stereo comp, you can right-click in the Flipbook and choose Stereo Modes to view your flipbook in various configurations:
• Side by Side - displays the views side by side at the correct aspect ratio, and adds selection controls above the Viewer.
• Squeezed Side by Side - displays the views side by side and squeezed to fit the format horizontally, and adds selection controls above the Viewer.
• Squeezed Above by Below - displays the views above and below each other and squeezed to fit the format vertically, and adds selection controls above the Viewer.
• Interlace H - displays the views interlaced horizontally, and adds selection controls above the Viewer.
• Interlace V - displays the views interlaced vertically, and adds selection controls above the Viewer.
• Checkerboard - displays the views using an alternating checkerboard pattern (one pixel from left and one pixel from right), and adds selection controls above the Viewer.
• Anaglyph - displays the views simultaneously using a red hue for left and green hue for right, and adds selection controls above the Viewer.
• Flicker - displays both views alternately, and adds selection controls above the Viewer.
• OpenGL Stereo - displays both views at once on a 3D monitor for review purposes. See Enabling OpenGL Stereo Output for more information.
Using HieroPlayer as Nuke's Flipbook
If you have a HieroPlayer license (get one free if you have Nuke or NukeX), you can flipbook using HieroPlayer rather than the default flipbook that ships with Nuke:
| 1. | Select the node that you want to output to the HieroPlayer flipbook. |
Note: If you select a Write node, you must first click its Render button in order to manually render its output to the destination defined in the file field. This step is necessary only in the case of Write nodes.
| 2. | Select Render > Flipbook selected (or press Alt+F). |
Alternatively, you can click the Flipbook this viewer button ![]() at the bottom-right of the Viewer. This flipbooks the nodes that are connected to the Viewer.
at the bottom-right of the Viewer. This flipbooks the nodes that are connected to the Viewer.
Note: If the Viewer node is not connected to any nodes, a warning displays:
Can't launch flipbook, there is nothing connected to the viewed input.
A Flipbook dialog opens.
| 3. | Select Flipbook > HieroPlayer and adjust the other controls as described in Flipbooking a Sequence. |
Note: If you enable Burn in the LUT, the flipbook files are rendered with the Viewer LUT applied. If you uncheck it, the flipbook is displayed using its equivalent LUT in HieroPlayer (based on the LUT’s name).
| 4. | Click OK. |
Nuke renders the output and then opens HieroPlayer with a clip in the Project bin and displays it in the Viewer. The clip is named automatically as [project]_[node]_[date]_[time] by default. For example:
myProject_Blur1_2020-2-21_12-53-58
Note: Image clips in HieroPlayer flipbooks are always rendered as .exr files.
If you change the OCIO config in the Project Settings and flipbook again, HieroPlayer creates a new project to contain flipbooks using that configuration. For example, flipbooking using nuke-default and then switching to aces_1.1 creates two distinct projects in HieroPlayer.
Subsequent flipbooks using either configuration are then automatically grouped in the correct HieroPlayer project.
Flipbooking with Audio
If you have an AudioRead node in your script, you can flipbook the audio file along with the image clip in HieroPlayer. Adding audio to a flipbook creates a bin containing an .exr, a .wav, and a sequence. For more information on audio files in Nuke, see Audio in Nuke.
To flipbook with audio, follow the steps in Anaglyph - displays the views simultaneously using a red hue for left and green hue for right, and adds selection controls above the Viewer. and then select Audio > AudioRead1 and click OK.
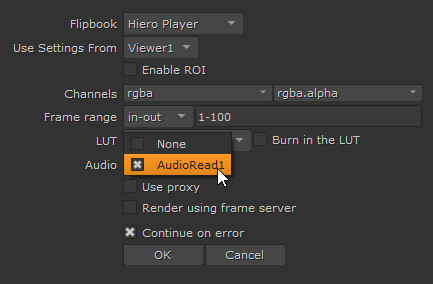
Note: The AudioRead node does not need to be connected to the main node tree when you flipbook to HieroPlayer.
Nuke renders the output and then opens HieroPlayer with a bin in the Project containing the imported audio file, an .exr clip, and a sequence. The bin items are named automatically as [project]_[node]_[date]_[time] by default. For example:
myProject_AudioRead1_2020-2-21_12-53-58
myProject_Blur1_2020-2-21_12-53-58
Note: Image clips in HieroPlayer flipbooks are always rendered as .exr files.
If you change the OCIO config in the Project Settings and flipbook again, HieroPlayer creates a new project to contain flipbooks using that configuration. For example, flipbooking using nuke-default and then switching to aces_1.1 creates two distinct projects in HieroPlayer.
Subsequent flipbooks using either configuration are then automatically grouped in the correct HieroPlayer project.
Capturing the Viewer
You can capture the contents of the Viewer for a quick real-time flipbook, also known as a playblast, and save the content out to .jpg for review.
Tip: Capturing the contents of the Viewer is very useful for quickly checking the animation in your 3D scene in real-time without having to do a full scanline render.
Playblast flipbooks the Viewer 'as is', including 2D and 3D scenes, handle and transform overlays (such as roto shape outlines), wipes, and so on.

|
|
The contents of a Viewer containing 3D and 2D information, including |
To capture the Viewer contents:
| 1. | Click the Capture button under the Viewer, to the right of the flipbook button. |
The Capture dialog displays.
| 2. | Select the required Flipbook tool using the dropdown. |
| 3. | Check that your settings are correct in the dialog. The default values are copied from the Viewer you currently have active. You can change them if necessary: |
• Frame range - set which Viewer you want to draw default values from, and set the frame range that you want to flipbook.
• Buffer - select the buffer you want to capture.
• Use proxy - check to use proxy mode.
• Continue on error - check to keep rendering even if an error occurs during the process.
• Customise write path - Check this to manually set the location (in the Write path field below) where the .jpg files are stored.
Note: Nuke only captures sequences using the .jpg format. Don't forget to include printf or hash frame padding, such as %4d or ####.
| 4. | Click OK to capture the contents of the Viewer. |
The frame range is cached as .jpgs to either the default location set in the Preferences dialog, or – if enabled – the directory specified in the Write path control.