3D
How to access 3D information in a NUKE scene.
Getting basic selection information
Currently there are two nodes that provide the geo knob required to retrieve a vertex selection:
the Viewer node
the GeoSelect node
To access the selection info of those nodes at the most basic level, you would do this:
geoSelectKnob1 = nuke.activeViewer().node()['geo']
geoSelectKnob2 = nuke.toNode('GeoSelect1')['geo']

viewerSel = geoSelectKnob1.getSelection() #SELECTION IN THE CURRENTLY ACTIVE VIEWER
geoSel = geoSelectKnob2.getSelection() #SELECTION SAVED IN GEOSELECT NODE
The above will return a list of points per object. Each point in that list carries it’s selection value (‘1.0’ being selected and ‘0.0’ being unselected). So with the above code, this will return the selection state of point index 540 in the first object saved in the GeoSelects geo knob:
geoSel[0][540]
To get useful information from this:
def selectedVertexInfos(selectionThreshold=0.5):
  '''
  selectedPoints(selectionThreshold) -> iterator
  Return an iterator which yields a tuple of the index and position of each point currently selected in the Viewer in turn.

  The selectionThreshold parameter is used when working with a soft selection.
  Only points with a selection level >= the selection threshold will be returned by this function.
  '''
  if not nuke.activeViewer():
    return

  geoSelectKnob = nuke.activeViewer().node()['geo']
  sel = geoSelectKnob.getSelection()
  objs = geoSelectKnob.getGeometry()
  for o in xrange(len(sel)):
    objSelection = sel[o]
    objPoints = objs[o].points()
    objTransform = objs[o].transform()
    for p in xrange(len(objSelection)):
      value = objSelection[p]
      if value >= selectionThreshold:
        pos = objPoints[p]
        tPos = objTransform * _nukemath.Vector4(pos.x, pos.y, pos.z, 1.0)
        yield VertexInfo(p, value, _nukemath.Vector3(tPos.x, tPos.y, tPos.z))
And with the above we can now get the vertex info of all selected points:
def getSelection(selectionThreshold=0.5):
  # Build a VertexSelection from VertexInfos
  vertexSelection = VertexSelection()
  for info in selectedVertexInfos(selectionThreshold):
    vertexSelection.add(info)
  return vertexSelection
This may seem like an awful lot of hassle, which is why the nukescripts.snap3d module is provided to do all the above work for you for common tasks:
Working with the current selection
The easiest way to get information from the current vertex selection is using the nukescripts.snap3d module.:
for v in nukescripts.snap3d.getSelection():
    print v
This will return the VertexInfo objects. To get each selected vertex’ position:
for v in nukescripts.snap3d.getSelection():
    print v.position
There are many functions that will get the selection for you and do fancy stuff with it already. Here is a very simple example of how create a card at the selected vertices’ position and bind a hotkey to it:
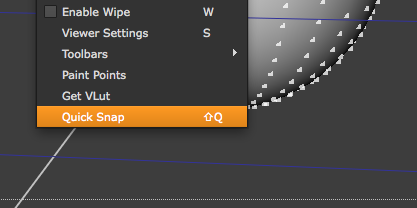
nuke.menu( 'Viewer' ).addCommand( 'Quick Snap', lambda: nukescripts.snap3d.translateRotateToPoints( nuke.createNode( 'Card2' ) ), 'shift+q' )
All this is doing is calling the nukescripts.snap3d.translateRotateToPoints method on a newly created card and assigning this action to a menu and hotkey - done.
There are heaps of goodies in this module, so make sure to take a closer look:
dir( nukescripts.snap3d )
# Result:
['VertexInfo', 'VertexSelection', '__builtins__', '__doc__', '__file__', '__name__', '__package__', '_nukemath', 'addSnapFunc', 'allNodes', 'anySelectedPoint', 'averageNormal', 'calcAveragePosition', 'calcBounds', 'calcRotationVector', 'callSnapFunc', 'cameraProjectionMatrix', 'getSelection', 'math', 'nuke', 'planeRotation', 'projectPoint', 'projectPoints', 'projectSelectedPoints', 'rotateToPointsVerified', 'scaleToPointsVerified', 'selectedPoints', 'selectedVertexInfos', 'snapFuncs', 'translateRotateScaleSelectionToPoints', 'translateRotateScaleThisNodeToPoints', 'translateRotateScaleToPoints', 'translateRotateScaleToPointsVerified', 'translateRotateSelectionToPoints', 'translateRotateThisNodeToPoints', 'translateRotateToPoints', 'translateRotateToPointsVerified', 'translateSelectionToPoints', 'translateThisNodeToPoints', 'translateToPoints', 'translateToPointsVerified', 'transpose', 'verifyNodeOrder', 'verifyNodeToSnap', 'verifyVertexSelection']
Examples
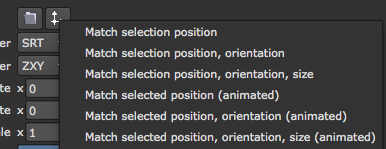
Extending the classic snap menu
Adding animated versions of the default 3 snap functions doesn’t take much effort, thanks to the handy methods available in the nukescripts.snap3d module:
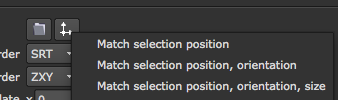
these are the corresponding methods that transform the node based on the vertex selection:
nukescripts.snap3d.translateToPoints( node )
nukescripts.snap3d.translateRotateToPoints( node )
nukescripts.snap3d.translateRotateScaleToPoints( node )
So lining up a node to the vertex selection in the active viewer is as simple as running the appropriate function with it. eg:
nukescripts.snap3d.translateRotateScaleToPoints( nuke.createNode('Card2') )
Note
examine the nukescripts.snap3d module to find more handy functions and save yourself a lot of time.
So let’s get started on creating animated versions of this:
Let’s create a new function with two arguments that provide the node and the mode:
def snapToPointsAnim( node=None, mode='t'):
If the node is not given, we assume that the node in the current context is used (i.e. when called from a node’s snap menu).
- def snapToPointsAnim( node=None, mode=’t’):
node = node or nuke.thisNode()
Some error handling might be in order in case the function is not called with one of the expected values for the mode:
def snapToPointsAnim( node=None, mode='t'):
    node = node or nuke.thisNode()
    if mode not in ( 't', 'tr', 'trs' ):
        raise ValueError, 'mode must be "t", "tr" or "trs"'
Each mode tells us which knobs we need to adjust for the respective line up, so let’s create a dictionary that will let us look up the knobs for each mode:
knobs = dict( t=['translate'], tr=['translate', 'rotate'], trs=['translate', 'rotate','scaling'] )
And similarly, we will save the required functions for each mode, so we can easily look them up later one:
snapFn = dict( t=nukescripts.snap3d.translateToPoints,
       tr=nukescripts.snap3d.translateRotateToPoints,
       trs=nukescripts.snap3d.translateRotateScaleToPoints )
Set the required knobs to be animated and clear any old animation they may have:
for k in knobs[ mode ]:
    node[ k ].clearAnimated()
    node[ k ].setAnimated()
Next we need to get the frame range from the user so we know which keyframes to set:
fRange = nuke.getInput( 'Frame Range', '%s-%s' % ( nuke.root().firstFrame(), nuke.root().lastFrame() ))
if not fRange:
    return
We are now ready to loop through all requested frames and set animation keys for the respective vertex positions:
tmp = nuke.nodes.CurveTool() # HACK TO FORCE PROPER UPDATE. THIS SHOULD BE FIXED
for f in nuke.FrameRange( fRange ):
    nuke.execute( tmp, f, f )
    snapFn[ mode ](node)
nuke.delete( tmp ) # CLEAN UP THE HACKY BIT
The complete code:
import nuke
import nukescripts.snap3d

def snapToPointsAnim( node=None, mode='t'):
    '''
    Animated versions of the three default snapping funtions in the axis menu
    args:
       node  -  node to snap
       mode  -  which mode. Available modes are: 't' to match translation, 'tr', to match translation ans rotation, 'trs' to match translation, rotation and scale. default: 't'
    '''

    node = node or nuke.thisNode()
    if mode not in ( 't', 'tr', 'trs' ):
        raise ValueError, 'mode must be "t", "tr" or "trs"'

    # KNOB MAP
    knobs = dict( t=['translate'], tr=['translate', 'rotate'], trs=['translate', 'rotate','scaling'] )
    # SNAP FUNCTION MAP
    snapFn = dict( t=nukescripts.snap3d.translateToPoints,
                   tr=nukescripts.snap3d.translateRotateToPoints,
                   trs=nukescripts.snap3d.translateRotateScaleToPoints )

    # SET REQUIRED KNOBS TO BE ANIMATED
    for k in knobs[ mode ]:
        node[ k ].clearAnimated()
        node[ k ].setAnimated()

    # GET FRAME RANGE
    fRange = nuke.getInput( 'Frame Range', '%s-%s' % ( nuke.root().firstFrame(), nuke.root().lastFrame() ))
    if not fRange:
        return

    # DO THE WORK
    tmp = nuke.nodes.CurveTool() # HACK TO FORCE PROPER UPDATE. THIS SHOULD BE FIXED
    for f in nuke.FrameRange( fRange ):
        nuke.execute( tmp, f, f )
        snapFn[ mode ](node)
    nuke.delete( tmp ) # CLEAN UP THE HACKY BIT
With the code in place you can now run:
snapToPointsAnim() - match position of selected vertices
snapToPointsAnim( mode=’tr’ ) - match position and rotation of selected vertices
snapToPointsAnim( mode=’trs’ ) - match position, rotation and scale of selected vertices
To add these functions to the snap menu, place something like this in your menu.py (in this example the examples is imported to provide the function):
import examples
m = nuke.menu( 'Axis' )
m.addCommand( 'Snap/Match selected position (animated)', lambda: examples.snapToPointsAnim( mode='t' ) )
m.addCommand( 'Snap/Match selected position, orientation (animated)', lambda: examples.snapToPointsAnim( mode='tr' ) )
m.addCommand( 'Snap/Match selected position, orientation, size (animated)', lambda: examples.snapToPointsAnim( mode='trs' ) )
Accessing Geometry (Surface Scatter)
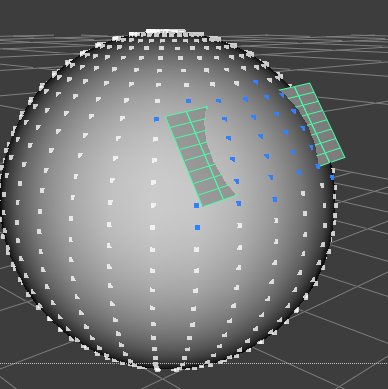
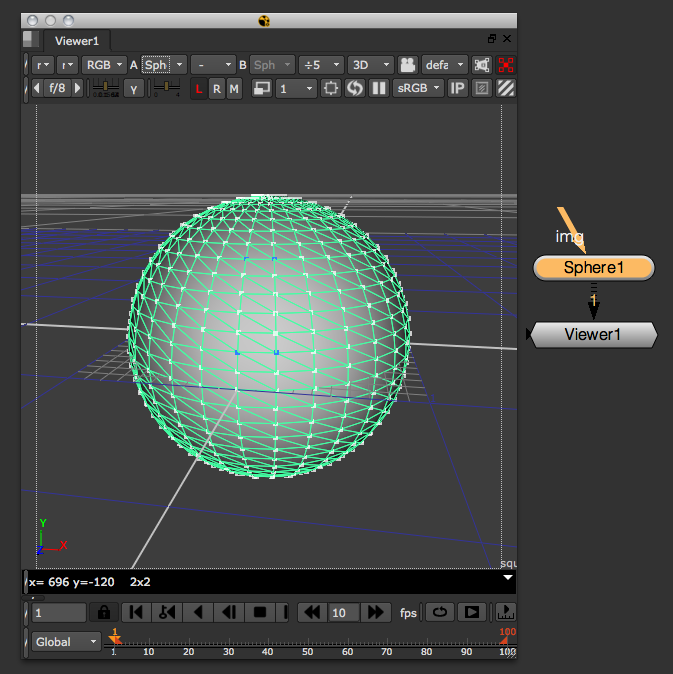
This example will show how to create new 3D objects at every selected vertex in the viewer. Start by creating a sphere and selecting some vertices on it:
The nukescripts package comes with handy module called snap3d which contains a whole bunch of shortcuts to commonly used tasks. Let’s use getSelection to gain access to all selected vertices in the active viewer:
vsel = nukescripts.snap3d.getSelection()
for v in vsel:
    print v

# Result:
<nukescripts.snap3d.VertexInfo instance at 0x1193b2878>
<nukescripts.snap3d.VertexInfo instance at 0x1193b2830>
<nukescripts.snap3d.VertexInfo instance at 0x1193b28c0>
<nukescripts.snap3d.VertexInfo instance at 0x1193b2710>
the VertexInfo object let’s us access the vertex position:
vsel = nukescripts.snap3d.getSelection()
for v in vsel:
    print v.position

# Result:
{0, 0.207912, 0.978148}
{0.203368, 0.207912, 0.956773}
{0, 0.669131, 0.743145}
{0.154509, 0.669131, 0.726905}
There, all the hard work is already done, all we need to do is to create the objects we want and assign the values returned by the VertexInfo object:
vsel = nukescripts.snap3d.getSelection()
for v in vsel:
    obj = nuke.nodes.Card2()
    obj['translate'].setValue( v.position )
This will create a Card2 object on each selected vertex. Let’s create a Scene node and connect them all up as we go. For this I will use enumerate() to get the index for each iteration which I can use as the input number for the Scene:
vsel = nukescripts.snap3d.getSelection()
sc = nuke.nodes.Scene()
for i, v in enumerate( vsel ):
    obj = nuke.nodes.Card2()
    obj['translate'].setValue( v.position )
    sc.setInput( i, obj)
To make this more flexible, let’s not hard code the Card2 object but define the type of object we want to scatter in a variable:
objType = 'Card2'
vsel = nukescripts.snap3d.getSelection()
sc = nuke.nodes.Scene()

for i, v in enumerate( vsel ):
    obj = eval( 'nuke.nodes.%s()' % objType )
    obj['translate'].setValue( v.position )
    sc.setInput( i, obj)
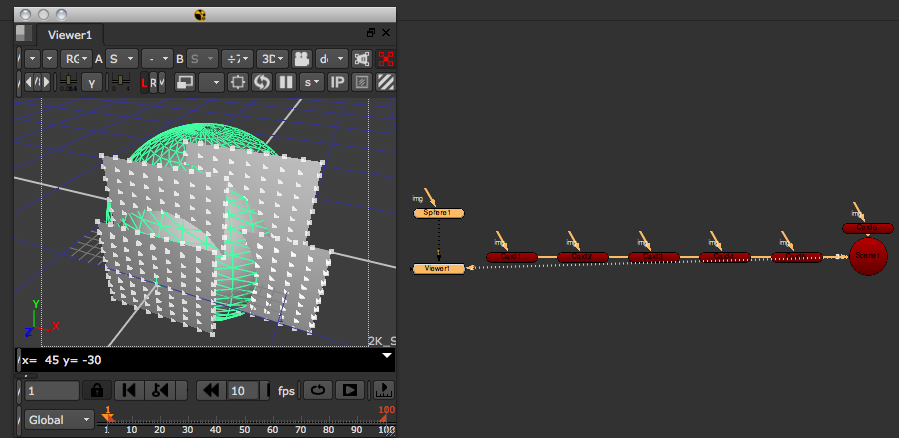
And lastly, we will connect the viewer to the new Scene node so we see the result immediately:
objType = 'Card2'
vsel = nukescripts.snap3d.getSelection()
sc = nuke.nodes.Scene()

for i, v in enumerate( vsel ):
    obj = eval( 'nuke.nodes.%s()' % objType )
    obj['translate'].setValue( v.position )
    sc.setInput( i, obj)

nuke.connectViewer( 1, sc )
To put this functionality into the snap menu we need to wrap up the code into a function and assign it to the Axis/Snap menu:
def scatterObjects():
    objType = 'Card2'
    vsel = nukescripts.snap3d.getSelection()
    sc = nuke.nodes.Scene()

    for i, v in enumerate( vsel ):
        obj = eval( 'nuke.nodes.%s()' % objType )
        obj['translate'].setValue( v.position )
        sc.setInput( i, obj)

    nuke.connectViewer( 1, sc )

nuke.menu( 'Axis' ).addCommand( 'Snap/Scatter Objects', lambda: scatterObjects() )
When running a function like this from the Snap menu, we can access the node the script is run from with nuke.thisNode(). So let’s add another line just before connecting the viewer to connect the current node to the Scene as well:
def scatterObjects():
    objType = 'Card2'
    vsel = nukescripts.snap3d.getSelection()
    sc = nuke.nodes.Scene()

    for i, v in enumerate( vsel ):
        obj = eval( 'nuke.nodes.%s()' % objType )
        obj['translate'].setValue( v.position )
        sc.setInput( i, obj)

    sc.setInput( i+1, nuke.thisNode() )
    nuke.connectViewer( 1, sc )

nuke.menu( 'Axis' ).addCommand( 'Snap/Scatter Objects', lambda: scatterObjects() )
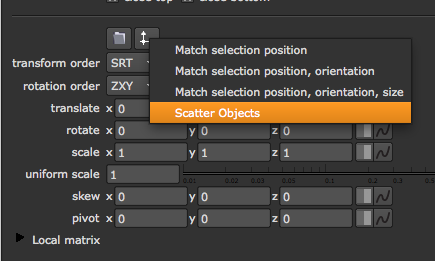
Run this from the new “Scatter Objects” menu entry again to see the new node connection. In order to control the newly create objects, let’s create a couple of user knobs in the Scene node so the user can adjust the size and position of the new objects:
def scatterObjects():
    vsel = nukescripts.snap3d.getSelection()
    sc = nuke.nodes.Scene()
    # add user knobs to control new nodes:
    offsetKnob = nuke.XYZ_Knob( 'offset' )
    sc.addKnob( offsetKnob )
    scaleKnob = nuke.Double_Knob( 'scale' )
    scaleKnob.setValue( 1 ) # set the initial value for scale to 1
    sc.addKnob( scaleKnob )
Instead of just assigning the respective vertex position to each new object, we can now create expressions to link everything to the master Scene node:
for i, v in enumerate( vsel ):
    obj = eval( 'nuke.nodes.%s()' % objType )
    # assign expressions to link to scene node's user knobs using the respective vertex position as the initial translation
    obj['translate'].setExpression( '%s + %s.offset' % ( v.position.x, sc.name() ), 0 )
    obj['translate'].setExpression( '%s + %s.offset' % ( v.position.y, sc.name() ), 1 )
    obj['translate'].setExpression( '%s + %s.offset' % ( v.position.z, sc.name() ), 2 )
    obj['uniform_scale'].setExpression( '%s.scale' % sc.name() )
    sc.setInput( i, obj)
Now for one last tweak:
Let’s give the user control over what kind of objects will be created at each selected vertex. To do this we use NUKE’s panel code to create a simple panel with a dropdown menu to offer the use a the choices:
# pop up a panel to ask for the desired object type
# the dictionary maps the name in the panel to the actual class used
typeDict = dict( Axis='Axis', Card='Card2', Sphere='Sphere', Cylinder='Cylinder', Cube='Cube' )

# create the initial panel and give it a title
p = nuke.Panel( 'Pick object type to scatter' )

# add a drop down list with the dictionary's keys as choices
p.addEnumerationPulldown( 'object', ' '.join( typeDict.keys() ) )

# adjust the panel's width a bit
p.setWidth( 250 )

# if the use confirms the dialog, return the respective node class
if p.show():
        objType = typeDict[ p.value( 'object' ) ]
else:
        return
And here is the complete code:
import nuke
import nukescripts

def scatterObjects():
    '''
    Places an object on each selected vertex. The new Scene node gets user knobs to control the new objects.
    args:
        obj  -  class of object to scatter (default = Card2)
    '''
    # pop up a panel to ask for the desired object type
    # the dictionary maps the name in the panel to the actual class used
    typeDict = dict( Axis='Axis', Card='Card2', Sphere='Sphere', Cylinder='Cylinder', Cube='Cube' )

    # create the initial panel and give it a title
    p = nuke.Panel( 'Pick object type to scatter' )

    # add a drop down list with the dictionary's keys as choices
    p.addEnumerationPulldown( 'object', ' '.join( typeDict.keys() ) )

    # adjust the panel's width a bit
    p.setWidth( 250 )

    # if the user confirms the dialogsave the choice for later, otherwise do nothing
    if p.show():
        objType = typeDict[ p.value( 'object' ) ]
    else:
        return


    vsel = nukescripts.snap3d.getSelection()
    sc = nuke.nodes.Scene()
    # add user knobs to control new nodes:
    offsetKnob = nuke.XYZ_Knob( 'offset' )
    sc.addKnob( offsetKnob )
    scaleKnob = nuke.Double_Knob( 'scale' )
    scaleKnob.setValue( 1 )
    sc.addKnob( scaleKnob )

    for i, v in enumerate( vsel ):
        obj = eval( 'nuke.nodes.%s()' % objType )
        # assign expressions to link to scene node's user knobs
        obj['translate'].setExpression( '%s + %s.offset' % ( v.position.x, sc.name() ), 0 )
        obj['translate'].setExpression( '%s + %s.offset' % ( v.position.y, sc.name() ), 1 )
        obj['translate'].setExpression( '%s + %s.offset' % ( v.position.z, sc.name() ), 2 )
        obj['uniform_scale'].setExpression( '%s.scale' % sc.name() )
        sc.setInput( i, obj)

    sc.setInput( i+1, nuke.thisNode() )
    nuke.connectViewer( 1, sc )
Don’t forget to put a line in your menu.py to add this to the actual snap menu, eg:
nuke.menu( 'Axis' ).addCommand( 'Snap/Scatter Objects', lambda: scatterObjects() )
Extending the new snap menu
For the new 3D system, there are handy methods available in the nukescripts.geosnap3d.py module. There are “Geo to” and “Pivot to” modes:


For Geo to mode:
The first button allows snapping of geometry to the vertex selection.
The second is the same but applies the snap over a frame range.
For Pivot to mode:
The first button allows snapping of the pivot to the vertex selection.
The second is the same but applies the snap over a frame range.
The third button allows snapping the pivot to the selected prim’s bounding box.
In both modes, the final custom button “…” is where user defined options can go. This is the same button regardless of whether in Geo to or Pivot to mode. Unlike the classic 3D system, there are already some animated options so these do not need to be added.
All but the custom button call:
nukescripts.geosnap3d.on_snap_knob(origin_knob, command)
to work out what needs to be done This is what action to perform, whether to translate/rotate/scale and what frame range to use if animated. The knob is passed in, rather than the node, to ensure it is possible to find other associated knobs with this snap using the same prefix on the knob name. Then a call is made to one of:
nukescripts.geosnap3d.geo_to_selection( node_to_snap, frames, translate_enabled, rotate_enabled, scale_enabled)

nukescripts.geosnap3d.pivot_to_selection( node_to_snap, frames, translate_enabled, rotate_enabled)

nukescripts.geosnap3d.pivot_to_bbox( node_to_snap, frames, rotate_enabled, command)
to perform the action. You can use a single frame number or an array of frames to use as the frames parameter. There are also some additional parameters not mentioned above which have default values. For more details see nukescripts.geosnap3d.py.
In order to implement your own custom option, similar code to the methods above can be used. It is recommended you take a look at the implementation of these methods for more details. Then you might start with the following python code:
import nuke
import nukescripts.geosnap3d

def my_custom_snap( origin_knob ):
    node_to_snap = origin_knob.node()
    # Implement custom code here
To add this custom option to the snap menu, place something like this in your menu.py (in this example the examples is imported to provide the function):
import examples
m = nuke.menu( 'Snap' )
m.addCommand( 'Custom/My Custom Snap', lambda: examples.my_custom_snap(nuke.thisKnob() ) )

Animation with the new snap menu
For the new 3D system, there are buttons on the UI that allow the user to apply the snap functions over a frame range. This is also possible to do using the nukescripts.geosnap3d.py directly as this example will show.
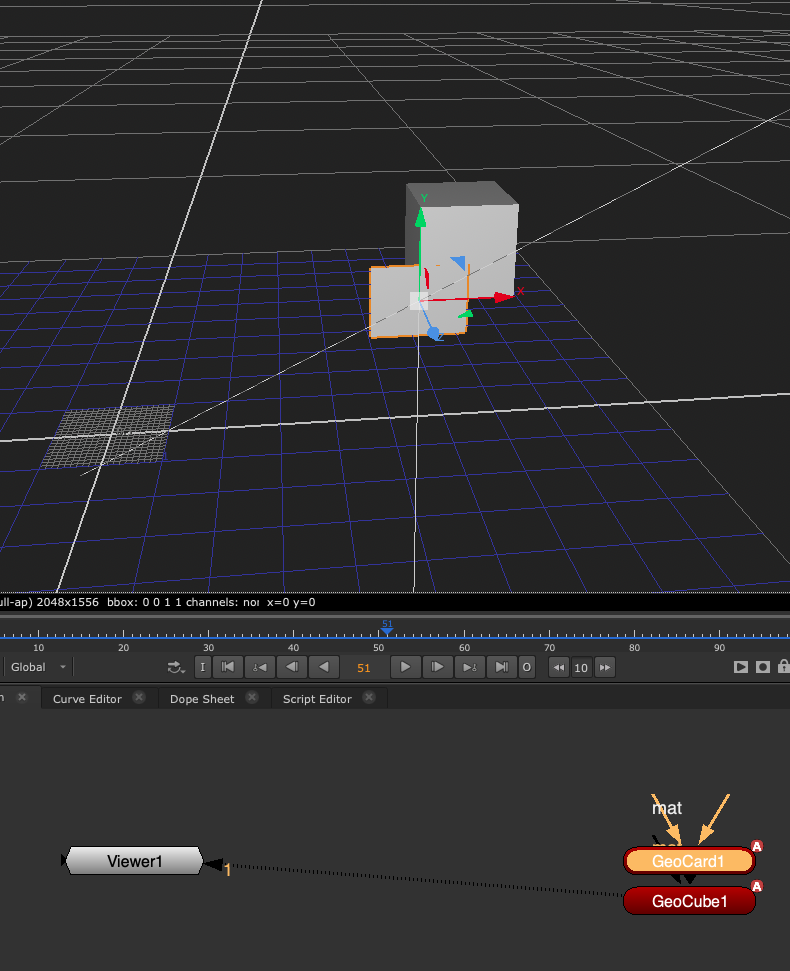
First, create the geometry you want to snap to and another geometry you want to apply the snap on. Here we create a GeoCard and a GeoCube and connect the GeoCube to the viewer:
geo_card = nuke.nodes.GeoCard()
geo_cube = nuke.nodes.GeoCube()
geo_cube.setInput(0, geo_card)
nuke.connectViewer(0, geo_cube)
Next we ensure the GeoCube has 24 vertices by setting rows and columns to 1:
CUBE_VERTEX_COUNT = 24
geo_cube['rows'].setValue(1)
geo_cube['columns'].setValue(1)
Now we animate the GeoCube so it moves from the origin to (10, 10, 10) over the frame range of 1-100:
ANIMATION_START_FRAME = 1
ANIMATION_END_FRAME = 100
TRANSLATION_START_VALUE = 0
TRANSLATION_END_VALUE = 10
geo_cube_translate_knob = geo_cube["translate"]
geo_cube_translate_knob.setAnimated()
geo_cube_translate_knob.setValueAt(TRANSLATION_START_VALUE, ANIMATION_START_FRAME)
geo_cube_translate_knob.setValueAt(TRANSLATION_END_VALUE, ANIMATION_END_FRAME)
Let’s select just the first vertex of the GeoCube now which we will snap to:
vertex_selection = [1] + [0] * (CUBE_VERTEX_COUNT - 1)
sel = nuke.GeoSelection()
sel.selectVertices(f"/{geo_cube.name()}", vertex_selection)
nuke.setGeoSelection(sel)
Finally, we can perform the snapping action which can be achieved by calling one of the following methods:
nukescripts.geosnap3d.geo_to_selection( node_to_snap, frames, translate_enabled, rotate_enabled, scale_enabled)

nukescripts.geosnap3d.pivot_to_selection( node_to_snap, frames, translate_enabled, rotate_enabled)

nukescripts.geosnap3d.pivot_to_bbox( node_to_snap, frames, rotate_enabled, command)
You can use a single frame number or an array of frames to use as the frames parameter. There are also some additional parameters not mentioned above which have default values. For more details see nukescripts.geosnap3d.py.
Note
If you intend to use pivot_to_bbox, you need to select the object rather than the vertex i.e. replace sel.selectVertices(f”/{geo_cube.name()}”, vertices_to_select) with sel.selectObject(f”/{geo_cube.name()}”).
Here we will just translate the GeoCard to the GeoCube’s first vertex for the frame range 1-100. This is achieved by using geo_to_selection:
SNAP_TRANSLATION = True
SNAP_ROTATION = False
SNAP_SCALE = False
frame_range = range(ANIMATION_START_FRAME, ANIMATION_END_FRAME)
geo_to_selection(geo_card, frame_range, SNAP_TRANSLATION, SNAP_ROTATION, SNAP_SCALE)
This give us the result:
The complete code:
import nuke
from nukescripts.geosnap3d import geo_to_selection

CUBE_VERTEX_COUNT = 24
ANIMATION_START_FRAME = 1
ANIMATION_END_FRAME = 100
TRANSLATION_START_VALUE = 0
TRANSLATION_END_VALUE = 10
SNAP_TRANSLATION = True
SNAP_ROTATION = False
SNAP_SCALE = False


def snap_to_frame_range():
    # Setup a geocard/geocube and connect to viewer
    geo_card = nuke.nodes.GeoCard()
    geo_cube = nuke.nodes.GeoCube()
    geo_cube.setInput(0, geo_card)
    nuke.connectViewer(0, geo_cube)

    # Ensure geocube has 24 vertices
    geo_cube['rows'].setValue(1)
    geo_cube['columns'].setValue(1)

    # Animate the geocube
    geo_cube_translate_knob = geo_cube["translate"]
    geo_cube_translate_knob.setAnimated()
    geo_cube_translate_knob.setValueAt(TRANSLATION_START_VALUE, ANIMATION_START_FRAME)
    geo_cube_translate_knob.setValueAt(TRANSLATION_END_VALUE, ANIMATION_END_FRAME)

    # Select the first vertex of the cube
    vertex_selection = [1] + [0] * (CUBE_VERTEX_COUNT - 1)
    sel = nuke.GeoSelection()
    sel.selectVertices(f"/{geo_cube.name()}", vertex_selection)
    nuke.setGeoSelection(sel)

    # Snap the geocard to the geocube's selected vertex over the frame range
    frame_range = range(ANIMATION_START_FRAME, ANIMATION_END_FRAME)
    geo_to_selection(geo_card, frame_range, SNAP_TRANSLATION, SNAP_ROTATION, SNAP_SCALE)
USD Tools
Pixar provides various “usd tools” to work with usd files. Since these are helpful tools, they are bundled with Nuke for easy access.
To run them, one needs to set up some environment variables, like QT_PLUGIN_PATH and PYTHONPATH. Also, it may be easier to refer to Nuke’s python rather than system python as Nuke’s python environment got the USD Python module (pxr) set up.
Whilst following the above is enough to launch the tools, it is still too many unnecessary manual steps. To simplify the execution, Nuke ships with a tool called “usdrunner”.
This “usdrunner” script is available from the install directory. On Mac, this is available in the Contents/Resources directory of the app bundle.
Invoking it with the “-h” or “–help” option prints out its usage on the standard output.
The most commonly used tool seems to be usdview, so that is what it defaults to when no tool is specified.
In the most simple case, one could open up a usd file with usdview bundled in the Nuke install as:
python usdrunner ~/Downloads/Cube.usda
The recommendation is to run this script through Python 3. It does not have to be Nuke’s python, but Nuke’s python will also work. This is just a simple wrapper script only using the standard library, so any basic Python 3 installation will work.
The usdrunner arguments might hide the usd tool arguments. If this is the case, it may be possible on some platforms to use double hyphens for the usd tool arguments, e.g. to get the help message from the usd tool rather than the usdrunner, one would issue something like this:
python usdrunner -- --help
If in doubt, it is always possible to open up the source code of usdrunner in an editor to see what it does or to customise it. It is just a small python wrapper script around the USD tools.