Using the Monitor Tab
The Monitor tab can be used to view your renders inside Katana.
Monitor Tab
Once a render has completed, you will be able to see the image in the Monitor tab.
Monitor Tab Controls
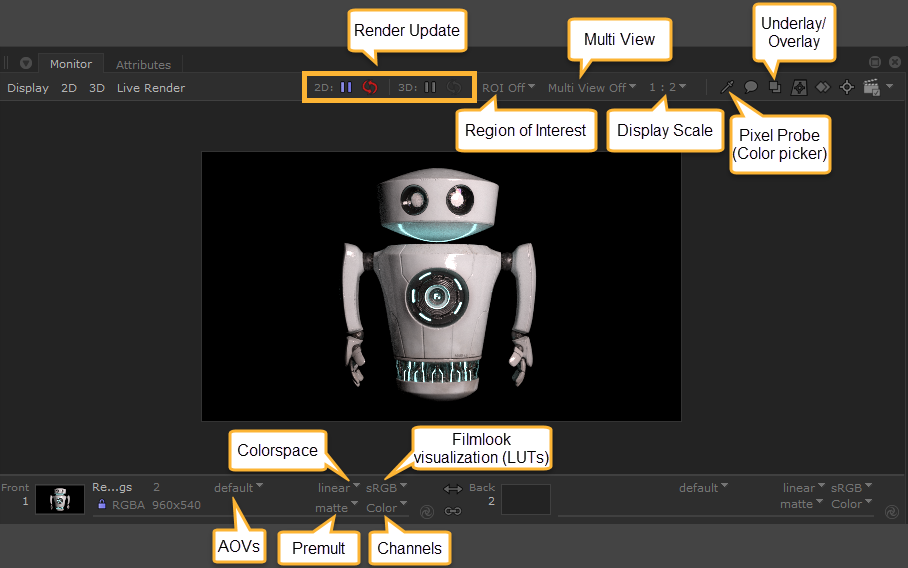
An overview of the key controls to edit how your image is displayed:
• Render Update controls - Choose a 2D or 3D update mode to determine when to trigger a render. See more at Changing How to Trigger a Render.
• Region of Interest dropdown - Use this to set a region of interest to render. For more information, see Rendering a Region of Interest (ROI).
• Multi View dropdown - If you want to view front and back at once, you can change the layout, including A/B buffer multiview and swipe modes. See more at Comparing Front and Back Images.
• Display Scale dropdown - If you want your rendered image to fill the whole Monitor tab window, you can use Frame Display Window or Frame Data Window, or you can choose a custom zoom. See more about changing the image position at Changing the Image Size and Position.
• Pixel Probe (Color picker) - This tool helps if you want to identify geometry by selecting pixels from the Monitor tab. Opens a new toolbar where you can select Front and back pixels. See more at Viewing the Pixel Values.
• Underlay/Overlay controls - Opens a new toolbar in which you can underlay or overlay the image with either the Over or Add function. See more at Underlaying and Overlaying an Image.
• AOVs dropdown - Use this dropdown to select which AOV to display in the Monitor tab. See Selecting An Output Pass.
• Premult dropdown - Change the alpha channel and premult settings. See more at Changing How the Alpha Channel is Displayed.
• Channels dropdown - Select the channel to display. See more at Changing the Displayed Channels.
• Colorspace dropdown - Select which colorspace to display. The default is ‘linear’.
• Filmlook visualization (LUTs) dropdown - Apply different Look Up Tables (LUTs) to the image. To add more options to this list, you can append to the “displays” section of the config.ocio file. Learn more about this at Q100197: Colorspaces in the Monitor Tab.
Tip: There are many useful keyboard shortcuts when using the Monitor tab. See Monitor Shortcuts.
Warning: In the Monitor Tab, Ctrl+Up Arrow/Down Arrow is used to increment or decrement the display exposure (fstop) offset by 1/4 stop. Ctrl+Home resets display exposure (fstop) offset back to 0.
Tip: Alt+Up Arrow/Down Arrow adjusts the gamma of the image.
Note: The Monitor tab supports the application of custom overlay masks with different framing options, based on a supplied configuration file. See more at Overlay Masking.
Viewing the Monitor Tab
If more than one Monitor tab is open, Katana always sends the preview render results to the first Monitor tab that was opened in a scene. If another instance of the Monitor tab is opened, the image rendered in the first instance is shown, or if nothing was rendered, then nothing is shown in the preview. Any consequent renders are shown only in the first instance of the Monitor tab, and any additional tabs opened cannot be considered the primary instance.
To toggle whether the Monitor tab is maximized, press Ctrl+Spacebar, double-click on the tab name, or hold the mouse pointer over the borders of the Monitor tab (outside of the image display area) and press Spacebar.
To switch the front and back images, hold the mouse pointer inside the image display area of the Monitor tab and press S.
To change which catalog slot to use, press the number that corresponds to the slot, for instance 3, or change the current Front image using the Catalog tab, see Changing the Catalog Renders Displayed in the Monitor Tab.
To view the catalog from inside the Monitor tab, press the Tab key. (Pressing the Tab key again returns to the Monitor view.)
Monitor Layer
The Monitor Layer allows you to toggle a render view directly in the Hydra Viewer, overlaying the geometry.
For a full overview of the Monitor Layer, see The Monitor Layer in the Hydra Viewer.