Search is based on keyword.
Ex: "Procedures"
Do not search with natural language
Ex: "How do I write a new procedure?"
Working With Vertex Maps Procedurally
You can create Vertex maps and assign weight values, seams, and RGBA values to them non-destructively using mesh operations. The tools are accessible from the Mesh Operations List.
Tip: For more information on procedural modeling and mesh operations, see Procedural Modeling.
The easiest way to access the Mesh Operations list is using the Modo layout.
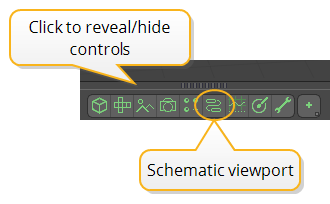
- Click the thin bar above the 3D viewport, indicated by a small arrow in the middle.
This reveals additional controls.
- Click the Mesh Operations list button.
The Mesh Operations List opens on the right.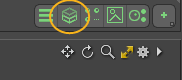
Creating a New Vertex Map Procedurally
The Create Vertex Map mesh operation allows you to create a new vertex map from the Mesh Operations list.
- In the Mesh Operations list, click Add Operator, and under Mesh Operations > Vertex Map, double-click Create Vertex Map.
The Create Vertex Map mesh operation is added to the list and its Properties are displayed on the right pane.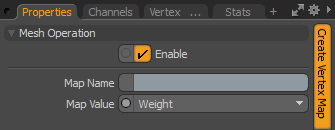
- In the Create Vertex Map Properties, enter a new Map Name and Map Value.
You have the following Map Value options:• Weight - Stores weight strength values for falloffs and texturing.
• UV Seam - Stores information on the seam edges from a UV map.
• RGB - Defines a vertex color map based on red, green, and blue color values.
• RGBA - Defines a vertex color map based on red, green, and blue color values and an additional transparency (Alpha) value.
Your new Vertex Map is created and listed in the Vertex Map List.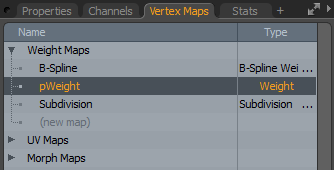
Setting Weight Values
You can set weight values to a specified Weight map using the Set Weight mesh operation.
Tip: Enable the Show Weightmaps ![]() button at the top of the 3D viewport to see the weight values in the viewport.
button at the top of the 3D viewport to see the weight values in the viewport.
You need to create a Weight map for your mesh, as described in Creating a New Vertex Map Procedurally. Then set weights the following way:
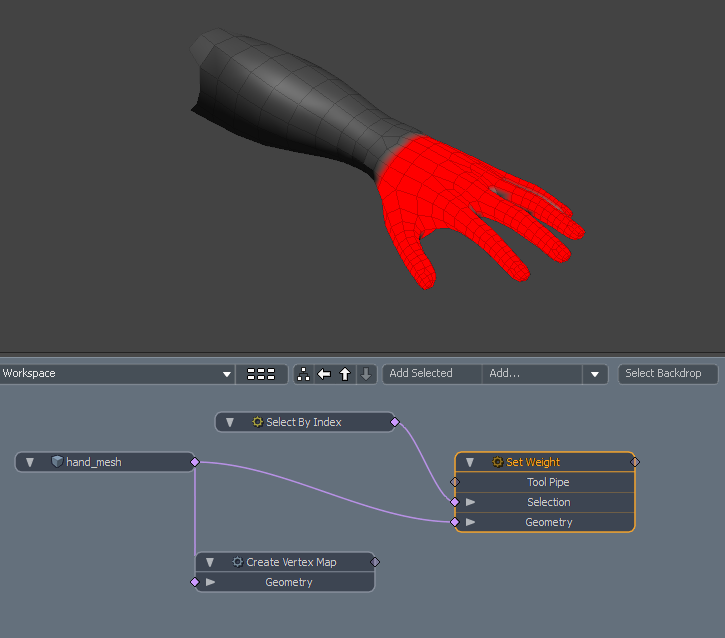
- In the Vertex Maps list on the lower right, under Weight Maps, select the weight map you created.
- In the Item List, select your mesh item and in the 3D viewport, select the vertices, edges, or polygons for which you want to set weights.

- In the Mesh Operations list, under Mesh Operations > Vertex Map, double-click Set Weight.
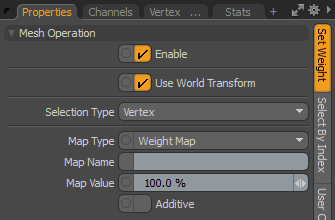
This adds the Set Weight mesh operation to the list and opens its properties in the Properties panel on the right pane. - In the Set Weight Properties, select the Map Type you want to use. A Weight Map is embedded on the mesh, while a Weight Container is a separate item.
Note: For more information on Weight Maps and Weight Containers, see Working with Weight Maps.
- Set Map Name to the name of the Weight Map you want to use, in our example, 'pWeight'.
If you have Show Weightmaps enabled in the Default view, the selected part of the mesh is colored red in the 3D viewport, indicating that the default 100% map value is assigned to it.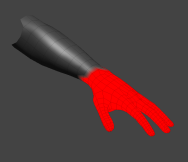
- Adjust the Map Value to set the weight value.


Set Weight Properties
|
Enable |
Enables/disables the Set Weight mesh operation. |
|
Use World Transform |
Sets the coordinates from Model Space to World Space where vertices are defined relative to an origin common to all the objects in a scene. |
|
Selection Type |
The element type selected. This mesh operation can take a Vertex, Edge, or Polygon selection. |
|
Map Type |
Set if you want to use a Weight Map or a Weight Container. For more information on the differences, see Working with Weight Maps. Note: If Map Type is set to Weight Map and the map can't be found, a new Weight Map is created. |
|
Map Name |
The name of the Weight Map to edit. |
|
Map Value |
The weight value to be applied to the selected elements. |
|
Additive |
When enabled, the Map Value is added to the current map value. When disabled, the current map value is set to the amount specified in Map Value. |
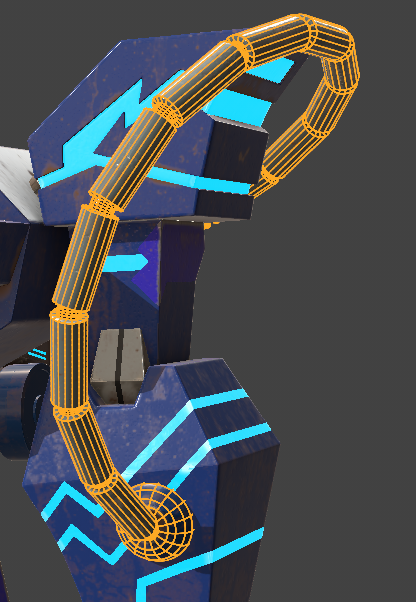
Setting Edge Weight Values
You can set edge weight values on a subdivision map using the Set Edge Weight mesh operation.
- In the Item List, select your mesh item and in the 3D viewport, select the edges for which you want to set weights.
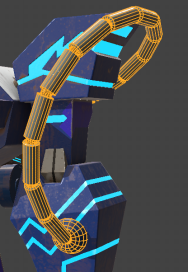
- In the Mesh Operations list, under Mesh Operations > Vertex Map, double-click Set Edge Weight.
This adds the Set Weight mesh operation to the list and opens its properties in the Properties panel on the right pane. - In the Set Edge Weight Properties, set the Map Value to the required percentage.
The edges are modified in the viewport.
|
|
|
|
|
Map Value 0% |
Map Value 25% |
Map Value 50% |

Set Seam
You can use the Set Seam mesh operation to set the values of a UV Seam (Cut) map. This is the procedural version of the direct modeling Cut Map tool.
Note: For more information on the Cut Map tool, see Creating Seams.
You need to create a UV Seam map for your mesh, as described in Creating a New Vertex Map Procedurally. Then set seam values the following way:
- In the Vertex Maps list on the lower right, under Other Maps, select the UV Seam map you created.
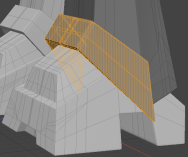
- In the Item List, select your mesh item and in the 3D viewport, select the edges for which you want to set seam values.
- In the Mesh Operations list, under Mesh Operations > Vertex Map, double-click Set Seam.
This adds the Set Seam mesh operation to the list and opens its properties in the Properties panel on the right pane. - In the Set Seam Properties, set Map Name to the name of the UV Seam map you want to use.
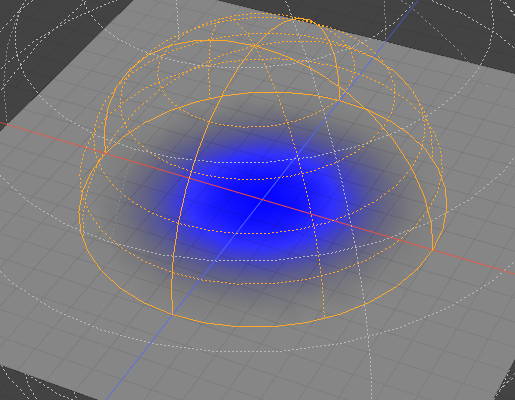
Seams are added along the selected edges. In the 3D viewport, the seams are highlighted in blue.
You can then use the UV Unwrap mesh operation to create UVs cut along the new seams. For more information, see Procedural UV Unwrap.

Set Seam Properties
|
Enable |
Enables/disables the Set Seam mesh operation. |
|
Use World Transform |
Sets the coordinates from Model Space to World Space where vertices are defined relative to an origin common to all the objects in a scene. |
|
Map Name |
The name of the UV Seam map to edit. |
Set RGB
You can set values on RGB/A maps using the Set RGB mesh operation.
You need to create an RGB or RGBA map for your mesh, as described in Creating a New Vertex Map Procedurally. Then set the values the following way:
- In the Item List, select your mesh item and in the 3D viewport, select the vertices, edges, or polygons for which you want to set the values.
- In the Mesh Operations list, under Mesh Operations > Vertex Map, double-click Set RGB.
This adds the Set RGB mesh operation to the list and opens its properties in the Properties panel on the right pane. - In the Set RGB Properties, set the relevant Map Type, set Map Name to the name of the RGB or RGBA map you want to use, and edit the Map Values.
The color of the selected vertices is updated in the 3D viewport.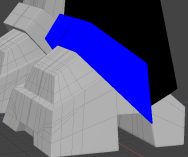

Set RGB Properties
|
Enable |
Enables/disables the Set RGB mesh operation. |
||||
|
Use World Transform |
Sets the coordinates from Model Space to World Space where vertices are defined relative to an origin common to all the objects in a scene. |
||||
|
Selection Type |
The element type selected. This mesh operation can take a Vertex, Edge, or Polygon selection. |
||||
|
Map Type |
Choose between RGB and RGBA maps. For more information on the differences, see Working with Weight Maps. Note: If a map of the set type can't be found, a new map is created. |
||||
|
Map Name |
The name of the map to edit. |
||||
|
Map Value -R/G/B/A |
The red, green, blue, and alpha values. Note: Map Value - A is only used if Map Type is set to RGBA. |
||||
|
Alpha Uses Falloff |
If you're using a falloff with this option enabled, the falloff weight is applied to the Alpha value. When disabled, Alpha is a set value.
|
||||
|
Additive |
When enabled, the Map Value is added to the current map value. When disabled, the current map value is set to the amount specified in Map Value. |
Mesh Operation Inputs
Set Weight, Set Edge Weight, Set Seam, and Set RGB all have inputs you can edit in the Mesh Operations list. You can expand them in the list by clicking the arrow ![]() in front of them. This reveals the inputs the operation uses.
in front of them. This reveals the inputs the operation uses.
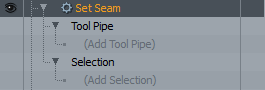
The Inputs of Set Seam
• Tool Pipe - Add falloffs and sub-tools to the operation. For example, instead of selecting vertices, edges, or polygons, you can use falloffs to create a selection.
• Selection - Select vertices/edges/polygons or modify your existing selection. For more information on procedural selection, see Procedural Selection.
Vertex Maps in the Schematic
The Vertex Map mesh operations are also available in the Schematic.
Create Vertex Map and Set Weight in the Schematic
To open the Schematic viewport:
• In the Modo layout, click the thin gray line below the 3D viewport, and click the Schematic viewport ![]() button.
button.
OR
• Switch to the Setup layout from the menu bar by clicking Layout > Layouts > Setup.
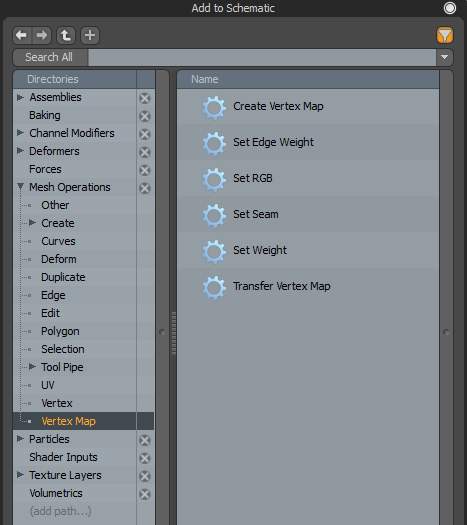
To access the Vertex Map tools, click Add... . The Vertex Map tools can be found under Mesh Operations > Vertex Map.
Sorry you didn't find this helpful
Why wasn't this helpful? (check all that apply)
Thanks for your feedback.
If you can't find what you're looking for or you have a workflow question, please try Foundry Support.
If you have any thoughts on how we can improve our learning content, please email the Documentation team using the button below.
Thanks for taking time to give us feedback.