Putting it all Together: Example 2
Our second example is a simple colour transfer model which transfers the colour distribution of one image to another. This example will highlight:
how to pass multiple images to your model
it will show that normalisation functions can be used in your model’s forward() function to ensure pixels are in the correct range
it will show how to control the attributes of a model that is defined as an attribute of another model using a float valued knob in Nuke
The parent model defined in this example, ColourTransfer, is a wrapper around another model, LinearColourTransfer. It is the LinearColourTransfer model that contains the main functionality for our colour transfer method, which is based on a simple linear transformation.
TorchScript
Let’s start by defining our LinearColourTransfer model, which contains the main colour transfer functionality
import torch
import torch.nn as nn

class LinearColourTransfer(nn.Module):
   """This model transfers the color distribution from one image to another
      using a linear transformation. The variable 'mix' controls how much the
      colours of the first image are changed to look like the second image.
   """
   def __init__(self):
      super(LinearColourTransfer, self).__init__()
      self.linear_layer = nn.Linear(6, 3)
      self.mix = 1.0
Note that we have defined our model with an attribute mix, which will control how much the colour in the first RGB image will be changed. This is a floating point value so we define it as mix = 1.0.
Next, let’s define our model’s forward() function as:
def forward(self, input):
      """

      This forward function accepts an input tensor representing two RGB images. The first RGB
      image will be recoloured so that it matches the color distribution of the second.

      :param input: A torch.Tensor of size 1 x 6 x H x W representing two RGB images
      :return: A torch.Tensor of size 1 x 3 x H x W representing the first RGB image,
                  recoloured so that it has the same mean and std deviation as the second image
      """
      # Normalize the first image stored in the tensor
      norm_input = input.clone()
      norm_input[:, 0:3, :, :] = self.normalize(input[:, 0:3, :, :])

      # Reshape the input tensor so it has size [(H * W) x 6]
      # This is the size required by self.linear_layer
      b, c, h, w = norm_input.size()
      reshaped_input = torch.reshape(norm_input, (6, h*w))
      reshaped_input = torch.transpose(reshaped_input, 0, 1)

      # Apply the linear colour transformation to the first image using the
      # colour distribution of the second image
      transformed_input = self.linear_layer(reshaped_input)

      # Reshape the output tensor so it has size [1 x 3 x H x W]
      transformed_input = torch.transpose(transformed_input, 0, 1)
      transformed_input = torch.reshape(transformed_input, (3, h, w))
      transformed_input = torch.unsqueeze(transformed_input, dim = 0)


      # Using .transpose() may have altered the tensor in memory so that it is no longer
      # contiguous, so apply the contiguous() function to fix this
      transformed_input = transformed_input.contiguous()

      # Use the 'mix' variable to control how different the final image will be to the input
      output = (1 - self.mix)*input[:, 0:3, :, :] + (self.mix)*transformed_input

      return output
Since this model uses two RGB images, its forward function accepts an input tensor of size 1 x 6 x H x W. Since self.linear_layer requires an input of size (H*W) x 6, this input tensor is reshaped before and after self.linear_layer is applied. This also ensures that the forward function’s output tensor has the expected shape of 1 x 3 x H x W. Note that when reshaping the tensors, using transpose() can create a tensor that is not contiguous in memory, so we need to call contiguous() on the transposed tensor to combat this.
The first input image is also normalised to ensure that it has the pixel range expected by self.linear_layer. The definition of normalise() can be found in the supporting python files.
Finally, in the final line, the mix variable is used to control how much the original and recoloured image are mixed in the output. This is the variable that will be controlled later by a custom knob in Nuke.
Next, let’s define the parent model, ColourTransfer, that wraps around this LinearColourTransfer model:
class ColourTransfer(nn.Module):
   """This model is a wrapper around our LinearColourTransfer Model.
   """
   def __init__(self, mixValue = 1.0):
      super(ColourTransfer, self).__init__()
      self.mixValue = mixValue
      self.LinearColourTransfer = LinearColourTransfer()

      # Load weights for LinearColourTransfer
      checkpoint_file = 'colourtransfer_ckpt_600.pth'
      checkpoint = torch.load(checkpoint_file)
      self.LinearColourTransfer.load_state_dict(checkpoint)
      self.LinearColourTransfer.eval()

   def forward(self, input):
      """
      :param input: A torch.Tensor of size 1 x 6 x H x W representing two RGB images
      :return: A torch.Tensor of size 1 x 3 x H x W representing the recoloured image
      """
      # Control self.LinearColourTransfer.mix using mixValue
      self.LinearColourTransfer.mix = self.mixValue

      output = self.LinearColourTransfer(input)

      return output
Since this is the parent model, the attributes that are declared in this class are the ones that we can control from Nuke with custom knobs, so we define a mixValue attribute in the __init__ function. The first line of this model’s forward() function ensures that mixValue controls LinearColourTransfer.mix.
In the __init__ function, we also load the weights for LinearColourTransfer and set the model to inference mode with .eval().
Now that we have defined our main ColourTransfer model, we can run the following code to convert this model to a TorchScript file:
model = ColourTransfer()
scripted_model = torch.jit.script(model)
scripted_model.save('colour_transfer.pt')
CatFileCreator
In the CatFileCreator node in Nuke, set the default knobs as follows:
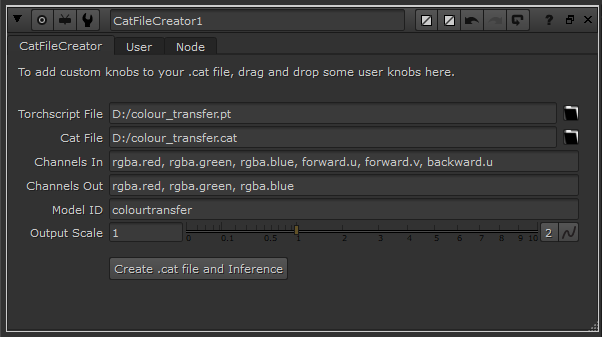
Since our model requires two RGB images as input and returns an RGB image as output, we’ve defined 6 input channels in the Channels In knob and three output channels in the Channels Out knob.
Next, add a float knob by dragging and dropping it to the top of the CatFileCreator properties panel and fill in the knob values as follows:

Note that the Name knob value is set to ‘mixValue’, the attribute defined in our parent ColourTransfer model. Click Create .cat file and Inference to create your .cat file and prepopulated Inference node.
Inference
Opening the new Inference node’s properties panel, you will see the knob values have been prepopulated and the Mix float knob has been created. From the Channels In knob we can see that this Inference node can be connected to an image containing the rgba.red, rgba.green, rgba.blue, forward.u, forward.v, backward.u channels. We create our 6 channel input image by reading in two RGB images and combining them by shuffling the RGB channels of the second image into the forward.u, forward.v and backward.u channels of the first as follows:

The Inference node can be attached to this image and will return the first RGB image recoloured with the colours of the second RGB image:
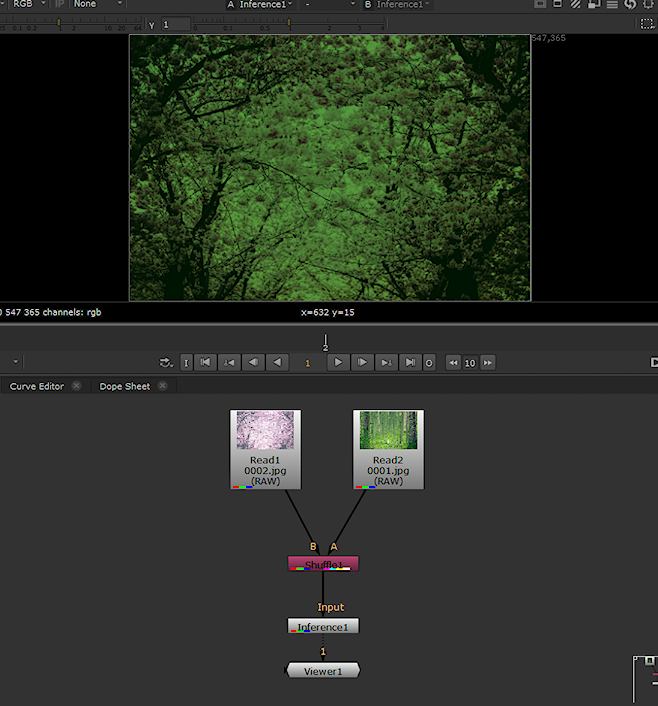
Note that the LinearColourTransfer model was trained in sRGB space. Therefore, to ensure our input image is in the correct colour space, we have checked the Raw Data knob in both Read nodes since these images were originally rendered in the sRGB space. Alternatively, a colour space node can be added before the Inference node to convert the image from Nuke linear to sRGB colour space.
Now that the input image is connected, change the value of the custom Mix knob to see the effect it has on the output image. It will control how much the output image mixes between the original image and the recoloured image. Toggle the Use GPU if available and Optimise for speed and Memory knobs to confirm that they are also working as expected.
Note
If instead you wanted to store the first RGB image in the motion channels and the second RGB image in the RGB channels, you can. In the CatFileCreator, just define the Channels In knob value as ‘forward.u, forward.v, backward.u, rgba.red, rgb.green, rgba.blue’ and ensure that you shuffle the first image into the motion channels and the second into the RGB channels.