A Simple Example
In this section, we’ll create a simple object detection model called Cifar10ResNet in PyTorch. This model will detect whether or not certain objects (cat, dog, car, etc) are present in the input image. If they are, the model will return a single channel white image, otherwise it will return a single channel black image. We’ll show how this model can be converted to TorchScript, and then we’ll convert this TorchScript model to a cat file using the CatFileCreator node in Nuke. Finally, we’ll apply this model to an input image using the Inference node in Nuke.
Torchscript
Let’s start by creating our own custom Cifar10ResNet model class:
import torch
import torch.nn as nn
import torch.nn.functional as F
from resnetSmall import ResNet, ResidualBlock

class Cifar10ResNet(torch.nn.Module):
    """
    This class is a wrapper for our custom ResNet model.
    """
    def __init__(self):

        super(Cifar10ResNet, self).__init__()
        self.model = ResNet(pretrained=True)
        self.model.eval()
Here, we are defining the Cifar10ResNet class which wraps around our own pretrained ResNet model. We define Cifar10ResNet as a torch.nn.Module. Note that we are calling the ResNet model with the pretrained flag set to true so that it loads our trained network weights. We are also setting the model to evaluation mode with eval() since we are not training the model. Next, we define the model forward function:
def forward(self, input):
    """
    The forward function for this nn.Module will pass the input tensor to the ResNet
    forward function. An integer from 0 - 9 will be returned indicating which object has
    been detected. If a plane is detected, the forward function returns a tensor of ones.
    Otherwise, it returns a tensor of zeros.

    :param input: A torch.Tensor of size 1 x 3 x H x W representing the input image
    :return: A torch.Tensor of size 1 x 1 x H x W of zeros or ones
    """
    modelOutput = self.model.forward(input)
    modelLabel = int(torch.argmax(modelOutput[0]))

    plane = 0
    if modelLabel == plane:
      output = torch.ones(1, 1, input.shape[2], input.shape[3])
    else:
      output = torch.zeros(1, 1, input.shape[2], input.shape[3])
    return output
The Cifar10ResNet forward() function is a simple one that passes the input to the ResNet forward(). If the returned label is 0, a plane has been detected and the forward function returns a tensor of ones of size 1 x 1 x H x W. Otherwise, it returns a tensor of zeros of size 1 x 1 x H x W.
To convert this model to TorchScript and save it as a .pt file, simply run the following code in PyTorch:
resnet = Cifar10ResNet()
module = torch.jit.script(resnet)
module.save('cifar10_detector.pt')
Important
To create a .cat file that can be run in all versions of Nuke from Nuke 13.x onwards, the following libraries must be used when converting a PyTorch model to TorchScript:
torch==1.6 (https://pytorch.org)
torchvision==0.7
TorchScript models created using PyTorch 1.6 can be converted to .cat files using Nuke 13.x or Nuke 14. Note that TorchScript models intended to run in Nuke 13.x should be converted to .cat file using Nuke 13.x as those converted with Nuke 14 will not run in Nuke 13.x.
Nuke 14 now uses PyTorch 1.12 which means that PyTorch models can also be converted to TorchScript using:
torch==1.12.1 (https://pytorch.org)
torchvision==0.13.1
TorchScript models created using PyTorch 1.12 must be converted to .cat files using Nuke 14. Note that .cat files created with Nuke 14 will not run in Nuke 13.x.
CatFileCreator
Now that we have created the .pt file, it’s time to convert it into a .cat file that we can use in Nuke. In order to do that, launch NukeX and set up a CatFileCreator node as follows.
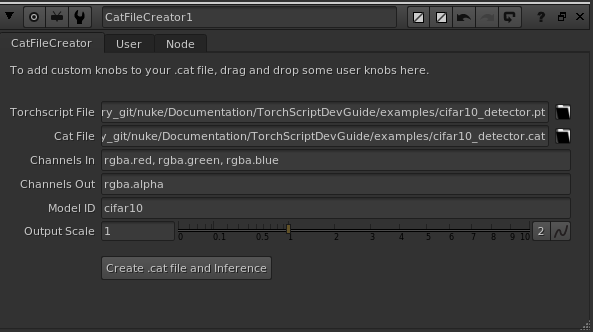
The Torchscript File knob points to our .pt file
The Cat File knob tells Nuke where to save our newly created .cat file.
The Channels In knob value tells Nuke that we want to process the red, green and blue channels of the image passed to the Inference node.
The Channels Out knob value ensures that our single channel output will appear in the alpha channel of the Inference node’s output image.
The Model Id allows us to encode the name of the model into the .cat file.
The scale parameter of 1 confirms that the width and height of our input image is the same as that of our output image.
Clicking the Create .cat file and Inference knob creates the .cat file and an Inference node with all of the details of the newly created .cat file.
Inference
Connect the Inference node to an image that has red, green and blue channels as follows:
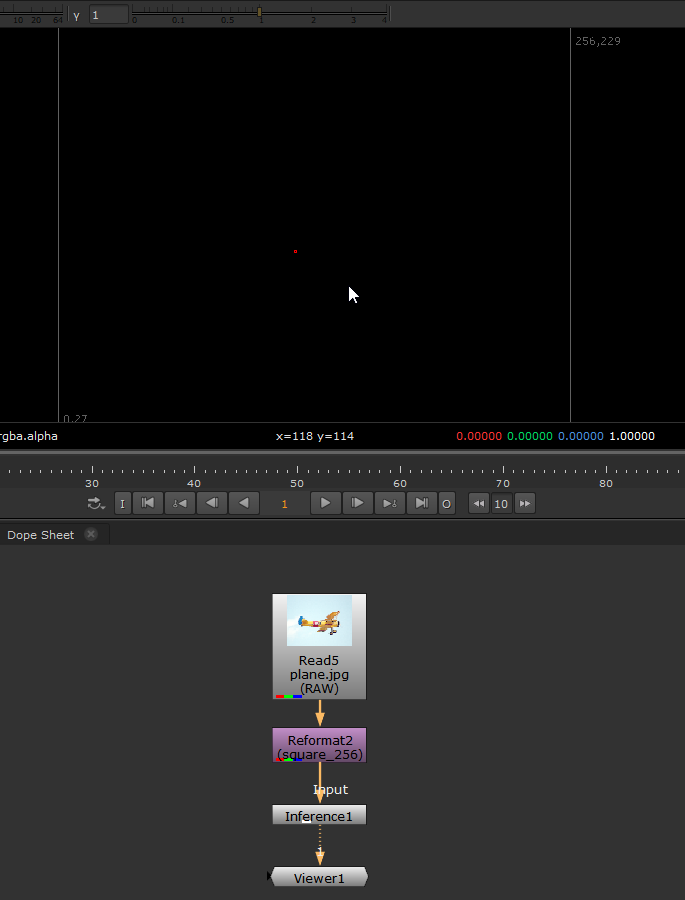
The output of the model appears in the alpha channel of the Inference node’s output image. It will be all ones if a plane is detected in the input image and otherwise, it will be all zeros.
Note
This model was trained on images in sRGB colour space, so pixel values must be in sRGB before being passed to the Inference node. By default, Nuke converts all images to Nuke’s linear colour space when processing. To ensure this model works correctly, if your image was written in sRGB space, check the Raw Data knob in your Read node to ensure your pixel data doesn’t get converted to Nuke linear. Otherwise add a colourSpace node before the Inference node to convert from linear to sRGB space, and add another colour space node after the Inference node to convert pixels back to Nuke’s linear colour space.