Animation Layout and Viewports
The Animate layout is a workspace specifically developed for animation. The workspace has a larger 3D viewport than other workspaces do. With this maximized space, you can concentrate on animating your characters. With the main toolbox across the bottom of the screen, you can set and refine keyframes in an efficient manner.
Directly below the 3D viewport is the Track view (also known as a Dope Sheet), which has details in its own topic. You can access Track view by dragging the top of the frame for the Timeline.
The toolbox below the Timeline has the tools necessary to scrub the Timeline, to control view settings, to add, edit and remove keyframes, and to refine animation timing. Some tools are unique to the Animate layout.
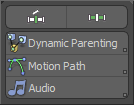
With the first group of five buttons, you have quick access to the Spacing Chart and In-between tools, as well as the Dynamic Parent, Motion Path, and Audio dialogs.
Spacing Chart
You can use the Spacing Chart in a workflow popularized by traditional hand-drawn animation. With this workflow, you concentrate on the poses of the character and treat each keyframe position like a single drawing in an animated sequence. You can define specific key poses for a character before working out the timing. Once the poses are set, then you can modify the timing independently. See the Spacing Chart topic for more information.
In-between Tool
You use the In-between tool for quickly creating poses between another pair of poses or for adjusting existing poses. You can use it for building overlap or follow-through, or to create moving holds anything where a pose or parts of a pose need to be biased towards their preceding or following poses (keyframes). The target item needs to be part of an actor, and the items being edited must have at least one key on its transform channels before and after the time at which you apply the tool. Modo supports all action and channel interpolation types. For example, Modo creates an in-between when using stepped curves.
You activate the tool by clicking the button at the right of the toolbar area. When active, Inbetween displays in the viewport near the axis widget. To create a new pose, set the Timeline's current time to where you want the pose keyframe. Then, activate the tool and drag with the right mouse button directly in the 3D view. Dragging moves the target item in time as the tool adjusts the inbetween pose. Releasing the button fixes the pose to the now current location. Dragging to the left adjusts the new pose towards the previous pose; dragging to the right adjusts the new pose towards the next pose. If you have not selected an item, but a current actor and action are active, then Modo edits all items in the actor that have surrounding keys at the current time.
To edit an existing pose:
| 1. | Select the target item or hierarchy of items to edit. |
| 2. | Position the Timeline indicator at the position to be edited. |
| 3. | Right-click and drag in the 3D viewport. |
The tool takes the existing transform of the items into account and biases the pose from there. If there are no selected items, then the tool works with the current actor as previously described.
Dynamic Parenting
Parenting is the act of creating a hierarchy and relating the motion of one object to that of another. Standard parenting hierarchies are fixed, and therefore, you cannot animate them. Sometimes, however, you need to change the parent of an item over time. Dynamic parenting gives you the capability to keyframe what an item is parented to and when.
For example, with an assembly line scenario, a product moves on a conveyor belt. Then a robotic arm picks up the product, places it into a package, and moves the package elsewhere. In this case, you parent the item first to the conveyor belt, then to the robotic hand, and finally to the product box. In this way, you only have to animate the conveyor, the robotic arm, and the box. The dynamically parented object goes along with the animated objects.

Select the target item to be parented (in Items mode). When you click the Dynamic Parenting button, the Dynamic Parent toolbox opens. Click the Add Parent button to initialize the Dynamic Parenting controls for the target. (Assign this when the Timeline is at frame 0.) Modo adds the Dynamic Parent Channel Modifier and provides some in-viewport controls for you to define the parent/child relationships.
Using the dialog, you only need to move the Timeline to the appropriate position and then use the Set Parent option to set the target parent item within the scene defining the parent relationship. Once you assign a parent, that parent remains associated with the item in time until you apply the next assignment. The World option is like unparenting the item in a place. The item remains in the position it is in when you select the option.
You can set as many different parent items as required, but you can only assign a single parent per key. If you click the Remove Current button, Modo removes the current parent from the target and leaves the other assignments in place. If you click the Select Modifier button, Modo selects the actual dynamic parent modifier item in the Items (Scenes) List for you to modify its attribute in the Properties panel. The Draw control defines the drawing of the control handle in the 3D viewport: with Off Modo never draws the handle, with On Modo always draws the handle, and with Selected Modo draws the handle only after you select the target item.
You can also assign dynamic parenting directly in the 3D viewport using the control handle. After selecting the target item and enabling the dynamic parenting option, you to drag the control dot (the purple dot) to the target parent item to link them. Right-clicking the control unparents the items.
This video demonstrates that process:
Motion Path
Motion paths are a useful visual aid for seeing how an item moves over time within a scene. With Modo's motion path feature, you can directly edit the curves (such as three-dimensional Bezier curves) in the GL viewport. Additionally, you can adjust the positional easing of the keyframes. Modo identifies each frame step visually as a dot along the path.
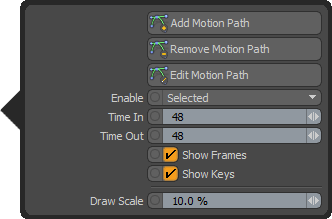
You can view any animation path by first selecting the target item. You may need to assign some position keyframes to the target prior to adding the path. (If there is no motion on an item, there is no path to view.) Once selected, clicking the Motion Path button opens the dialog and you can click the Add Motion Path button to draw the path. The green section of the path represents the time behind the current item, and the purple path represents time in front of the item.
To modify the path directly in the 3D viewport, enable the Edit Motion Path option by clicking the button. Doing this draws the path within the viewport as a ribbon to represent the Z-axis rotation of the item along its length. At each keyframe location, Modo shows small cyan cubes. You can drag these cubes to reposition them. When you reposition these, tangent handles show on the selected key. You can drag the tangent handles to adjust the curvature of the incoming and outgoing curve.
How you edit the curve is dependent on which channels are keyed at the keyframe location. You must key all three (X,Y, and Z) channels at each location for free curvature editing; otherwise, Modo locks the curve to the particular axis that it was keyed to. Right-clicking and dragging the handles adjusts easing in and out of the key without adjusting the path's shape. (Ctrl+click has the same effect.) Clicking the Edit Motion Path button again disables editing of the path. You can define whether the path displays with the Enable option: with Off, Modo never draws the path, with On, Modo always draws the path, and with Selected Modo draws the path only when you've selected the target item.
The Time In/Out options control the number of keyframes displayed before and after the current location. This controls the length of the path around the current time. The Show Frames and Show Keys options control the visibility of the small frame step tick marks on the path and the cyan cube keyframes respectively. The Draw Scale value determines the thickness of the ribbon as it relates to the path. A value of 0% disables the ribbon aspect of the path drawing. You can disable the path display for an item by clicking the Remove Motion Path button in the pop-up window with the selected target item.
Audio
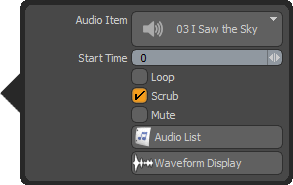
Audio is often an important part of the animation workflow for syncing actions to sound cues or, more importantly, lip sync with a character. Modo can load sound files and play them back with the Timeline. If you click the Audio button, you can use the controls in the Audio popup window. Once Modo loads the audio, its waveform displays inside the Timeline. Clicking the Audio Item opens the Audio viewport for you to load and select a variety of audio file formats. Clicking a loaded file selects it and assigns it as the current audio file to the Timeline. Once you load and select the audio file, any subsequent playback of the Timeline plays the audio. (Your computer system must have the proper playback hardware connected and configured.)
The Start Time setting controls the frame at which the audio file starts to play. If you select the Loop checkbox, Modo plays shorter sound files consecutively and repeats the file until the end of the Timeline. If you select the Scrub checkbox, Modo controls playback of audio when you manually shuttle the Timeline. Selecting Mute temporarily disables the audio playback. Clicking the Audio List button shows or hides the Audio List popup, where you can select audio items and edit their associated attributes in the Properties panel. Clicking the Waveform Display button displays or hides the audio file's waveform in the Timeline itself. See the Using Audio Overview topic for additional details about using audio in Modo.
Time Tool
![]() With the Time tool, you can shuttle the Timeline indirectly while in the 3D viewport. Doing this can increase efficiency when adjusting items in the viewport and eliminate the need to go directly to the Timeline to manually scrub back and forth. Clicking the Time Tool icon activates the function and adds its controls as an overlay to the 3D viewport. The large number in the overlay displays the current Timeline location in the chosen format, and the smaller numbers below show the current time.
With the Time tool, you can shuttle the Timeline indirectly while in the 3D viewport. Doing this can increase efficiency when adjusting items in the viewport and eliminate the need to go directly to the Timeline to manually scrub back and forth. Clicking the Time Tool icon activates the function and adds its controls as an overlay to the 3D viewport. The large number in the overlay displays the current Timeline location in the chosen format, and the smaller numbers below show the current time.
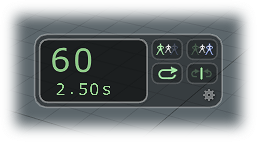
Outside of the display itself, you use the Time tool to control the Timeline with the right mouse button and, possibly, a middle button. When the Time tool is active, you can right-click in the 3D viewport and drag the pointer to scrub the Timeline position. If you hold down the Ctrl key while right-clicking and dragging the Time tools jumps between keyframes. With a multi-button mouse, clicking in the viewport with the middle mouse button invokes real-time playback of the Timeline around the current time, holding down control with the middle mouse button will temporarily jump to the previous keyframe. The Time Tool specific overlay provides additional functionality for improving workflow:
![]() A click temporarily jumps to the previous keyframe; a right-click steps the Timeline to the previous keyframe.
A click temporarily jumps to the previous keyframe; a right-click steps the Timeline to the previous keyframe.
![]() A click temporarily jumps to the next keyframe; a right-click steps the Timeline to the next keyframe.
A click temporarily jumps to the next keyframe; a right-click steps the Timeline to the next keyframe.
![]() Determines the middle-click playback mode by indicating Loop or Ping-Pong.
Determines the middle-click playback mode by indicating Loop or Ping-Pong.
![]() Scrub-mode control, when enabled, returns the Timeline position to the current time when the mouse button is released.
Scrub-mode control, when enabled, returns the Timeline position to the current time when the mouse button is released.

Clicking the gear icon in the overlay opens a dialog box for you to define the Auto Play Range, which is the number of steps around the current time that is played when pressing the middle mouse button. You can also select a checkbox to use a scroll wheel to step through keyframes.
If you select the Use Viewport Regions checkbox, Modo places easy-access viewport overlay buttons for the keyframe jump controls. The button regions are invisible until you move the pointer over the designated Viewport Regions Locations (Sides or Top Corners). The buttons appear as transparent gray boxes when visible, and you can click> them to jump to the previous or next keyframes temporarily or right-click to step the Timeline to the next or previous keyframe. (The direction depends on which button you press: left button goes back and right goes forward.)
The Time tool does not operate like a regular tool because you can activate and apply other tools while the Time tool is active. Also, the Time tool uses the middle and right mouse buttons. Therefore, using the Time tool overrides any additional functionality these mouse buttons provide for specific tools. You can only disable the Time tool by clicking the Time Tool button again.
Keyframe Tool
Courtesy William Vaughan
![]() The Keyframe tool adds a control widget to the 3D viewport for you to visualize and modify keyframes directly in the Animation view. Clicking the Keyframe Tool button enables the widget. Then, when you select any item that has keyframes associated with it, the widget connects the keyframes to the item's center location. The color of the widget signifies its current state: red for a keyframe, green when animated (but no keyframe), and blue with a mix of keyframes on the item.
The Keyframe tool adds a control widget to the 3D viewport for you to visualize and modify keyframes directly in the Animation view. Clicking the Keyframe Tool button enables the widget. Then, when you select any item that has keyframes associated with it, the widget connects the keyframes to the item's center location. The color of the widget signifies its current state: red for a keyframe, green when animated (but no keyframe), and blue with a mix of keyframes on the item.
Clicking the + sign opens the keyframe popup, which shows the keyframe states for all animated transforms of a given item. You can click the dots that represent the X, Y, and Z channels for each transform to toggle the keyframe state for each. Clicking the transform icon, itself, automatically keys all three channels. Clicking a green dot sets a key for that channel and changes the dot to red. Clicking a red dot removes the key. Clicking when the widget dot is blue sets a key for all animated channels.
|
|
The tool only works for items that currently have keyframed transform channels. The widget does not draw when you have selected non-animated items.
Animation Timeline Controls
![]()
The Timeline controls provide the functions for shuttling the Timeline. Clicking the button activates the function. Some buttons also have alternate functions that can be accessed by right-clicking the button. You can view the keyboard shortcuts for Timeline transport in the Timeline topic.
|
Buttons |
Description |
|---|---|
|
|
This controls the Auto Keyframe settings. For details, see the Timeline topic. |
|
|
Moves the Timeline to the first frame of the Current Start position. |
|
|
Moves the Timeline backwards one frame. |
|
|
Displays the current Timeline position. You can manually specify the current frame value. |
|
|
Moves the Timeline forward one frame. |
|
|
Moves the Timeline to the last frame of Current End position. |
|
|
This is the Play button. Clicking it plays the Timeline forward. Right-click to access the Reverse Play button to play the Timeline backward. |
|
|
(Play Keys) Plays only the keyframes for the current actor. (It also supports the Range Time Markers.) |
|
|
Plays through the timeline one frame at a time to populate the cache with meshes resulting from deformers and mesh operations. Right-click to reveal the Cache Deformers at Current Time option. |
|
|
Caches meshes resulting from deformers and mesh operations around the current frame (about +/- half a second). |
|
|
Removes a frame and moves all the following keyframes one frame back.* |
|
|
Adds a frame and moves all the following keyframes one frame forward.* |
|
|
Moves the Timeline to the first keyframe position for the selected item(s). |
|
|
Moves the Timeline to the previous keyframe position. |
|
|
Assigns a keyframe to all currently selected channels. |
|
|
Assigns a keyframe to all animated channels belonging to the currently selected items. |
|
|
Assigns keyframes to all animated channels belonging to the items in the actor and also to any channel members. |
|
|
Assigns keyframes to all animated channels belonging to the items in the Group. |
|
|
Moves the Timeline to next the keyframe position. |
|
|
Moves the Timeline to the last keyframe position. |
|
* These controls also work with actions when applied while one is active (and there are no items or channels selected). |
|


Channel Sets
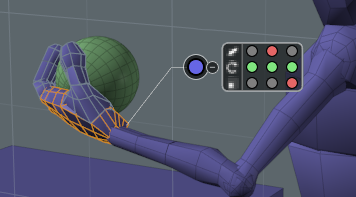
![]()
With channel sets you can display a collection of channels from the same or different items in the 3D views with an interface similar to the Channel Haul tool. There are two main differences. First, the interface remains open until you explicitly close it - even when selecting other items in the scene. Second, Modo replaces the hauling controls of the Channel Haul tool by keying buttons.
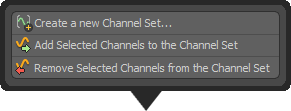
You create sets in the Channel Sets dialog. By selecting a single item in the Items list (or the 3D viewport) and then selecting the target channels in the Properties or Channels viewport, you can click the Channel Sets button to open the dialog. Clicking the Create new Channel Set button opens the New Channel Set dialog where you can specify a name for the set. Leave the options in the dialog at their default values (Mode: From Selected Channels) to automatically add the previously selected channels to the set when Modo creates it. After clicking OK, Modo creates the set and and activates it, which makes the channel visible in the 3D viewport.
You can add additional channels from other items by clicking Add Selected Channels or eliminate target channels from the active set by clicking Remove Selected Channels. After you create a channel set, you can use the dialog to specify the current Channel Set. This set displays its interface in the 3D views. Setting this to (none) closes the interface.
The viewport interface works much like the Channel Haul tool. You can change channel values by clicking on the channel name and dragging horizontally. By clicking the numeric value of the channel, you can edit the value directly. When a value has been edited, the small dot to the right of the value turns yellow. This allows you to discard the change by simply clicking on the yellow dot.
You move the interface around in the 3D views by dragging the header area that shows the name of the set and close the interface by clicking the x button on the upper-left corner. The main difference from the Channel Haul tool is that, instead of hauling controls to the left of the channel name, the Channel Set interface has controls for keyframing the channels. These work in the same way as the controls in the Properties viewport. Clicking them toggles the key state of the channel at the current time (or at the key time set by using the middle mouse button to drag in the Timeline).
Channel sets are a special type of group, so you can create and edit them in the Groups Viewport. The current channel set is the one that displays in the 3D views and can be specified from the pop-up menu in the toolbar. When you select a Channel Set, the Graph Editor and the Dope Sheet display the contents of the current channel set.
Animated Channel Toggle
![]() To the right of the Channel Set controls is the Animated Channel button. If no channel sets are active (set to none), the Animated Channel button, when enabled, displays any animated channels (with keyframes) associated to the current selection in the channel sets' viewport window. This window makes it convenient for you to work with channels by adding keyframes without needing to make specific sets to work with.
To the right of the Channel Set controls is the Animated Channel button. If no channel sets are active (set to none), the Animated Channel button, when enabled, displays any animated channels (with keyframes) associated to the current selection in the channel sets' viewport window. This window makes it convenient for you to work with channels by adding keyframes without needing to make specific sets to work with.
Key Sets
Key sets provide a convenient and quick way for adding keys to multiple channels at once. You can create key sets in advance. For example, you might create a key set for all the animated channels in a character: its arms, hands, and so forth. Alternatively, you can create key sets as you work by adding or removing channels as needed. You select the active key set from the popup menu. To set keys on all the channels in the set, you assign them with the keying button to the right of the Key Set controls.
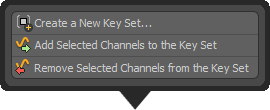
You create and modify key sets in the same manner as Channel Sets by selecting an item and the target channels and then clicking the Create a New Key Set button. In the New Key Set dialog, you can specify the name of the set. After you click OK, Modo creates the set and makes it active. When a specific key set is active, pressing the Key button defines a keyframe for all items within the key set on the current frame. (The items do not have to be selected.)
Filter Option
![]() Click the Filter button to control visibility of certain key sets associated with an actor. Modo parents the Group Items together. You associate these in the Groups Viewport by clicking the key set group and dragging it onto the actor groups. When assigned as such, Modo only displays the key set group in the pop-up menu when that actor is active. This is useful when working with multiple actors that each have their own unique key sets.
Click the Filter button to control visibility of certain key sets associated with an actor. Modo parents the Group Items together. You associate these in the Groups Viewport by clicking the key set group and dragging it onto the actor groups. When assigned as such, Modo only displays the key set group in the pop-up menu when that actor is active. This is useful when working with multiple actors that each have their own unique key sets.
Action, Actors and Poses
![]()
The Actor, Action, and Pose menus provide ways to simplify the steps for selecting and keyframing elements in a complex scene. Actors are collections of multiple items that provide ease in selecting the associated elements and setting keyframes. Actions are alternate takes of the same Timeline for an entire actor. Poses are a collection of specific keyframe values that can be applied anywhere along the Timeline for all or part of an actor (such as different hand positions). When working with actors, actions, and poses, you must take many considerations into account. See the Actor, Action, and Pose topic for detailed information.
Keying Hierarchy
![]() The Hierarchy Mode options provide a workflow enhancement for you to set implicit selections of items based on a hierarchy. For instance, you could keyframe all the fingers in a hand while having only a single finger joint actually selected. Generally, you can only adjust selected items. This is the default behavior, but, based on the hierarchy of the elements being animated (such as a bipedal, jointed character), you can change the hierarchy mode to manage associated objects simultaneously. The hierarchy mode also affects the Graph Editor and Dope Sheet viewports to display the associated items based on the mode type.
The Hierarchy Mode options provide a workflow enhancement for you to set implicit selections of items based on a hierarchy. For instance, you could keyframe all the fingers in a hand while having only a single finger joint actually selected. Generally, you can only adjust selected items. This is the default behavior, but, based on the hierarchy of the elements being animated (such as a bipedal, jointed character), you can change the hierarchy mode to manage associated objects simultaneously. The hierarchy mode also affects the Graph Editor and Dope Sheet viewports to display the associated items based on the mode type.
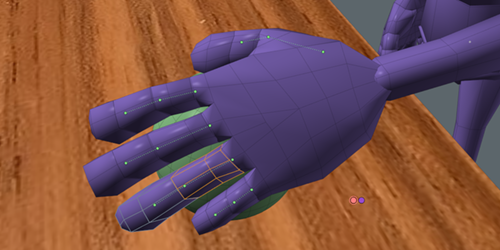
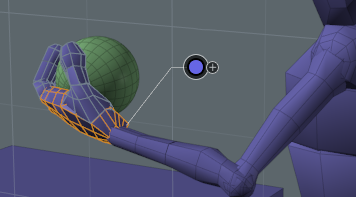
Clicking the mode button opens a popup for you to specify an alternate mode. If you select a mode other than None, Modo indicates additional items with implied selections in the 3D Viewports by small colored dots at each item's center position. The hierarchy connections show as dotted lines drawn between the items. In the illustration, the Branch Related mode is selected so that the single finger joint that is explicitly selected also implicitly selects all the other fingers. The colors for each dot represent the keyframe status (same as with the general controls): green is animated, red is a keyframe position, blue is a mixed state, and orange is for non-animated elements.
Pose Tool
![]() With the Pose tool, you can easily pose and animate hierarchies of elements by using a simplified drag and pin workflow. When the Pose tool is active, it simulates an IK type of setup between elements. (Inverse Kinematics, or IK, is the ability to animate the position of a goal item and have other related elements automatically follow by reaching toward the goal as it moves.) This helps to simplify the animation workflow greatly and provides an intuitive method to position elements. Although often used with bipedal characters, Modo does not limit the Pose tool specifically to these types of setups. You can manipulate any hierarchy of joints, items, or elements with the Pose tool, and it is equally effective.
With the Pose tool, you can easily pose and animate hierarchies of elements by using a simplified drag and pin workflow. When the Pose tool is active, it simulates an IK type of setup between elements. (Inverse Kinematics, or IK, is the ability to animate the position of a goal item and have other related elements automatically follow by reaching toward the goal as it moves.) This helps to simplify the animation workflow greatly and provides an intuitive method to position elements. Although often used with bipedal characters, Modo does not limit the Pose tool specifically to these types of setups. You can manipulate any hierarchy of joints, items, or elements with the Pose tool, and it is equally effective.
With this workflow, you select the base (or root element) of a hierarchy and then click the Pose tool button to activate the tool. When this tool is active, blue dots show on each item's Center in the 3D viewport for each element within the selected hierarchy. From there you can drag any dot to move the target element, which also affects the related elements in the chain. How far the related elements move is dependent on how far you drag the target itself, their position relative to the target, and the weighting value specified in the Pose tool's Properties panel. When moving an item isn't the desirable behavior, you can also pin specific items to keep them stationary. You do this by right-clicking any dot and changing its color to red to indicate its locked state. Position changes on either side of the locked element keep the elements on the opposing side stationary.
The Pose tool offers a simple-to-use, but powerful means of working with characters. See the Pose Tool topic for more detailed information.
Channel Haul Tool
![]() You use the Channel Haul button to adjust any item's selected channels by dragging directly in the 3D viewport.
You use the Channel Haul button to adjust any item's selected channels by dragging directly in the 3D viewport.
The channels visible within the viewport depend on the channels that you selected in either the Properties or Channels viewport. Clicking the Channel Haul button or pressing the C key activates the tool and the viewport display in the 3D viewport. Dragging anywhere off the display simultaneously edits all active fields. You can limit this to specific channels by clicking the Boolean buttons preceding each channel. The topmost Boolean button enables or disables all channels at the same time. You edit values individually clicking the channel name in the display and dragging the pointer to interactively adjust the value. You can also specify a new value by clicking the current value and typing a new one. With the Channel Haul tool, you can modify up to 6 specified channels.
If you have not selected a channel, Modo reminds you that the tool is still active. Click the Channel Haul button again (or press the spacebar) to disable the tool.

Apply/Discard Changes Buttons
![]()
![]() Click the Apply button to apply channel changes you have made to a scene or action or click the Discard button to discard all the changes. Click Apply when you want to commit changes without having to scrub the Timeline and return to the frame that was previously being editing, or click Discard to erase all changes quickly. The latter is a quick way to return anything that you've edited back to its previous values without having to undo multiple times or to go through all the changed channels and reset them manually. For example, you could adjust a pose or test rigging controls. Then, click Apply if you want to retain the many changes to multiple items or click Discard if you don't.
Click the Apply button to apply channel changes you have made to a scene or action or click the Discard button to discard all the changes. Click Apply when you want to commit changes without having to scrub the Timeline and return to the frame that was previously being editing, or click Discard to erase all changes quickly. The latter is a quick way to return anything that you've edited back to its previous values without having to undo multiple times or to go through all the changed channels and reset them manually. For example, you could adjust a pose or test rigging controls. Then, click Apply if you want to retain the many changes to multiple items or click Discard if you don't.
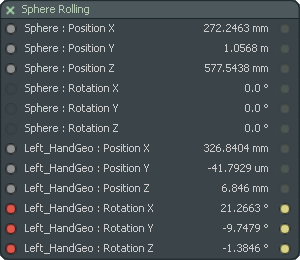
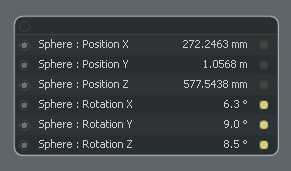
Keyframe Control Block
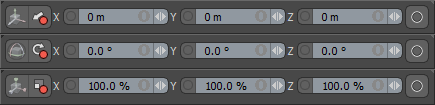
This section of the Animation interface layout works like a spreadsheet and shows all the transform values for the current selection. Modo dedicates each row to a specific transform (either Position, Rotation, or Scale, from top to bottom). The first, second, and last columns have function for each row. The first column has the tool buttons that enable or disable the actual transform tool associated with it. You use the second column to automatically set a keyframe for all three axes of the specific transform. The X, Y, and Z input fields represent the current values for the item. In the last column on the right, the buttons with the circles reset the item by adding a keyframe for all three values of the given transform to 0 (zero).
Coordinate Options
![]()
![]() The Animation layout supports three different types of action centers that automatically orient the Transform Tool's handles when working with items. If you click the World Coordinates button (the left icon), Modo orients the handles to the world-based XYZ planes in the scene. If you click the Local button (the right icon), Modo orients the handles to match the orientation of the target element that is being modified. (In this case, local is local to the selected item.) When both buttons are disabled, which is the default state, then the orientations of the tool handles match the parent item of the selected element for you to transform items relative to the item that defines its orientation. Clicking the buttons in the interface toggles the modes on or off.
The Animation layout supports three different types of action centers that automatically orient the Transform Tool's handles when working with items. If you click the World Coordinates button (the left icon), Modo orients the handles to the world-based XYZ planes in the scene. If you click the Local button (the right icon), Modo orients the handles to match the orientation of the target element that is being modified. (In this case, local is local to the selected item.) When both buttons are disabled, which is the default state, then the orientations of the tool handles match the parent item of the selected element for you to transform items relative to the item that defines its orientation. Clicking the buttons in the interface toggles the modes on or off.
Interface Toggles
The buttons in the last section of the Animation layout hide and show viewports in the animation layout, provide a way to convert the GL viewports to video and frames and provide access to a variety of utility viewports as palettes. The top left button shows or hides the Graph Editor or Dope Sheet viewport. When you click the button, the viewport opens below the 3D viewport. If you click the button again, Modo hides the viewport. The top right button shows or hides the Items (Scenes) List or Properties Panel cluster of tabs present in the other interfaces. Depending on the amount of screen space available, you can maximize the main 3D viewport workspace when it's necessary to focus on the animation itself.
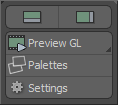
Preview GL
![]()
You use the Preview GL options to convert the GL viewport into a video or frame sequence format for external playback. In complex scenes, converting can reduce hardware limitations to allow for full-speed, full-frame playback. This can also be useful for reviewing animations when someone who doesn't own Modo needs to see an animation for approval purposes. Modo makes video previews easy to create. When you apply any of the commands, Modo temporarily disables any visible HUD elements including the navigation icons, information overlays, tool feedback overlays, and onion skinning to keep the resulting video uncluttered. Modo only displays the frame number. After the recording completes, Modo restores the HUD elements to their previous state.
Modo provides three preview options, which provide ways to make a temporary video that opens in an external player for review. Modo determines the video format based on the Movie I/O setting in File I/O Preferences and determines the size by the size of the active 3D viewport when you invoke the Preview command. Once Modo creates the video file itself, it calls the operating system for the default playback mechanism for the chosen format. Make sure you have proper video playback support in your operating system before creating a preview. You click the button to invoke the command, and Modo sequentially goes through each frame of the current start and end times to create the preview file. Once Modo creates the preview it opens the default playback application with the video automatically loaded. You can then use the playback software to view the video.
Right-clicking the Preview GL button opens the Preview menu where you specify alternate options. Specifying Preview GL 1/2 produces a video at half the size of the 3D viewport and Preview GL 1/4 produces a video that is one quarter the size of the 3D viewport. The Record GL options provide identical video files, with the same 1/2 and 1/4 options; however, by invoking these commands Modo prompts you to specify a Save location and Filename. Use Preview GL for quick, local reviews and Record GL when you need to review the video at a later time or send it to another location.
Specifying Image Sequence saves a sequence of bitmap images that match the active viewport size to the designated folder. Invoking the command opens an OS-specific folder for you to define the location and provide a filename and format for the preview. Once specified, Modo sequentially steps through the Timeline and saves a file for each frame. You then use a sequence player or video-editing application to gather the still frames into a playable video sequence.
Palettes
![]()
Click the Palettes button to choose from a variety of useful viewports that open as floating palettes in the Animation workspace. Doing this eliminates the need to switch to an alternate workspace layout for simple tasks. The commands act as toggles: clicking opens the named palette; the second click closes the palette. (Also, you can close a palette by clicking the OS-specific close button.) You can arrange open palettes by dragging a palette's header. While the palettes are open, you can hide them temporarily by pressing the grave accent (`) key. This is also the tilde (~) key next to the 1 on American keyboards.
Settings
![]()
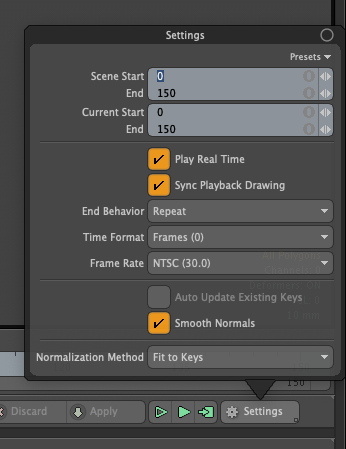
Click the Settings button to open the Scene Options panel to define frame ranges for animations and to set some formats and default behaviors.
Scene Start/End: Sets the sequence length using the start and end frame numbers.
Current Start/End: Sets the current length using the start and end frame. When animating, you may concentrate on a single area of a scene for fine-tuning. With the current range setting, you can temporarily crop out the rest of the scene so you can concentrate on the one section. Double-click the Timeline to reset the Current range to the Scene range.
Play Real Time: When selected, the sequence plays back in an OpenGL viewport using the Frame Rate setting to the best of the host system's abilities (and skipping frames if necessary). When clear, Modo plays every frame in the sequence at the fastest speed possible, which (depending on scene complexity) may be slower or faster than the specified frame rate.
Sync Playback Drawing: Due to Modo's method of processing sequences in OpenGL viewports, mesh drawing may be out-of-sync during playback (i.e. separate meshes, like eyes, lagging behind a character's animated body and head). This playback option is enabled by default. Disabling this option may lead to faster animation playback.
End Behavior: Determines what happens when playback reaches the end of the play range. The following options are available:
• Hold - Stops the animation at the end of the playback.
• Repeat - The default setting, loops playback indefinitely.
• Wrap - Repeats the playback until the current time matches the initial time and then it stops.
Time Format: Use to specify which standard Modo uses when displaying individual frame numbers
• Frames - Indicates frames as sequential numbers by using a standard numbering format.
• Seconds - Indicates frames as a passage of time by using the 0.0s format.
• SMPTE - Specifies frames by using a shorthand method 00:00:00:00, which represents hours:minutes:seconds:frames.
• Film Code - Specifies frames by a linear measurement (which would be the length of the film in feet if the animation were filmed) using a 0.0 + 0 format.
Frame Rate: You can specify a frame rate by standard definitions, such as Film (24), PAL (25), and NTSC (29.97). (The values shown are in frames per second, or fps, which is the number of still images that play back in sequence in one second of time.)
Auto Update Existing Keys: This option is only available when Auto Key is set to Off. Normally, when Auto Key is off, any edits that you make are discarded when the current time is changed unless the edits have been manually keyed. With this option, Modo updates existing keyframes automatically if their values are changed without requiring manual keying. Modo still discards un-keyed changes when the current time changes.