Search is based on keyword.
Ex: "Procedures"
Do not search with natural language
Ex: "How do I write a new procedure?"
Modeling Overview and Techniques
For all intents and purposes, modeling-wise, Modo is a tool for working with polygons. There are other ways provided for generating forms, somewhat indirectly, such as spline and bezier curve patching, or working with different types of subdivision surfaces, or even fur, but the ultimate goal of those operations is to eventually create polygons for rendering and baking, or to export to their ultimate destination.
Modo provides a variety of ways to manipulate and shape those polygons into the desired shape. Some tools manipulate polygons directly, such as the transform and deform tools, others provide means to manipulate polygons indirectly, such as the sculpting of multi-resolution meshes. There are as many methodologies for reaching a finished result as there are users; everyone has their own unique approach. However, of the various methodologies, there are some basics to understand for Modo's way of working that eases the overall learning curve, allowing you to reach your goal and find your own individual style.

Modeling in Modo
In any 3D modeling toolset, each tool needs to infer, or be informed about, several key variables in order to work properly. It needs to know its central position, meaning the location in 3D space, from where the desired effect is applied. It also needs to know its operational axis or orientation. And, finally, it needs to know which portion of the scene is going to be affected and by how much. In Modo, each of these variables has been extracted to its own operational layer. Modo offers each as a building block individually, such as Specifying Action Centers and Falloffs and Using Falloffs. All the tools in Modo are made up of these building blocks and understanding how each part contributes to produce the final result is important for moving forward. You can also assemble these blocks to make your own custom tools using the Tool Pipe, providing a flexible and really powerful way to work.
Components Versus Items
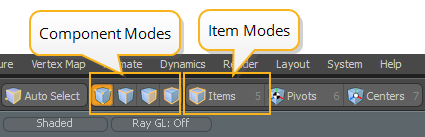
One of the areas that is often confusing to new users of Modo are the various selection modes. When modeling, you can work in one of three component modes: Vertices, Edges, and Polygons. This is where the actual geometry is created and shaped. There is also an Items mode, which is useful for positioning modeled objects in a scene, and is a necessity of animation in Modo proper. When in any individual selection mode, only selections of that type can be made. The important distinction is that when editing an item, you are editing the layer itself (think of it like a container), while editing a component is editing the contents of the layer (what's inside the container). Modifications made in the Vertex, Edge, and Polygon modes happen around the center point, while transforms applied while in Items mode moves the entire item, including its center point.
To learn more about selection mode types, see Selecting Items.
Interacting with Modo
Interacting with Modo itself is done mostly through the manipulation of the mouse, taking advantage of all three buttons, and the scroll wheel (some may prefer a trackball or tablet -both typically have functions that can be remapped to mimic the options available on a mouse). Mouse button activity is supplemented by keyboard commands, which are, at times, used in unison with the mouse. This can take some getting used to (see Mouse Standards for more information). Given that Modo is a 3D application that you interact with in a 2D fashion, this may feel awkward at first, but it produces the most predictable results.
It's recommended you read through Understanding the Interface to familiarize yourself with the many viewports, tabs, and panels. Main functions are organized as tabs across the top, such as Modeling or Sculpting. When in any of these areas, only the tools necessary for the task at hand are provided, streamlining the process. This way of working also makes it easy to jump in and out of tasks easily, providing a comfortable non-linear workflow. You can model, UV map, sculpt, and then model some more with very little worry that one process has a negative affect on the others. In fact, a non-linear workflow is encouraged in Modo.

Using Tools
To use any tool to perform an action, you must first click the tool button or the menu command. For one-shot commands, such as Delete, Fit, or Hide, that is all that is necessary to produce a result. For interactive tools, such as Move, Rotate, and Bevel, this makes the tool itself active, but it isn't yet acting on anything in the scene. At this point you can modify the default values of the tool in the Tool Properties panel, and then press Apply to act upon the target, or click in the 3D viewport to set the tool in interactive mode. This action draws the appropriate tool handle within the viewport. Now, the property values can be interactively adjusted by clicking and dragging on any of the available tool handles (handles change to a yellow color to show they can be adjusted), constraining the action to specific axes, or by Hauling, which is the act of clicking and dragging the mouse pointer left/right or up/down, away from any tool handle. This allows you to modify multiple axes at once. When the desired result for a tool is achieved, you can simply drop the tool by pressing the spacebar to finalize the application of it. Once a tool is dropped, interactive editing of tool attributes is no longer possible and the action of the tool is fixed into the target geometry.

Work Plane
You should understand that actions don't arbitrarily happen in 3D space within a viewport. For example, when creating points, the individual vertices are created at the intersection of the Work Plane and where you click in the viewport, providing predictable and repeatable results. Understanding the Work Plane and its functions is important to understanding how Modo works. The Work Plane is the light gray grid that is visible in any viewport.
In a perspective view, you may notice that the grid changes position. This is the Work Plane orienting itself towards you, trying to stay as close as possible to parallel with the viewport window, while remaining aligned to the nearest axis. You can also modify the Work Plane to a fixed arbitrary position, based on a component selection. This temporarily orients the entire Modo universe to align with that selection, so all functions now work in relation to the Work Plane, making it easier to perform tasks that would be very difficult otherwise. For more information, refer to Using the Work Plane.

Action Centers
When performing any action on a selection, the position of the center of origin and the axis orientation of the tool handle itself has a dramatic effect over the result when applied. You can orient the Work Plane to suit many situations, but constantly modifying the Work Plane would get tedious, so Modo has what are called Action Centers - automatic combinations of center positions and axis directions for tools. There are a variety of options, based on different criteria; some are oriented to selections, some to a viewport's orientation, while others are based on fixed positions, such as the item's center (0,0,0). Action Centers are often packaged with tools to provide specific functions. Take for instance the Flex tool - this combines a rotation tool with an action center that orients itself automatically to the selection border, making it easy to pose characters. Understanding Action Centers are necessary to a fluid experience with Modo. See Specifying Action Centers and Falloffs for more information on working with them.

Falloffs
Ordinarily, when performing an action on a selection, the application is uniform across the selection area. Falloffs provide a means to vary the strength of the action across a given area. Once activated, all of Modo's tools respect the falloffs and apply themselves appropriately, opening up a variety of options that would be incredibly difficulty to reproduce otherwise. When enabled, a falloff snaps to a selection, if a tool is currently active, scaling to fit within the selection's bounding box. This makes them incredibly easy to apply and use. Falloffs can also be packaged along with tools, and often are. They are the basis of the many deformation tools - Rotate combined with a linear falloff produces the Twist tool. Move combined with the same falloff produces the Shear effect. Falloffs may appear simple, but they wield an incredible amount of power when working in Modo. For more information on using and applying falloffs, please refer to Using Falloffs.
Sorry you didn't find this helpful
Why wasn't this helpful? (check all that apply)
Thanks for your feedback.
If you can't find what you're looking for or you have a workflow question, please try Foundry Support.
If you have any thoughts on how we can improve our learning content, please email the Documentation team using the button below.
Thanks for taking time to give us feedback.