This section allows you to edit basic behaviors of Modo.
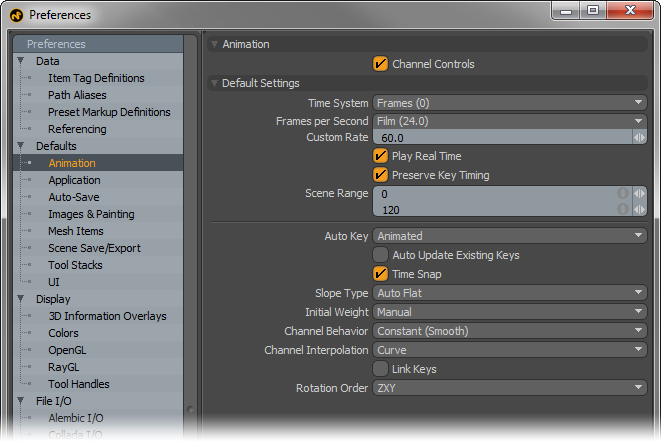
Channel Controls: this option toggles Modo's ability to set keyframes on specific attributes within the viewport panels. When disabled, it removes the keying fields, the default enabled state allows you to set a keyframe directly next to the attribute, using the small circle control preceding each input field.
Channel Controls disabled |
Channel Controls enabled |
Time System: this setting determines how Modo displays time in both the Timeline and input fields related to timing. This option also determines the default time system for any new scene. You can modify these settings independently for each scene in the Scene Item. You can also input alternate time styles into dialog for Modo to convert to the chosen format, such as entering 3.25s is displayed as 00:03:06 with SMPTE format time system. The following options are available.
• Frames: indicates frames as sequential numbers, using standard numbering format.
• Seconds: indicates frames as a passage of time, using the 0.0s format.
• SMPTE: specifies frames utilizing a shorthand method, 00:00:00:00 representing hours:minutes:seconds:frames
• Film Code: specifies frames by the length of the film in feet (linear measurement) using the 0.0 + 0 format.
Frames per Second: also referred to as FPS, this setting defines the number of still images that play back in sequence in one second of real time. You can specify a frame rate using the dropdown menu, applying standard definitions, such as Film (24 fps), PAL (25 FPS), and NTSC (29.97 fps). This option determines the default FPS value for new scenes. You can modify these settings independently for each scene in the Scene item. Choose Custom... to specify alternate custom values using the Custom Rate option.
Custom Rate: if Custom is selected as the default Frames Per Second, you can define the custom value in this field.
Play Real Time: when this option is enabled, Modo attempts to play back the sequence at the true speed, skipping frames if necessary. When disabled, Modo plays back every frame in sequence as fast as the system can handle it, which may be faster or slower than the specified Frames Per Second value.
Preserve Key Timing: when enabled, Modo retains the timing of keyframes when the Frames Per Second value is modified, adjusting their position in the Timeline as necessary. When disabled, frames retain their Timeline position, which changes their position in time. For example, an animation is timed with a keyframe at frame 120 of the Timeline. At 30fps, the key appears at the 4 second mark. If the Frames Per Second value is changed to 24fps after the keyframe was set with Preserve Key Timings enabled, the keyframe moves to frame 96, retaining its position in time at the 4 second mark. If disabled, at 24fps the keyframe remains at frame 120, which is at the 5 second mark, slowing down the animation speed by 20%.
Scene Range: this value specifies the default time duration for new scenes. You can change the duration for each scene in the Scene item.
Auto Key: when items are moved in a scene, the Auto Key function can automatically create keyframes eliminating the need to manually create them. The different settings specify how keyframes are created. All generates keyframe data for all channels associated with the modified item, Animated only keyframes values that have been edited or modified, and None disabled the auto keyframe functionality. This option determines the default Auto Key behavior for new scenes. You can modify these settings independently for each scene in the Scene item.
Auto Update Existing Keys: this option is only available when Auto Key is off. In that case, any edits that are made get discarded when the current time is changed, unless they have been manually keyed. This option allows existing keyframes to be updated automatically, if their values are changed without requiring manual keying. Un-keyed changes still get discarded when the current time is changed.
Time Snap: when enabled, this toggle snaps the current time indicator and any keyframes to whole frame values. To define sub-frame keyframes, disable this option.
Slope Type: this option determines the default slope type applied to new keyframes. See the Open topic with navigation for slope definitions.
Initial Weight: this option determines the default weight type applied to new keyframes. See the Open topic with navigation for weight definitions.
Channel Behavior: this option specifies how a channel acts outside of the keyframed range. See the Open topic with navigation for information on pre and post channel behaviors.
Channel Interpolation: this option determines the default channel interpolation method. See the Graph Editor for information on curve interpolation behavior.
Link Keys: when link keys are enabled in the Graph Editor (its background changes to orange), associated keyframes remain linked together in time, meaning that, for properties like Position, Rotation and Scale that each have associated X,Y and Z values, editing a single axis value, by moving it forward or backwards in time, keeps all the keyframe positions linked together as if all three were selected. When inactive, only the selected channels are modified. This option determines the default link keys behavior.
Rotation Order: changing the order that rotations are applied can sometimes help to reduce or even eliminate gimbal lock (gimbal lock is when two axes rotate into a parallel angle and lose a degree of rotation). This option determines the default rotation order for all new items. Rotation order can also be adjusted on a per item basis in its associated Property panel when selected.
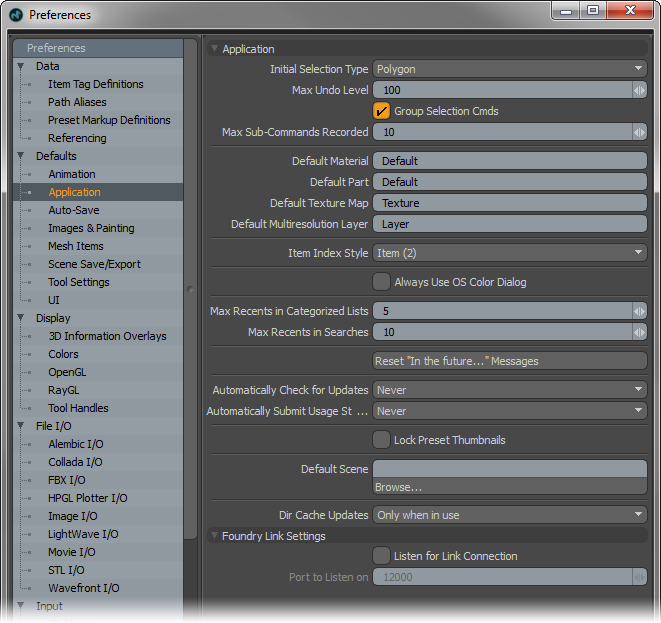
Initial Selection Type: this option determines the default selection mode when Modo is first opened. For more information on selection modes, see Selection Modes and Types.
Max Undo Levels: the undo history is viewable within the Command History viewport. This option controls the maximum number of steps backwards you can go in the history. The default value of '100' is generally very good at allowing leeway to step backwards through the history. Increasing the value allows you to go further back in time, but also increases memory usage. For memory intensive scenes, it may be beneficial to reduce this value to reduce total memory overhead.
Group Selection Cmds: when this option is enabled, Modo groups multiple consecutive selection actions into a single undoable action. The grouping size is determined by the Max Sub-Commands Recorded Value.
Max Sub-Commands Recorded: this option determines the maximum number of consecutive actions grouped into a single undoable action when the Group Selection Cmds option is enabled.
Default Material: this option determines the default material tag applied to newly created polygons. This is also the default name that appears in the Polygon Set Material dialog box when defining new material tags.
Default Part: this option determines the default name used for new part tags. Name appears in the Polygon Set Part dialog box.
Default Texture Map: this option determines the default name used for new and auto-generated UV maps. The name appears in the Vertex Map List viewport.
Default Multiresolution Layer: this option determines the default name used for new Multiresolution Sculpting layers. The name appears in the Sculpt viewport of the Sculpting and Painting workspace layout.
Item Index Style: scenes cannot have multiple items with identical names (much like program files in the same folder), when this occurs, Modo automatically renames the item, be it a Shader Tree layer, item layer or Vertex Map, appending a numeral to the end of the defined names in a style determined by this option.
Use OS Color picker: when enabled, Modo uses the operating system-specific color picker by default, duplicating the behavior of pre-501 versions. When disabled, Modo uses its own internal Color Picker Viewport.
Max Recents in Categorized Lists: Add menus, such as Add Layer in the Shader Tree or Add Item in the Item List have a Recent menu at the top of the list to hold the most recent items added during the present Modo session. You can adjust this setting to determine the maximum number of recent entries in the menu.
Max Recents in Searches: several of the list viewports (like the Item List and the Shader Tree) offer a search function through the use of the small F button. Previous search terms can be cached in the drop-down menu when searching, allowing speedier subsequent searches for the same term. The Max Recents in Searches determines the number of search terms that are cached for this purpose.
Reset "In the Future...": Messages: many pop-up dialogs in Modo provide a function to dismiss them in the future. For example, when welding pairs of points consecutively, you can dismiss future pop-ups of the same dialog using the In the Future setting in the pop-up itself. You can use this button to reset all these types of pop-ups to their factory installed state (meaning, if they have been dismissed permanently, this brings them back).
Automatically Check for Updates: this option can be used to determine how often Modo checks the update server to see if a newer version is available. You can disable this action with the Never option, or checking Every Launch, Daily or Weekly. When a newer build number is encountered, Modo alerts you to the new version.
NOTE: Modo doesn't update itself, it is up to you to download the new version from your Foundry user account and install separately. For installation instructions, see the Installation and Licensing section of this documentation.
Automatically Submit Usage Statistics: usage statistics of Modo sessions can be submitted to The Foundry. This helps us to determine application stability and in the case of instability, helps us to detect the source of the problem. You can help out in the efforts to improve Modo by opting to submit this information to us Every Launch, Daily or Weekly. Selecting the Never option disables the function completely. The information collected and submitted is the Modo build version, the current OS, the last 10 commands run prior to any crash/hang, the duration of the last session and if it ended successfully or terminated in a crash/hang event. No personal information is collected. We hope you'll help us in our efforts to improve Modo, but we also understand should you choose to opt-out.
Lock Preset Thumbnails: when this option is enabled, saving over any existing presets retains the existing thumbnail.
Default Scene: this option allows you to simply store your favorite settings, default lighting setups and geometry into a scene that is loaded by default when a new scene is created or Modo is opened. Any file type that Modo supports can be loaded as a default scene, and the specified scene can contain any number of elements, including any of the items types Modo supports, such as lights, cameras, meshes and even deformers and falloffs.
The most common usage is to store camera, frame and GI settings that are used as the new default values, and maybe even a lighting setup and a ground plane if desired. To use, simply create a scene, with all the items and settings desired and save it somewhere on the local hard disk drive. Then close the file and use the Default Scene preference option to locate the saved file and then exit Modo. The next time Modo is opened, the saved scene is present, rather than the regular Modo default. You can open and edit the specified Default Scene at any time should it be necessary to make any adjustments. Simply save the scene file to initialize the new settings.
It should be noted that when a Default Scene is specified, the settings of the designated scene override any scene specific Preference settings, such as those for Framerate, Scene Length, Color Mangement, Default Gamma values, and so on.
Dir Cache Settings: When using the Preset browser, this option determines how the thumbnail cache is built for viewing the various assets. The Only When in Use option will build the cache only once the Preset browser is opened or made visible. The Always Keep Updated option will refresh the cache each time Modo is opened. During the initial cache process, if significant changes have been made (such as installing a new version) this may take some time, and use processing resources. During this process things might seem slightly sluggish, depending on system specifications.
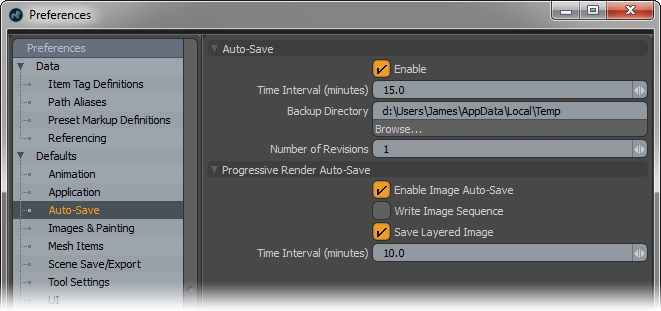
You can use the Auto-Save option to systematically save an alternate file at a specific time interval, with options to save multiple versions. This can be helpful if you tend to forget to save your files regularly and want some insurance against system crashes.
NOTE: Modo may slow down slightly as the file is being saved. It can also take some time to save large files which may cause a slowdown in workflow.
NOTE: The auto-save file is saved in an alternate location and is therefore a separate file from the original saved file. In the event of a unexpected exit, you can recover the last auto-saved version from the defined Backup Directory location.
Enable: when this option is enabled, Modo automatically saves a backup scene file and associated texture maps that have changes, such as images for sculpting or painting, at the specified location and interval.
Time Interval: this option determines the length of time in minutes between each auto-save operation.
Backup Directory: you can use this option to set the directory location for auto-save files. This location can be different from where you save files regularly.
Number of Revisions: you can set the number of revisions you would like to auto-save. Having multiple versions can be useful in reviewing how a file progresses or as insurance against file corruption.
Enable Image Auto-Save: This option will enable the ability for Modo to automatically save the generated progressing rendered Preview image at the defined interval as an EXR file. The image(s) is saved to the defined 'Backup Directory' location (as defined above).
Write Image Sequence: When this option is enabled subsequent saves will have a number appended to the file name so the overall progress of the rendering is saved.
Save Layered Image: When enabled, Modo saves the combined render outputs into a single file.
Time Interval (minutes): This option determines the interval of time between auto-saves.
Enable Image Antialiasing by Default: Modo provides an image antialiasing function to smooth the rendered result of bitmap images. In certain instances, lower resolution images may appear blurry when rendered. By default, Modo always enables this option found in the Image Map properties. You can set the default antialiasing to disabled with this option.
NOTE: You can override the default value on a per image basis in the Image Map properties.
Default New Image Resolution: when creating a new blank image for painting or baking, this value defines the default resolution. You can also change this at the time the image is created.
Always Display Images as Icons: when this option is enabled, Image maps are represented in palettes and menus as generic file icons instead of thumbnail images. In scenes with many textures, this preference saves the processing time required to build thumbnails when opening menus and palettes with images.
UDIM is: this option allows you to control how UDIM values are read from filenames when working with UDIM images. There is an option for preceding and following numerical UDIM values in a filename. For more information on working with UDIM images, see the UDIM Workflow section.
Threaded Painting: this option, enabled by default, threads the painting and sculpting tool into multiple processes, providing better performance. It is possible, however, that in some dual or single core systems this setting should be disabled.
Auto Create Textures: When enabled and an image map does not exist, one is created automatically when you paint on a mesh You can disable this feature to avoid automatic image map creation.
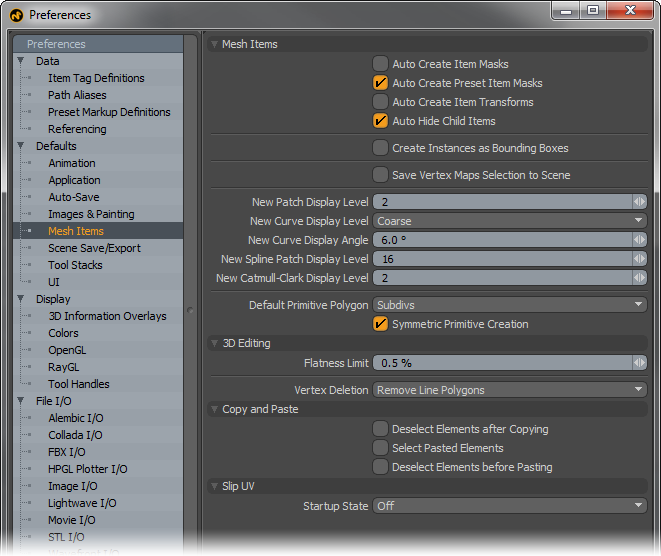
Auto Create Item Masks: when this option is enabled, an item mask is automatically generated for each new item layer that is created in the Items list. For more information on item masks, see Open topic with navigation.
Auto Create Preset Item Masks: when this option is enabled, an item mask is automatically generated for each new mesh preset item that is added to any scene. This can be especially helpful to limit Shader Tree layers to the specific preset, should there be identically named material tags between existing layers and the preset.
Auto Create Item Transforms: when new items are created in the Items list, they do not have specific transform channels in the channels viewport by default (Position, Scale and Rotate). Enabling this option instructs Modo to create the 3 basic transform channels for all new items.
Auto Hide Child Items: you can create hierarchies of elements in a scene, and relate elements under Group Locators for organization. The Auto Hide Child option, when enabled, allows you to toggle visibility of all related child layers when any parent layer is toggled. When disabled, layer visibility in a hierarchy is toggled individually per layer.
Create Instances as Bounding Boxes: by default, Modo displays instanced items as full wireframe representations of the source item. When this option is enabled, Modo only displays bounding box representations of instanced items. This can improve display performance for heavily instanced scenes.
Save Vertex Maps Selection to Scene: when this option is enabled, any selected Vertex Map remains selected when the file is closed and later re-opened. When disabled, all Vertex Map selections are reset with no maps being selected when the file is re-opened.
New Patch Display Level: determines the default Patch level for Subdivision Surfaces items. Higher values produce smoother results but generate more geometry. You can manually adjust the Patch display level for each item in the item's properties. For more information on this, see Mesh Item.
New Curve Display Level: determines the default amount for how smoothly curves are displayed in the 3D Viewports. You can choose between Coarse, Medium and Fine.
New Curve Display Angle: this option defines the default value that controls how curves are quantized for display and freezing. This is analogous to the patch resolution for subdivision surfaces.
New Spline Patch Display Level: this option determines the default Spline Patch Level for patched surfaces. You can manually adjust this value in the item's properties.
New Catmull-Clark Display Level: this option determines the default Catmull-Clark Subdivision Surfaces subdivision level. Higher values produce smoother results but generate more geometry. You can manually adjust the subdivision level for Catmull-Clark surfaces in the item's properties.
Default Primitive Polygon: certain primitive mesh objects (such as the Sphere and Torus) have an option that sets the type of polygons the tool generates. The Default Primitive Polygons option defines the default state for these values.
Symmetric Primitive Creation: when this option is enabled in conjunction with the symmetry option, for any primitives that are created, such as a cube or a sphere, an identical, mirrored version is also created across the line of symmetry.
Flatness Limit: this value determines the threshold at which a polygon is considered to be planar or non-planar. Higher values designate fewer polygons as being non-planar. You can use the Statistics panel to select these types of polygons automatically.
Vertex Deletion: this setting determines what action Modo takes when all but two vertices of any given polygon are deleted.
• Remove Line Polygons: this option removes the remaining two-point polygons that result from the action, but retains the vertices from surrounding polygons if shared. This is the default value and is recommended for most users.
• Keep All Polygons: this options retains the two-point polygons (also known as line polygons). The remaining two-point polygon does not render, but can be used like a polygon or an edge, and can be extruded and extended into a full polygon.
Deselect Elements after Copying/Select Pasted Elements/Deselect Elements before Pasting: by default, when you paste a copied element into Modo, the original selection remains active and the newly pasted geometry is inserted unselected. With these options, you can now have Modo automatically select/deselect elements, also providing a workflow familiar to many graphics applications.
Startup State: here you can automatically disable the Slip UV option each time a tool is dropped. Off means Slip UV is always off when a tool is activated; and is the default setting. Last Selected is the default behavior for the tool, where the Slip UV state is retained.
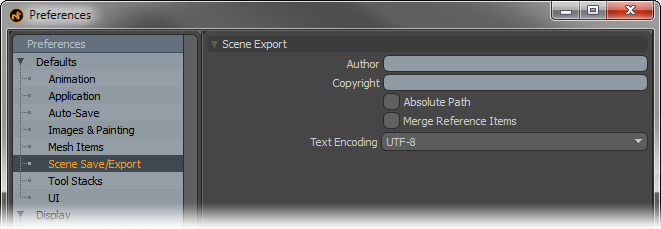
Author/Copyright: these values, when defined, are embedded within saved and exported files (where supported).
Absolute Path: when this option is enabled, Modo writes all link references (such as those to images, MDDs and IES files) as absolute paths, referencing their location to specific areas of a disc drive when saving files. When disabled, Modo uses relative paths to locate linked files.
Merge Reference Items: when utilizing referenced items, you can enable this option to embed the referenced items into the scene file when saving, instead of having them remain external entities.
Text Encoding: Determines the text encoding of the file when saved, using either UTF-8 or the OS systems default.
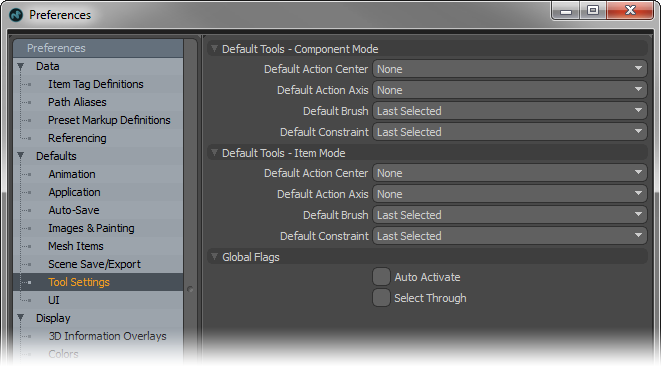
The Tool Stacks options allow you to define default states for different functions for both the component selection modes (vertices, edges and polygons) and for items selection mode.
Default Action Center: this option to determines the default Action Centers when Modo is first opened.
Default Action Axis: this option determines the default Action Axis when Modo is first opened.
Default Brush: this option determines the default Brush Tip that is auto-selected when utilizing any sculpting or painting brush. Last Selected obviously returns the brush to its prior state.
Default Constraint: You can use this option to determine the Constraint type when Modo is first opened.
Auto Activate: By enabling this option, the 'Auto Activate' tool control property of the Tool Pipe viewport becomes a global setting, rather than a per-tool option.
Select Through: By enabling this option, the 'Select Through' tool control property of the Tool Pipe viewport becomes a global setting, rather than a per-tool option.
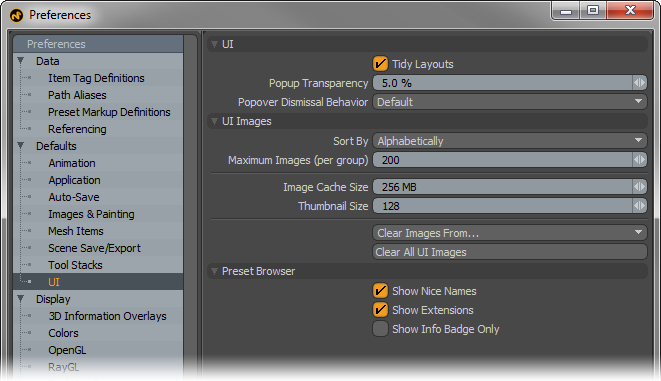
Tidy Layouts: Modo's interface is made up of a collection of viewports. Viewports always have a frame you can use to resize the window. When multiple viewports are nested within each other, multiple viewport frame borders become unnecessary. The Tidy Layouts option, enabled by default, removes redundant viewport frames providing additional screen space and a cleaner UI. However, you may wish to disable the setting to better see how viewports relate to one another for the purposes of interface customization.
Popup Transparency: this percent value controls the transparency of pop-up windows, pop-overs and pie menus. Higher values make the pop-ups more transparent, allowing the background to been seen through them, making them less obtrusive, but also more difficult to read the contents.
NOTE: This may affect performance on some systems.
Popover Dismissal Behavior: this options can be used to override the dismissing behavior for popovers. The Default option retains the hard coded behavior. Force Click-Off makes sure that popovers remain open until explicitly clicked away from and Force Roll-Off dismisses the window when the cursor is simply rolled away from it. This only affect simple popovers, point at popovers are always click-off.
Sort By: this option determines how images are sorted in UI viewports, such as the Clip Browser function. Images can be sorted Alphabetically or by Age with the most recently imported images appearing at the top of the list.
Maximum Images (per group): this determines the maximum number of clips (stills or animations) that can be loaded into a Clip Browser.
Image Cache Size: this setting determines the maximum amount of RAM dedicated to holding all user interface thumbnails, such as those generated for imported images, image inks and brush tip images.
Thumbnail Size: this setting determines the pixel resolution for auto-generated user interface thumbnails.
Clear Images From: you can open this menu to choose from multiple user-determined options to remove images from the user interface. Once a particular command is invoked, images in that function's Clip Browser are removed from display, clearing memory.
Clear All UI Images: this option clears all latent images from the various Clip Browsers for the tools, for example, the Image Ink Browser, Brush Tip Browser, and so on.
Show Nice Names: shows underscores as spaces for file names in the Preset Browser.
Show Extensions: shows the file extension for file sin the Preset Browser.
Show Info Badge Only: when enabled, this option only shows the i badge icon over thumbnails in the Preset Browser. This setting only affects thumbnail views, as badges are always shown in List mode.