Search is based on keyword.
Ex: "Procedures"
Do not search with natural language
Ex: "How do I write a new procedure?"
Contact Support
Managing Storyboard Panels
This page focuses primarily on the editing tools that can be found within the Edit workspace.
There are several ways to edit panels in Flix 5. You can opt to simply re-order the panels within a sequence, draw notes on the panels, or round-trip files between Flix 5 and other applications, such as Photoshop, Maya, and so on. Panel editing happens in the Edit workspace.
Note: Any action that changes the state of a sequence causes Flix 5 to autosave your work, unless a previous action caused an autosave in the last 5 minutes. Flix 5 keeps track of up to 10 autosave snapshots, after which the oldest is overwritten by the next autosave.
The simplest way to create a new panel is to click on the New button on the Workspace toolbar. This creates a blank panel that you can edit in Photoshop and update or version in Flix 5. However, you can also import files into a Flix 5 sequence from another program, or import existing panels from other Flix 5 projects or sequences to create new panels in your sequence.
Deleting Storyboard Panels
At any time, you can delete panels from your sequence. Unless the panel is locked for editing, deleting a panel removes it from your version of the sequence and notifies Editorial of the deletion when sending changes.
To delete a panel, do the following:
Select a panel and click on the Delete ![]() button or right-click on a panel and select Delete from the dropdown menu.
button or right-click on a panel and select Delete from the dropdown menu.
Note: Deleting a panel only removes it from the current edit. You can still access the deleted panel from the Libraries.
Note: If you want to temporarily remove the panel from your sequence, you can also cut the panel and paste it back into the sequence at a later point, so long as you haven’t cleared the clipboard.
Splitting Storyboard Panels
If you have animated panels in the Sequence Editor pane, you can split them by doing the following:
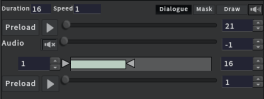
| 1. | In the Viewer Controls pane, scrub the slider to select the frame where you want the animated panel to be split. |
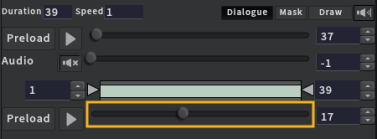
| 2. | In the Edit Workspace, on the Workspace toolbar, click on the Split  button. button. |
The animated panel is split into two animated panels.
|
|
|
|
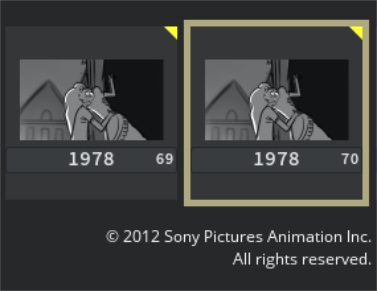
First animated panel containing frames 1 to 16. |
Second animated panel containing frames 17 to 39. |
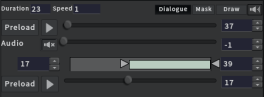
Note: A yellow triangle tag appears in the upper right-hand corner of both animated panels as they share the same panel ID.
Duplicating Storyboard Panels
Duplicating a panel creates a copy of the panel that isn’t instanced. This ensures that the duplicate panel is completely separate from the original, and any changes made to the original don’t affect the duplicate. Click Duplicate on the Workspace toolbar to insert a copy directly downstream from the original panel.
Note: Duplicating panels freezes all toolbar actions until the duplicate or duplicates are created.
Locating Original Files on Your Machine
You can also locate the source file in a browser on your machine by right-clicking on a panel and selecting Reveal Original in Finder (Reveal Original in File Browser in Windows and Linux) from the dropdown menu. You can also open the selected panel in a file browser by clicking on the Original Files![]() button on the Workspace toolbar, in the Edit workspace. This is particularly useful if, for any reason, a panel has several amendments and you want to bring the original back into the sequence without creating a new version of the panel.
button on the Workspace toolbar, in the Edit workspace. This is particularly useful if, for any reason, a panel has several amendments and you want to bring the original back into the sequence without creating a new version of the panel.
Note: The Editing Plug-in Group button is dynamic. If the button isn't set to the correct plug-in option, it might appear on the Workspace toolbar, in the Edit workspace, as Photoshop ![]() button. To change it, click and hold the button until the list of plug-ins appears in a dropdown menu and select the Original Files
button. To change it, click and hold the button until the list of plug-ins appears in a dropdown menu and select the Original Files ![]() plug-in.
plug-in.
Creating Dialogue
You can add dialogue to panels in either the Edit or Dialogue workspaces. For more information about how to add, edit, or delete dialogue in either of these views, please see Managing Dialogue.
Instancing Storyboard Panels
Instancing panels is very similar to creating duplicates, but instead of simply copying the selected panels, the duplicates are linked to the originals. Any changes to the dialogue or notes of a panel affects all the linked panels and you can instance as many as you want. Changes made in Photoshop or another program creates a new version of the panel. You can instance panels with the Copy and Paste buttons and shortcuts.
Undoing and Redoing Actions
Editorial and dialogue actions you commit in Flix 5, such as removing a panel from a sequence or editing the dialogue associated with a panel, can be undone by clicking the Undo  button.
Tip: You can also use Ctrl/Cmd+Z to undo actions on supported browsers.
If you've undone an action and then decide you want to put it back the way it was, click the Redo  button to quickly reinstate the change. Both of these icons can be found on the Workspace toolbar in the Edit workspace.
Adding and Removing Panels
Follow the steps below to add panels to or remove panels from Flix 5:
| 1. | Add a new panel to a sequence in Flix 5 by either: |
• Clicking the New button on the Workspace toolbar, or
• Dragging a panel (a, m, p, ref, rlo, s, and so on) from the Panel Libraries pane.
Alternatively, you can hover your cursor over the upper-left corner of the Panel Libraries panels when the display is set to a, p, or All Loaded. Hovering over this location brings up a + button. Click this to add an existing panel from the library to the Sequence Editor.
Note: To add multiple panels to a sequence from the Panel Libraries pane, Shift + select the panels you want to add and click on the + button.
| 2. | If you created a new, blank panel, it’s inserted into the sequence downstream of the selected panel in the Sequence Editor pane. |
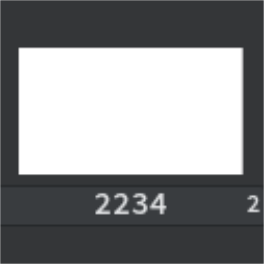
The blank panel is displayed in both the Sequence Editor pane and in the Panel Libraries. Any changes made to the panel refreshes the thumbnail in both locations.
Below the panel, there are two different numbers, one is the panel ID and the other one is the panel index.
Tip: You can swap between panel IDs and panel indices. To do so, in the Edit workspace, right-click and select Swap Panel Labels from the dropdown menu.
You can overwrite blank panels by either replacing them with other panels or by exporting them out to another application to edit before reimporting them. For more information on exporting panels to other applications, see Importing and Exporting.
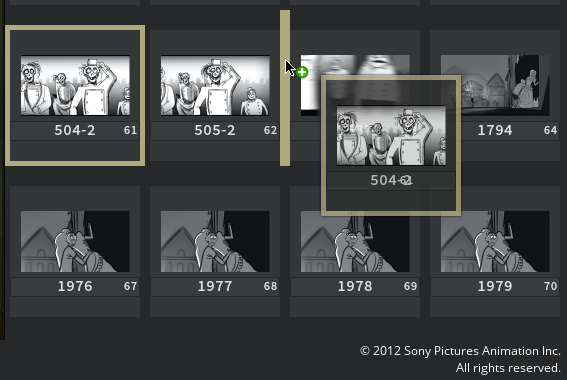
| 3. | If you added a panel from the Panel Libraries, you can reorder the panels within the sequence, edit it in Flix 5 or another application, or drag the panel over another blank panel to replace it. |
| 4. | Delete panels from your sequence by selecting the panels that you want to delete and either: |
• clicking the Delete ![]() button, or
button, or
• pressing Delete on your keyboard, or
• right-clicking on a panel and selecting Delete from the list.
Rearranging Sequences
Panels do not have to be fixed in place in the Viewer. If you want to rearrange panels to change how a scene is laid out, there are a few ways to do this:
Drag-and-Drop
| 1. | Select the panel and drag it to a new location in the Sequence Editor pane. |
A yellow line appears between the panels where the selected panel is to be inserted.
| 2. | Drop the panel. It now appears in its new place. |
Keyboard
If you want to move only a single selected panel within the sequence, press Alt+arrow to move the panel in the direction of the arrow you pressed. You can only move one panel at a time with this method.
Cut, Copy, and Paste
| 1. | Select the target panel(s) and either: |
• Click the Cut![]() button, or
button, or
• Press Ctrl/Cmd+X on your keyboard.
Or, select the panel(s) that you want to copy and either:
• Click the Copy![]() button, or
button, or
• Press Ctrl/Cmd+C on your keyboard.
Note: Copying and pasting a panel into the sequence also instances it to the original. If you don’t want to instance the panel, consider duplicating it instead. For more information on instanced panels, please see Instancing Panels
| 2. | Select the panel upstream of where you want to insert the cut panel and either: |
• Click the Paste ![]() button, or
button, or
• Press Ctrl/Cmd+V on your keyboard.
Note: Selecting multiple panels in a specific order before you cut or copy them allows you to paste them in the order they were selected instead of in the order they are in the sequence.
Note: You can also right-click on one or several panels and select Cut, Copy, Paste, Delete, and Select All from the dropdown menu.
Instancing Panels
Follow the steps below to instance panels within Flix 5:
| 1. | Select the panel you want to instance and copy it by either: |
• Clicking the Copy![]() button, or
button, or
• Pressing Ctrl/Cmd+C on your keyboard.
| 2. | Select the location in the sequence where you want to paste the panel and paste it by either: |
• Clicking on the Paste ![]() button, or
button, or
• Pressing Ctrl/Cmd+V on your keyboard.
Instanced panels are indicated by a yellow triangle tag in the upper right-hand corner of the panel. Hovering your mouse over the tag displays which panel indices are instanced.
To instance panels by replacing one panel with another:
| 1. | Drag a panel over another in the Sequence Editor pane. |
When the mouse is in the correct position to drop and replace the panel, a yellow circle appears around the cursor.

| 2. | Drop the panel on the one beneath it. |
Dropping a panel onto another preserves the original panel but replaces the one underneath the drop. This creates an instance to the original panel.
Note: Editing an instanced panel does not version up the other instances of that panel.
Uninstancing Panels
To uninstance a panel without losing all the changes you’ve made, duplicate either panel and cut or delete the original from the sequence. Alternatively, if you are making changes to the panel within Photoshop, the link is automatically broken.
Editing Existing Panels
To replace the image of an existing panel without adjusting the timing, dialogue, or duration:
| 1. | Open Flix 5 and select the panel you want to replace. |
| 2. | Open Photoshop and navigate to File > Automate > Flix New Template [aspect ratio]. |
The numbers represent the aspect ratio of each template. For example, the template 177 is equivalent to an aspect ratio of 1.77.
A blank template opens. Create the new panel, as you want it to appear in Flix 5.
| 3. | When you are finished drawing the new panel, navigate to File > Automate > Flix Replace Current Image. |
The panel is sent to Flix 5 and versions up the existing panel, maintaining all the dialogue and timing of the original.
You can also create a master file to replace an existing panel. The master file preserves elements of a panel, such as layers, groups, or layer comps. Sending master files to Flix 5 is useful for sharing master files with the Editorial department or other artists. To create a master file from an existing panel:
| 1. | Open Flix 5 and select the panel you want to update with the master file. |
| 2. | Export the panel to Photoshop using one of the methods described in Flix to Photoshop. |
| 3. | In Photoshop, navigate to File > Automate > Flix Master Image. |
The current project in Photoshop is used to create the master file and is imported into Flix 5 libraries.
If you select the Flix Master Image option a second time, Flix 5 versions up the master file and import it in the Panel Libraries.
| 4. | From the Panel Libraries, import the master file in your sequence to replace the existing panel. |
Note: You can change the panel selection in the current sequence through Photoshop without having to go to Flix 5. To select another panel before sending the new panel to Flix 5, click on Flix Select Next or Flix Select Previous in Photoshop.
Note: For more information on how to re-import changes into Flix 5 from Photoshop, see Photoshop to Flix.
Editing in Photoshop and Maya
If you want to make changes to your panels, or to the panel metadata, you can export the selected panels straight into Photoshop or Maya. So long as you have a copy of the application on the machine you are using or on the network you are connected to, when you export the panels, they open within the application automatically. Changes can then be imported back into Flix 5 as subsequent versions.
Note: For more information on how to export panels to other applications, see Flix to Photoshop and Maya.