What's New in the Modo 12.0 Series
Modo 12.0 has several new features and feature enhancements in addition to bug fixes. This page documents the new features and links to the appropriate page of the online help so you can get the information you need to start working with the new features right away. To read about bug fixes and feature enhancements, navigate to a specific release notes.
Modo 12.0v1 Features
Advanced 3D Viewport GPU Acceleration
The Advanced 3D Viewport in Modo now uses Multi Sample Anti-Aliasing (MSAA) GPU hardware to speed up anti-aliased rendering. Enabling the new Multisampling option processes renderings faster. A new GPU powered Anisotropic texture filtering option, Anisotropic Filtering, provides superior viewport texture quality at the slight expense of performance. Anisotropic filtering improves the clarity and crispness of textured objects processed by the GPU in order to give a realistic 3D viewport experience.
For more information, see 3D (OpenGL) Viewport.
Cloud Assets and Foundry Share Site
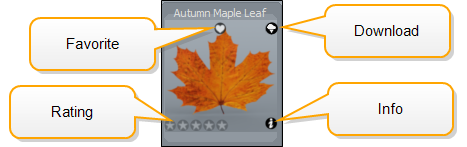
Creating, sharing, and downloading preset assets has been improved in Modo 12.0. Cloud Assets can now be dragged and dropped into the Items list or directly into the 3D viewport. If you prefer to download the assets and not apply them to your scene, you can use the new download button ![]() that appears in the upper right of the preset thumbnail. An info
that appears in the upper right of the preset thumbnail. An info ![]() button is also available on the lower right of the thumbnail to bring up details about the asset from the share site.
button is also available on the lower right of the thumbnail to bring up details about the asset from the share site.
In addition, the preset creation workflow is now simplified. Selected items can be dragged and dropped into the Preset Browser.
For more information, see Preset Browser and Creating Your Own Presets
Falloff Tools
New Weight Map Falloff, Incidence Falloff, Falloff Operator, and Area Falloff tools have been added to evaluate a weight map applied to a mesh operation.
A new Gradient channel has been added to all Falloffs, which allows you to create new shapes to remap the weight of a falloff. For more information, see Falloffs.
glTF 2.0 Export to Facebook
Updates have been made to the glTF shader. glTF 2.0 export enables another up and coming file format for Modo. Developed in conjunction with Facebook's new 3D Posts functionality, artists can now create 3D objects in Modo and then share them on the Facebook News Feed. Facebook users can then grab, spin, and interact with the objects to look at them from all angles. The technology presents advertisers with a unique opportunity to create more engaging and compelling content, offering artists the opportunity to enjoy interactive 3D experiences on Facebook.
For more information, see glTF Shader, File I/O Preferences and Importing and Exporting File Formats.
Hatchet Collection Python Scripts
A selection of Python scripts from the Pushing Point Hatchet Collection has been added to enhance the core functionality of Modo, making creation more efficient. A wide variety of new tools are now available from the interface, which can be used to convert curves, offset curves, make random selections, flatten ngons, and much more.
For more information, see the following tools:
| PolyScale Offset | Scales a selected polygon on a mesh item. |
| PolyScale Offset Detach | Scales a selected polygon on a mesh item and detaches it. |
| Flatten Ngons | Flattens ngons in a model that are not planar, producing a two dimensional form and smoother properties when rendered. |
| Triple Fan | Splits a selected polygon at a selected vertex point. |
| Flip It | Flips a selection of polygons to a specified axis. |
| Open Curve Offset | Copies an existing curve(s) and positions it parallel to the existing curve at a specified offset value. |
| Closed Curve Offset | Copies an existing curve(s), positions it at a specified offset value, and then joins them together. |
| Reduce Collapse Tools | Removes the selected polygon without destroying the integrity of the geometry. Selected polygons are deleted but no hole is left behind. The gap is closed by merging the neighboring polygons together. |
| Weight Map Slicer | Creates new weight maps on the left and right side of the created weight map using symmetry. |
| UV to Weight | Converts a UV map into a weight map using either the U or V direction. |
| Morph Slicer | Copies an existing morph map using symmetry and creates a left and right version of it. |
| Edge Zip | Creates new SubD topology. An edge selection is welded to the corresponding edges running parallel to the original edge to create new topology. |
| Fix Black Dots | Corrects new topology for selected polygons, removing pinched areas and holes from your mesh item. |
Jitter Tool
The Jitter has new Rigid Translate, Rigid Rotate, Rigid Scale, and Lock Stacked options. These options are used to randomize the position of connected geometry based on their bounding box. All points within the connected pieces move the same amount.
MeshFusion Surface Strips
MeshFusion is significantly enhanced with the new Surface Strip creation options. Surface Strips are an innovative new feature that allows the creation of strip geometry (topology) lying flush on any Fusion Item surface. This provides a wide range of opportunities for post-Fusion modeling with procedural operations or direct modeling of the Fusion output mesh. The most obvious examples are channels and ridges along arbitrary paths, but the range of design creation options is much wider allowing artists to explore iterations more creatively.
For more information, see Fusion Surface Strips.
Mesh Operations
Triangulate Tool
A new Triangulate mesh operator has been added to convert polygons into triangle pairs used to export triangulated models.
Merge Meshes
The Merge Meshes operator can now read replicator items as geometry inputs allowing replicated geometry to be manipulated using procedural modeling tools and to convert it to a single mesh item. In addition, Groups are now supported by the Merge Meshes tool.
A new Merge Hierarchy option has been added, allowing you to include the child geometry of any parent source item in a merged mesh. In addition, a new Index option has been added, allowing you to specify which geometry items to merge.
Mesh Paint
The Mesh Paint tool provides more controlled ways of applying objects to quickly layout environments or design using a model bashing technique. For example, with Mesh Paint, artists can quickly drag a bolt along the hull of a ship or quickly brush many copies of boulders across a landscape. Linear, Array, Radial Array paint modes are now available and respects symmetry. Item variations can also be easily painted by using a preset from the Preset Browser.
Modeling in 3D Dimension
Transform, Scale, and Actions Centers 3rd Dimension Modifier
The Transform, Scale and Action Centers tools now allow you to manipulate any mesh item or component by moving it in 3rd dimension (forward and backward) in the 3D Viewport by pressing Ctrl/Cmd+Shift+right-mouse-button.
For more information, see Transform , Scale, and Specifying Action Centers and Falloffs .
Rendering and Shading
A new Frame Range channel has been added to the Render item properties to control which frames to render during an animation rendering.
For more information, see Render Item: Frame.
Several issues with parsing render output patterns on the render item have been resolved and many of the pre-render sanity checks have also been improved.
The glTF Shader now contains constants that are used to WYSIWYG preview glTF material shaders directly in the Modo Advanced viewport, rendering before exporting to other external renderers. In addition, a Shading Model dropdown has been added to glTF shader properties, with Physically BasedUnlit settings.
Slide Tool
The Slide / Edge Slide tool displays a new handle when using the Vertices selection mode, allowing you to move selected vertices along their connected edges.
UI Changes
A number of UI changes have been made to improve your workflow while using Modo.
New Palette Icons
To encourage you to work within a single layout, new tool palettes are now available in the menu bar for easy access on the top left corner. You can open these palettes while working in any layout. For more information, see Exploring the Layout.
![]()
• The Topology Tools Palette now has a new Foreground Opacity setting to allow you to alter the level of transparency of the foreground mesh interactively, without having to go into Preferences to change the value.
Updated Selection Mode icons
Selection modifier buttons are now grouped into one central location in the menu bar. For more information, see Selection Mode Types.
![]()
• The Items button has been removed from the menu bar. Modo is now implicitly in Items selection mode until you select one of component modes; Polygons, Edges, or Vertices.To quickly return to Items mode, click Shift + Space bar or click the component mode button to deselect the active selection mode.
• The Auto Select mode ![]() icon is now displayed as an icon only and acts as a toggle between component and item modes.
icon is now displayed as an icon only and acts as a toggle between component and item modes.
Active Tools Highlighted
UI elements are displayed in orange in the menu bar to provide you with a visual awareness of all the various components used for that activated tool preset.

Center Selection and Pivot Tools
![]()
To improve Rigging and Animation workflows, the Center Selection and Pivot Selection icons are now available from the menu bar.
For more information, see Selecting Items.
Selection Polygon Type Dropdown Menu
The Selection Polygon Type icon now has a dropdown menu allowing you to quickly specify Material, Part, Smoothing Group, and Selection Set options.
![]()
For more information, see Polygon Set Material/Part/Smoothing.
New Mesh Constraints Button

To quickly identify that you have a mesh constraint active, we have moved Mesh Constraints tool from the Toolbar to menu bar.
When active, the button displays in orange. The Mesh Constraints button now defaults to a background constraint.
To select a different type of constraint, hold the Alt key and click Mesh Constraints. A dropdown menu displays, allowing you to select another constraint type. Once selected, this constraint type is then set as the default and the next time you activate the Mesh Constraints button, it is available.
For more information, see Mesh Constraints.
Tool HUD Updates
The Tool HUD is now hidden by default. To enable the Tool HUD press Ctrl/Cmd+Tab.
3D Viewport Updates
The 3D (OpenGL) Viewport has the following updates to improve your workflow experience:
• The Ray GL button has been removed from the 3D Viewport to unclutter the 3D viewport. It is now available in the 3D Viewport Styles dropdown menu. Once activated, a pop-up dialog displays the RayG L controls.
• A new Topology 3D Viewport preset is available from the 3D Viewport Styles dropdown menu, which allows you to quickly work with the retopology tools in the Topology Tools Palette without having to change to the Topology layout.
• To quickly return to the default Model layout, we have added the Model Base preset to the 3D Viewport Styles dropdown menu.
• The Perspective view in the 3D viewport has been changed to make the view less exaggerated. By default, the Preferences > Display > OpenGL > Flatness of Perspective setting is now set to 60% .
Work Plane Updates
The Work Plane tool has been improved to reduce the number of steps to apply your changes. Now you can make a selection in the 3D viewport and click Work Plane to align the work plane immediately to what is selected in the viewport. If you want to access other Work Plane options, press Alt + Work Plane. A dropdown menu displays. The Work Plane button displays in orange to indicate that it is active. Clicking Work Plane again resets it.
For more information, see Using the Work Plane.
UV Viewport Updates
The UV Viewport now displays a number of common display option icons  to make it easier to access rather than having to open the UV Viewport options menu. The following display options are available; Auto Spans, Show Overlap, Show Distortion, Show Image, and Show Inactive UVs.
New Kits Button
Kit icons are now grouped on the right side of the menu bar to separate them from the modifier buttons. Functionality has been added to help you manage these installed Kits. Clicking on a Kits button, such as Afx IO, displays a pop-up dialog, which lists all of the Kits you have installed and running in your Modo session. You can quickly set these kits as Hidden, Visible, or Expanded from this dialog and the interface is updated.
For more information, see Exploring the Layout.
UV Tools
UV Align Improvements
The UV Align tools have been updated to allow you to align multiple UVs at once.
For more information, see Align UV.
UV Commands - Fit UVs Improvements
The Fit UVs tool has new Gaps options to set the border padding. Also, it is now easier to align multiple UV selections in one go.
For more information, see Fit UVs.