Overview, Timeline, & Hierarchy
Learn about a few basic concepts before creating an animation in Modo.
Model Setup for Animation
Once you model your object and create a surface for it, you set it up in a scene and add lights. The next step is to bring it to life with animation. To ensure the smoothest animation workflow in Modo, you should understand a few basic concepts before proceeding. The first and most important is the difference between components and items. Modo has a number of selection modes for editing meshes: Vertices, Edges, and Polygons. The Items selection mode is activated automatically when none of the other selection modes are enabled. In most default layouts, these modes are displayed across the top of the screen, under the menu bar.
![]()
Modo Modes
Pressing the space bar on your keyboard toggles through the first three modes: Vertices, Edges, and Polygons. These three are the component modes and how you build the geometry. You edit the raw geometry that makes up the mesh layer when in these modes and apply any type of transform action (position, rotation, or scale). Regardless of where you position the geometry in the layer, the center position for that item in the Properties panel always reads as 0 for each axis. This indicates that component edits modify the contents of the layer. If you select Items mode and apply the same transforms, you can see the property values change as you transform the layer as a whole. This is an item-level transform and where you animate (and position*) objects. You can use the same tools (Move, Scale, and Rotate) to transform items in both the component and item modes, but, if you keep track of which mode you are in, working with these tools becomes second nature.
Mesh Items as Layers
When modeling objects, think of Mesh Items as layers. (Certain tools, like Booleans, use a background/foreground layering concept for their operations.) You use layers for applying a re-topology with background constraints.) You may want to keep each element in its own layer and use groupings in the Items list to keep things organized. Alternatively, you can merge elements to keep everything in a single layer. However you prefer to work, Modo is flexible, but each individual mesh layer is its own object in Modo. Each has its own settings and controls in the Properties panel, its own center and pivot points, and its own set of Vertex Maps. (Disabled layers don't show up in the Lists viewport.) Anything that needs to move independently from another item needs to have its own item layer. For example, consider a car model. The body needs to be one layer, and the four wheels each need to be their own independent layers. Depending on how detailed you want to be, you could also make layers for the doors, the hood, and trunk objects as well. When these items are independent, you can open them separately from the rest of the model.
Note: When working with very detailed meshes, it might be useful to display certain meshes only as bounding boxes during animation playback, to eliminate lag. To do this, enable Bounding Box Drawing in Animation under System > Preferences > Display > OpenGL. This option draws surface items as bounding boxes during animation playback, if their polygon count exceeds the Max GL Polygon Count value. For more information, see Display Preferences.
Transform Items
Modo uses a layered approach to working with item transforms that has several benefits over a traditional system. Channels define the rotation, position, and scale properties of any item. When you first create a new Mesh Item, before applying any transforms to it, you can switch to the Channels viewport and see that there are no transform channels present. The input fields are visible in the Properties panel, but until you assign a value, the channels do not exist. What you see are the options: Add Position, Add Rotation, and Add Scale. You can add them manually, but anytime you transform an item, Modo creates the channels automatically.
When you add more than one transform, Modo implements the additional transforms in the order that they are listed in the Channels view from bottom to top. Because of this, you can control how Modo places, orients, and sizes the item in the scene based on the order of its transform items. This system is very flexible, and you can apply complex motions by assigning a few additional transform items.
Modo only adds the channels that are necessary. For scenes with thousands of items, doing this can significantly save in file size and processing time (and power) by not having any unnecessary channel data. With this, Modo keeps the Items list clean because all the transforms are under the single item. (In a traditional system, the same result could only be achieved by parenting multiple null items together and animating each one individually, which creates additional unnecessary items.)
Hierarchies
With the previous car example that has individual Mesh Items, how does one move the whole car around in the scene? It's too cumbersome to select each individual item in the viewport or Items list. Also, this method is prone to errors. To ensure all the elements remain together when moving this car, you create a hierarchy. Hierarchies are groups of items that define how each element relates to other elements. For details about creating hierarchies, see the Items (Scenes) List and Animation Setup documentation.
The most basic Modo hierarchy is a group. With the car example, you can select all the elements of the car. By using the keyboard shortcut, Ctrl+G, you then place all the Mesh Items into a group (seen as a folder icon in the Items list). To move the entire car and have its individual parts follow along, select the top Group Item (the Group Locator) and apply a transform to it. All the related items in the group follow along. Another benefit to creating a hierarchy is that it organizes the Items list. This is especially important when building up complex scenes.
Centers and Pivots
Modo provides two methods for setting the point around which an item rotates and scales: centers and pivots. In Modo, you can use pivots in the same manner as with other applications. However, Modo also provides centers to use in many situations instead of pivots. The pivots and centers are not visible for all viewports. (This is a per viewport setting.) To see centers and pivots, move the pointer over the target viewport and press O to see the Drawing and Visibility options for viewports. In the pop-up window, click the Visibility sub-tab.
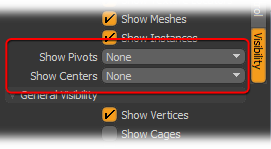
In the Show Centers and Show Pivots lists, specify Selected to show any layers for an associated center or pivot whenever it is selected in the Items list. If you select All, Modo always displays them regardless of selection, but for a scene with many items, displaying them may be overwhelming.
Center: This is the Local Origin of the model and the default location around which an item's transforms originate. It's the location that sits at the World Origin (0,0,0) when all the item transforms are at their defaults (if you have not moved, rotated, or scaled the item in Items mode). You cannot animate centers relative to the element they represent, but you can adjust their location to set the point from where the item rotates and scales.
Pivot: Pivots also provide the ability to specify the location around which an item rotates and scales. A pivot is an offset from the center. (When adjusted, you see a small dotted line draw between the center and the pivot as a reminder.) You can use pivots to animate a location (for example, to have a a cube rolling across the floor where the rotation point jumps to each edge as it rolls) because you cannot animate centers. Once a pivot moves (defining an offset from the center), Modo rotates and scales around this position instead of the center.
The main difference between pivots and centers is that pivots can be animated and centers cannot. (Pivots animate relative to the center because the pivots are an offset from the center.) In most cases, centers are fine for animated items, which is why they are the default method.
Again, using the car example, if the entire object were modeled in a single layer, then you could create the individual Mesh Items by copying and pasting from one layer to a new layer for the tires and doors. In this case, each item has its own center, but the default location for each one is in the same location at the World Origin. If you try to animate the car's tires to roll, you would find they don't rotate as expected. They probably rotate from a point originating somewhere under the center of the vehicle, which sends the tire out into unexpected circles. Centers don't default to the center of the geometrical bounding box. Therefore, you need to position the center, itself, to the correct location relative to the tire. In this case, you could have modeled the tire separate from the car at the origin, and then used an item-level transform to move the tires to the proper position relative to the car body. Modo doesn't care how you create an item, and you can reposition the center point independently without affecting the geometry itself.
![]()
If you right-click the Items selection mode button, you can view other mode selections. By clicking Center, you can edit the location of center positions without affecting the location of the original geometry in any way. So, in the example, by making sure the tire Mesh Item is selected in the Items list, you can see a small circle with three lines coming out from it. This circle represents the center of the item's layer. By clicking the center icon, itself, (the white circle), it turns orange. With the center selected, the Move (W) and Rotate (E) transform tools affect the center point. You could move it into the center of the wheel.
Alternatively, you could use a trick with the Work Plane that is much more precise. Switching back momentarily to Polygons selection mode, you should see a selection that could be made that would represent the position from where the wheel should rotate. Select this and apply the Edit > Work Plane > Align to Selection command. Now, switch back into Center mode and select the center again. In the Animate and Setup interface tabs, click Set to Work Plane. Doing that moves the center to the origin of the Work Plane, which is precisely aligned to the center of the previous polygon selection. Reset the Work Plane by pressing the End key. Everything returns to normal with the center precisely positioned. (See the Using the Work Plane topic for more information.) Now, when you animate the tire, it rotates around the proper location.
Just like in modeling there is a process to getting the best results, animation requires a bit of setup. Once you understand the basic setup techniques, it eventually becomes quick and easy.
Animating Workflow
Once you set up the model (also referred to as rigging for more complex setups), you are ready to start animating it. To make anything occur over time, Modo requires a keyframe. A keyframe sets a specific value for elements in time: a position, a surface setting, or other parameter. You can keyframe nearly any setting in Modo to change over time. In traditional 2D cartoon animation, artists draw the important poses for an animated sequence. Then, another artist, called the in-betweener, draws all the subsequent frames that transition from one pose to the next. Animating in 3D is very similar. You set up the key poses, positions, or settings, but, unlike traditional animation, Modo creates the in-between frames for you.
With Modo's general workflow, you select the type of element you want to work with and then use a tool or apply a command that affects your selection. For example, you can select a vertex, activate the Move tool, and move the vertex. Keyframing is similar in Modo. In this case, you work with channels, which are properties that animate any item.
When you press the Key button (or S in Items mode), Modo determines on which channels to create keys. It does this by using channel selections. Modo runs through each selected channel and creates a keyframe on that channel at the current time. You can select channels in two ways: by clicking them in a Channels Viewport or by clicking the control label on a Properties viewport (the small gray circle that precedes an attribute in the Properties panel). If you click the dot, it changes from gray to red to signify that a keyframe is set at that point in time for that property.
Constantly selecting channels to add keyframe can be tedious, so Modo provides some auto-key behaviors to help with this. These are set with commands in the Auto Key menu at the bottom of the Animation interface layout (next to the transport controls). The default setting is Animated. With this on, Modo automatically creates keyframes on channels that are already animated (have at least one key set on the channel previously) whenever a value of the channel changes. You can change the channel by using the Transform Tool, using the mini-slider, or by typing a value on a Forms control. If you make changes to a channel that has not been keyed, Modo still applies the changes but does not make keyframes.
If you select All, Modo creates keyframes on any channel at the current time whenever the channel's value changes. When using this setting you must be aware of whether you're in animation mode or not. (It's very easy to create animated values when they may not be wanted.)
The last setting is None. With this, Modo never creates keyframes automatically for you. To make keys, you must use the Key button whenever you've made changes.
Which setting you use is entirely up to you and how you like to animate your models. Some people like auto-keying; some people don't. The recommended setting is Animated because it provides a workflow somewhere between the two extremes of on and off. To use it properly, in advance, you create keys on the channels of the item you want to animate.
The other area that Modo tries to help with keyframing is with automatic channel selection. Auto-keying only works when channel values have changed. When you need to create a set of keys for channels without changing the current values, you use Key button (which requires selected channels) or click the individual channel buttons on the Properties forms. To help with this, Modo automatically selects channels for you when you use the Transform tools. For example, if you activate the Move tool, Modo selects the position channels.
A general Auto Key workflow
| 1. | Select the camera and go to its Properties viewport. |
| 2. | Click the channel keying buttons for the six position and rotation channels. (They should turn red.) |
| 3. | Activate the transform Move tool (W key) and move the camera. |
| 4. | Activate the transform Rotate tool (E key) and rotate the camera. |
| 5. | Move the time slider to a new time. |
| 6. | Move or rotate the camera again. |
| 7. | Go to a new time. |
Once you have made those initial keys, you should not have to do any further manual keying unless you want to key the camera in place. This also works when using viewport navigation to move the camera. This general overview should be enough information to get started with animating.
*When working with Instances and Replicators, model the base mesh at the origin. All duplicated items use that position as the transform origin when propagating duplicates. Adjusting the center position afterwards can remedy any peculiarities as well.