UV Relax
The UV Relax tool can be used to refine an existing UV map in much the same way as the smooth tool is used to soften and regularize a model's surface.
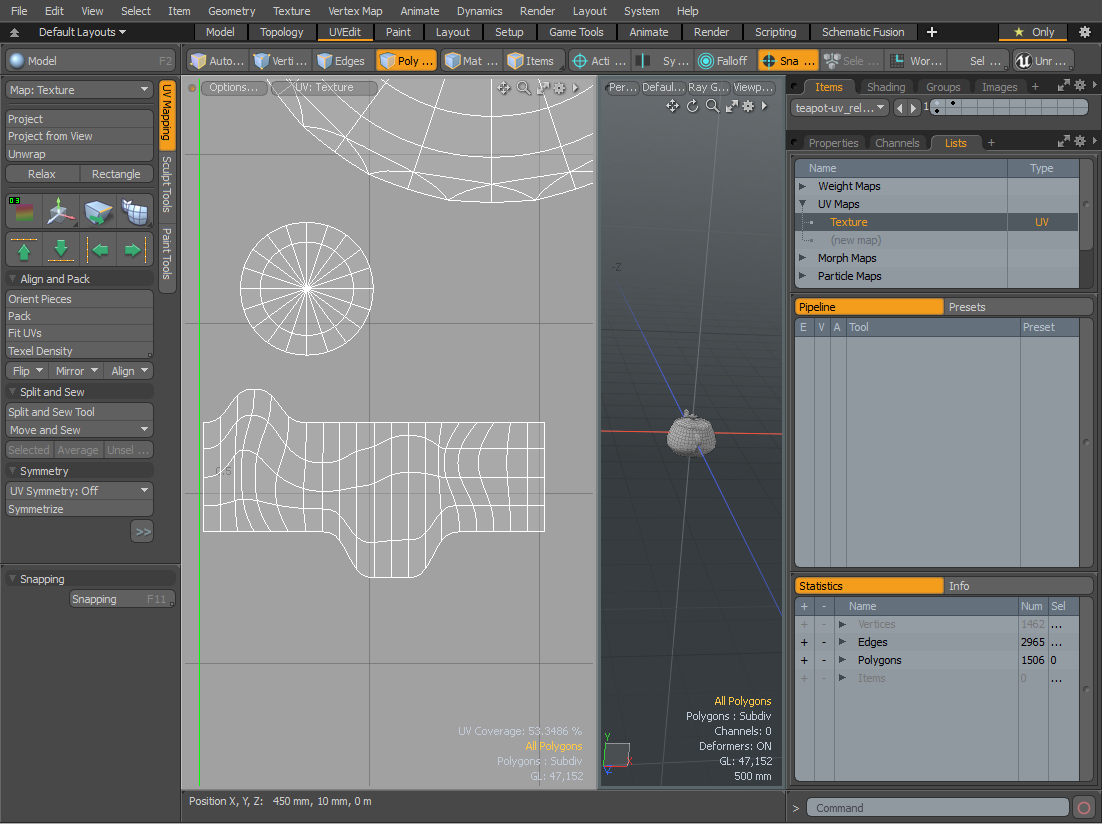
Any geometry with a UV map can be relaxed. The only prerequisite is to make sure the target UV map is selected, and that only those polygons you intend to relax are visible. The UV Relax tool is found in the UV tools menu of the Modo and Model layouts, and the results of its usage can be viewed in real-time in the UV viewports. To activate, click the UV Relax tool button. To relax the UV map, click in the UV viewport and drag the cursor to increase/decrease the Iterations value. When the tool is active, additional options for refining the UV map are found in the tool's properties panel.
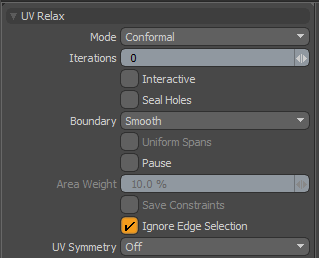
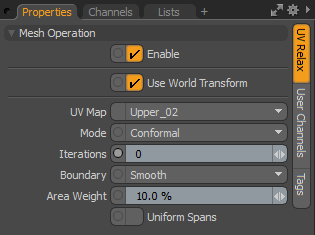
The UV Relax tool properties panel.
UV Relax Properties
The following UV Relax options are available:
|
Options
|
Descriptions
|
|
UV Map
|
Procedural modeling only. Defines the name of the UV texture map used for the mesh operation.
|
|
Mode
|
Allows you to choose from various modes that control how the Relax tool acts upon the target UVs.
• Spring - Generates a 2D dynamic simulation that makes all the edges in the UV map act like springs, each pulling on the others to find their equilibrium. This method doesn't deal with overlapping UVs very well.
• Conformal - Relaxes the mesh using the ABF++ (Asynchronous Forward Bounding) algorithm to smooth out the UV map, as with the Unwrap tool.
• Adaptive - An adaptive attempt to retain the original relative polygon size from the 3D mesh surface.
• Angle Based - Uses the LSCM (Least Square Conformal Maps) algorithm to smooth out the UV map, as with the Unwrap tool.
|
|
Iterations
|
Determines the number of iterations for unchanged iterations. Increasing the Iterations relax/smooth the geometry; the degree of iteration necessary is largely dependent on the complexity of the target mesh.
|
|
Interactive
|
The interactive mode offers you an amazing way to edit a UV map using Pins. When Interactive is enabled, you can click over any vertex in the UV map, adding a blue square handle to it. When there is more than one handle in the map (and a sufficient number of Iterations) you can interactively drag around the UV map to reshape the layout, as if it were a sheet of rubber that twists and pulls between the your added Pins. Removing pins is done by Ctrl/Cmd+clicking over an existing pin. You can add as many handles as necessary, but fewer handles usually provide the best results. Use the Save Constraints checkbox if you want Modo to remember which vertices were set as pins each time the tool is used.
|
|
Seal Holes
|
If the target mesh isn't "water-tight" (such as a head model with open eye sockets) the Relax algorithm can sometimes have difficulty resolving these areas. The Seal Holes option creates a virtual polygon to close the holes and improves the unwrapping effect.
|
|
Boundary
|
Determines how to relax boundary UV vertex positions. The following options are available:
Smooth - Locks boundaries off and relaxes both the boundary edges and the inside UV vertex positions.
Locked - Locks the outer boundary edge of all UV islands and only relaxes the inside areas of geometry; the outer edges act like pins constraining the connected edges.
(A UV island is a connected group of polygons in a UV map.)
Click on the image below to view an animation.
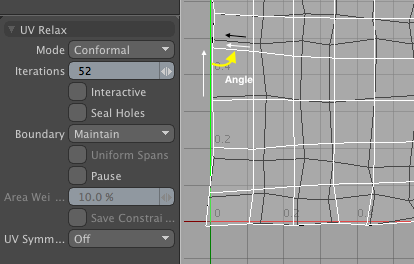
Maintain - Ensures boundary points only move along the boundary to keep the angle between boundary edge and incoming inner edge. In other words, it ensures that the boundary points only are moved along the boundary, not towards the interior of the surface. For example, when starting with a symmetrical UV map, such as a model created by the Unwrap Symmetrize function, enabling the Maintain option retains the symmetrical properties of the map while relaxing.
Straighten - When this option is enabled, boundary edge sections of the UV islands are straightened and the internal points are relaxed inside the new boundary. This is useful when aligning UVs for piped shapes or hairs.
|
|
Uniform Spans
|
Creates uniform spans for UV edges. This option is enabled when the Boundary has been set to Straighten.
|
|
Pause
|
Temporarily disables the iterative updates to allow pinning to be applied without continual updating of the relaxed results. Disable the Pause function to evaluate the relaxation with the updated settings.
|
|
Area Weight
|
Using the Adaptive relaxation mode, the Area Weight option determines a weighting applied to an area to allow it to resist changes from the relaxing of the UV vertices of the modified UV island.
|
|
Save Constraints
|
Using the Interactive option to pin vertices, the Save Constraints option saves which vertices have handles and keeps them intact for the next time the tool is applied.
|
|
Ignore Edge Selection
|
When this checkbox is toggled, the UV Relax operation ignores any currently selected edges. This option is enabled by default.
|
|
UV Symmetry
|
Sets the Symmetry state. The following options are available:
• Off - Sets the Symmetry state to off.
• U - Sets the Symmetry state to use the U axis.
• V - Sets the Symmetry state to use the V axis.
|
Applying Different Boundary Options using the UV Relax Tool
The following example demonstrates how to set different Boundary options to relax UVs for a selected UV island.
|
2.
|
Below the menu bar, click the UV tab on the switcher bar. |
|
3.
|
Open teapot-uv_relax-example.lxo, which has a UV Map to modify. |
|
4.
|
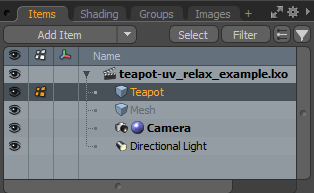
In the Items Lists on the right panel, expand the teapot-uv_relax-example.lxo item and select Teapot. |
|
5.
|
In the Lists tab, expand UV Maps, and select Texture. |
The UV map is displayed in the UV Viewport. Alternatively, you can view the UV map in the Texture > Open UV Editor window.

|
7.
|
On the Toolbox, open the UV Mapping tab, and click Relax. |
UV Relax properties are displayed at the bottom of the Toolbox.
|
8.
|
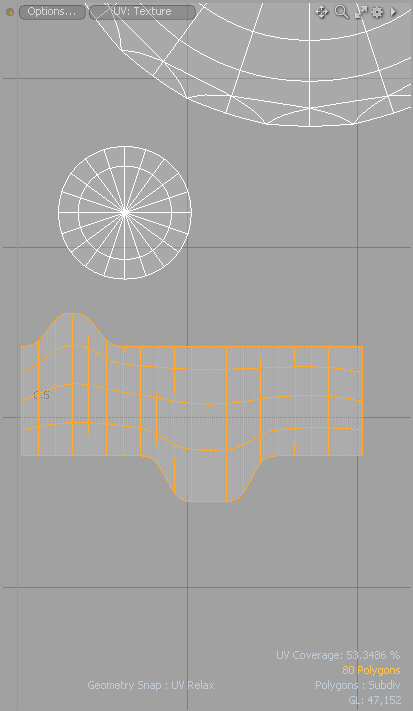
Set Boundary to Locked. |
Only the UVs inside the selected UV island are relaxed within the locked boundary edges.
|
9.
|
Set Boundary to Straighten and set the Iterations to 9. |
The boundary edges of the UV island are straightened and the internal points are relaxed inside a new boundary.
|
10.
|
Experiment with the other Boundary options and UV Relax options. |
Procedural UV Relax
The UV Relax mesh operation is the procedural version of the UV Relax tool.
The UV Relax mesh operation can be used to refine an existing UV map in a similar way as the Smooth tool, which is used to soften and regularize a model's surface.
The UV Relax mesh operation properties are the same as the properties of the UV Relax tool.
For UV Relax properties, see UV Relax Properties.