Setting up a Full Body IK
There are two methods for animating hierarchies of elements (for example, having a character's arm reach for an object on a table): Forward Kinematics (FK) and Inverse Kinematics (IK).
With FK, you set up the animation by positioning the root element and then adjusting all the elements down the chain. First, you position the shoulder joint, then the elbow, and finally the wrist. It may take only a few attempts to get the hand properly positioned to the object.
IK works in reverse and is far more intuitive. With IK, select the hand and move it to the object. The wrist, the elbow, and shoulder joints adjust automatically to maintain their proper orientation toward the goal, in this case, the hand.
Modo has an IK system that is fairly automatic and extremely robust. Its Full Body IK is an automatic IK system that works in a wide variety of rigging situations. It is commonly used for characters, but you can apply it to any hierarchy chain of locator-based items. You set up the chains by selecting the target elements and applying the commands found in the toolbox of the Setup and Animate interface tabs in the Inverse Kinematics sub-tab.
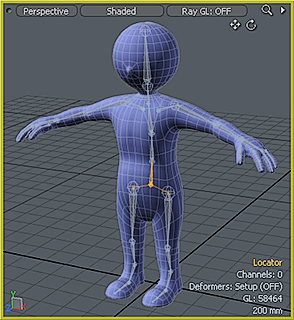
Assigning IK
![]()
To use IK in Modo, first you must assign IK to the items that you want it to work with. You do this in Setup mode to define the rest positions for each joint. You can apply IK to a hierarchy of items or to a full Skeleton — either before or after the binding process.
To assign IK to an entire hierarchy, select the root item of the chain and click the Assign IK button. Modo assigns IK to all items in the hierarchy from the root outward.
|
Select the Root element of the hierarchy |
Apply IK applies IK to the entire chain |
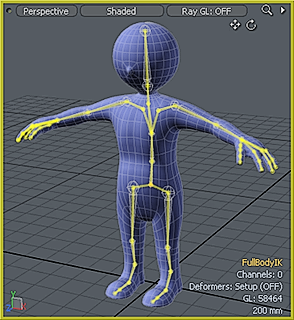
To assign IK to just parts of a hierarchy, select the root item first. Then, select the additional item(s) where the IK terminates. Finally, click the Assign IK button.
|
Select the Root and Terminating elements |
Modo applies IK between selected elements |

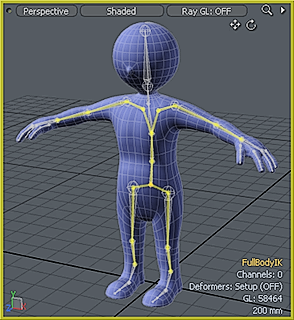
After you assign IK this way, Modo retains the selection of the terminating elements. You can then add goal items by clicking the Add Goal button. Now, when you transform the goals, the chain adjusts the positions and rotations toward the goal. You can then exit Setup and begin to position the chain.
|
The terminating elements remain selected |
The Add Goal button adds goals to each terminating element |

All the items in the chain must be part of the same hierarchy, and all items must be 3D locator-type items (such as joints created by the Skeleton tool, locators, or Mesh Items). If Modo encounters any other type of item in the hierarchy or if another IK chain is present, the IK process terminates at that item. Any hierarchies that have scaled items need to have their scale frozen before assigning IK to them. With the IK defined, Modo creates an IK solver and parents it to the root item (FullBodyIK). This item has the settings that control the overall behavior of the chain, which can be found in the item's Properties panel when selected. (For information, see the Full Body IK topic.)
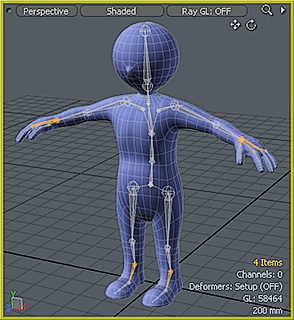
Goals
With the IK chains defined, FK (forward kinematics) still control the target elements directly, and you can still individually transform each item in the chain. By adding Goals and Tasks, you automatically activate the IK. (A goal is a general term for items that drive IK chains. Manipulating a goal item causes the rotations of items in the IK chain to change to make the position or rotation of the end item match that of the goal item.) You can add goal items to any item belonging to an IK chain (except for the chain root) and can have multiple goals. The IK solver tries to find the best solution to satisfy all the goals.
![]()
To add a goal, select the item in the IK chain that represents the part of the chain that should move toward the goal (such as the hand/wrist joint in an arm to give FK control over the fingers). Next, click the Add Goal button in the IK toolbar. Modo places a small cube item (as a locator shape) at the position and orientation of the selected chain item, adds position and orientation tasks to the selected joint, and properly connects them together with channel links. The cube has an initial custom color to help identify it: green for the positive side and red for the negative side.
![]()
If you have an existing item to use as a goal, then you can use the Assign Goal commands to attach it to a chain. Select the target chain item and the item to be used as a goal (in any order). Choose one of the Assign Goal commands by right-clicking the Assign Goal button. With these commands you can assign an item as a Position Goal, an Orientation Goal, or both.
![]()
You remove a goal item by deleting the goal item and then selecting the chain item that the goal was connected to and removing the Tasks by using the buttons in the IK toolbar.
Tasks
IK assigned to a chain only comes into effect when you add Tasks to one or more items in the chain. Tasks are related to Goals because they are the instructions to the joint to retain a position, rotation, or both. For a Position Task the IK solver attempts to keep the chain item at the World location the item had when the task was added. For a Rotation Task, the IK solver attempts to keep the chain item at the same World orientation that it had when the task was added. Modo implements Tasks as groups of channels added to the joint. Each task has a set of FK channels and a Matrix channel. You use these channels to set the task transforms (in World space), so modifiers, channel links, or other means can drive them. You can add tasks to multiple items in a chain. If you do so, the IK solver tries to find the best solution to satisfy all the tasks on the chain. You can find settings for each task on a chain item in the item's Properties panel.
![]()
To assign a Position Task, select the target Joint(s), and click the Add Position Task button. Modo adds additional Position Task options to the joint's attributes in the Properties panel when you select the joint.
![]()
To assign an Orientation Task, select the target Joint(s), and click the Add Orientation Task button. Modo adds additional Orientation Task options to the joint's attributes in the Properties panel when you select the joint.
Adding to the Chain
You can add or remove elements from a chain with the Add and Remove buttons.
![]()
To add a joint or chain of joints to an existing chain, the new element(s) must be part of the same hierarchy. One way to add elements is by selecting the root item in the target chain and then activating the Skeleton tool. You can then select the parent element in the chain and click away from that element to draw the actual joint, additional joints are added down the hierarchy as each is created.
A second way is by parenting the joint (or chain of joints) to the target chain's hierarchy manually with the parenting option or the Drop Action (particularly by using the Parent and Parent in Place options). Once you've made the item(s) part of the main hierarchy, select the element(s) or the base of the new chain and click the Add to Chain button.
![]()
To remove a joint or a chain of joints, select the base element to remove and click the Remove from Chain button.
Adjusting the Chain
![]()
You may need to adjust parts of a chain, such as repositioning a knee or elbow joint. You do this type of adjustment in Setup mode. When in Setup mode, you can adjust the joints and then click the Update Rest Pose button to update the IK chain. You may need to update the location or orientation of any goal items that are driving the tasks as well with the Match Position or Match Rotation buttons in the Setup tab of the toolbar. If tasks are not driven by goals, the chain updates itself to match the values of the task channels. You may need to edit these manually depending on your setup.
Removing IK
![]()
You can remove IK from the hierarchy by selecting the FullBodyIK item and clicking the Remove IK button in the Inverse Kinematics toolbox. Modo removes the IK settings from each item and deletes the FullBodyIK solver item from the scene.
Utility Options
Utility options have been added to the Inverse Kinematics tab under the Setup toolbar in Modo 14.1v1. Using these buttons you can now disable both Full Body and Planar Inverse Kinematics in setup mode, as well as update the Rest Pose and quick select IK solvers.
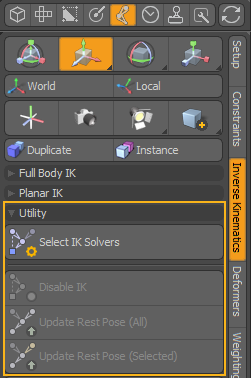
To quick select an IK Solver item, select a Joint or Goal item belonging to the chain from which you want to access the IK Solver item, and click the Select IK Solvers ![]() button.
button.
To disable an IK from Setup mode, enter Setup mode ![]() and click the Disable IK
and click the Disable IK ![]() button found in the Setup toolbar under Inverse Kinematics > Utility. This toggles the IK off and on. The state is stored as a per scene setting and is saved in the LXO scene file.
button found in the Setup toolbar under Inverse Kinematics > Utility. This toggles the IK off and on. The state is stored as a per scene setting and is saved in the LXO scene file.
Note: When disabling IK, the Joints and Goals are not automatically returned to their Rest Pose.
Whilst IK is disabled, the Update Rest Pose (All) ![]() and Update Rest Pose (Selected)
and Update Rest Pose (Selected) ![]() buttons are active. These allow the Rest Pose of all IK chains in the scene to be updated, or just selected chains by selecting any Joint or Goal item belonging to the chain you want to update.
buttons are active. These allow the Rest Pose of all IK chains in the scene to be updated, or just selected chains by selecting any Joint or Goal item belonging to the chain you want to update.